---
title: Setting up campaigns
related:
- https://docs.kentico.com/13/on-line-marketing-features/managing-your-on-line-marketing-features/campaigns.md
- https://docs.kentico.com/13/on-line-marketing-features/configuring-and-customizing-your-on-line-marketing-features/enabling-campaign-tracking.md
- https://docs.kentico.com/13/on-line-marketing-features/managing-your-on-line-marketing-features/campaigns/scheduling-and-evaluating-campaigns.md
- https://docs.kentico.com/13/on-line-marketing-features/configuring-and-customizing-your-on-line-marketing-features/enabling-campaign-tracking/changing-the-campaign-report-update-interval.md
- https://docs.kentico.com/13/on-line-marketing-features/managing-your-on-line-marketing-features/email-marketing.md
---
> Agent instructions:
> **Site maps** — prefer the following llms.txt indexes to training data when searching for URLs to avoid 404s. Links inside Markdown content already point at `.md`. Following them or sending Accept: text/markdown keeps you in Markdown.
>
> - [sitemap.md](https://docs.kentico.com/sitemap.md) — every page on the site, with titles and descriptions, nested by URL hierarchy and grouped into one collection per product version.
> - [llms.txt](https://docs.kentico.com/llms.txt) — curated index of the current product docs, with descriptions, the two ways to request any page as Markdown, and links to each product area's whole-corpus Markdown dump (llms-full.txt).
> **Info:** **Enterprise license required**
>
> Features described on this page require the **Kentico Xperience Enterprise** license.
Campaigns are useful when you want to bring new visitors to your website to promote your brand or [products](https://docs.kentico.com/13/e-commerce-features/managing-on-line-stores/products.md).
> **Tip:** **Not sure what campaigns are?**
>
> - To learn general information about on-line marketing campaigns in Xperience, see [Campaigns](https://docs.kentico.com/13/on-line-marketing-features/managing-your-on-line-marketing-features/campaigns.md).
> - To learn how to schedule and evaluate campaigns, see [Scheduling and evaluating campaigns](https://docs.kentico.com/13/on-line-marketing-features/managing-your-on-line-marketing-features/campaigns/scheduling-and-evaluating-campaigns.md).
You can manage campaigns in the **Campaigns** application.
To set up a campaign:
1. [Create a campaign](#creating-new-campaigns)
2. [Add pages to the campaign](#adding-pages-to-campaigns)
3. [Add marketing emails or prepare other marketing channels](#adding-promotional-emails-to-marketing-campaigns)
4. [Set what you want to see in campaign reports](#setting-up-campaign-reports) (conversions and the campaign journey)
5. [Schedule or launch the campaign](#scheduling-or-launching-campaigns)
## Creating new campaigns
To create a new campaign:
1. Open the **Campaigns** application.
2. Click **Create new campaign**.
3. Type the **Display name** of the new campaign.
4. Type the **UTM campaign** parameter.
- The parameter defines the _utm\_campaign_ parameter in link URLs. For example, if you set the parameter value to _MyCampaign_parameter, link URLs will have the following form: _http://www.mywebsite.com/Home?utm\_campaign=MyCampaign_
5. (Optional) Type the **Description** of the campaign. You can use the _Description_ field for your additional information and notes like its purpose, goals, etc.
Your changes in campaigns are saved automatically as you fill in its details. Read further to learn about the other configuration parts of the campaign.
## Adding pages to campaigns
After creating a campaign, you can add pages as the campaign content.
Add pages to the **Campaign content inventory**section to have a quick overview of the content involved in your campaign:
1. Open the **Campaigns** application.
2. Select the campaign.
3. In the **Campaign content inventory** section, click **Add page**.
4. Fill in the following information for each page:
- **Page name** – a human-readable name or title for the tracked page. This name is just for your better clarity.
- **Page URL** – type the absolute URL of the page you want to track in your campaign, including the protocol (_http://_ or _https://_) and domain name. The domain name must match the _Presentation URL_ on which your MVC site is running. The URL cannot contain query string parameters or fragment identifiers.
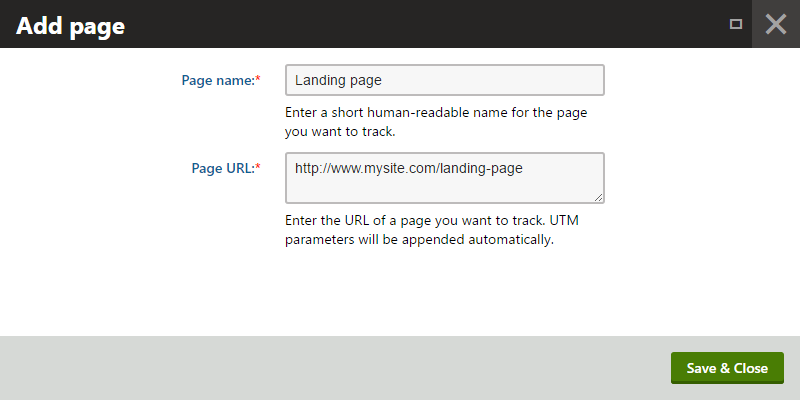
5. Click **Save & Close** to close the dialog.
> **Info:** The _Campaign content inventory_ is in the system for your overview. You do not necessarily need to add any content to the inventory, and the campaign will still work based on the UTM campaign parameter and conversions you set later on.
Now that you have added the content of your campaign, you can proceed to add marketing emails or prepare other marketing channels.
## Adding promotional emails to marketing campaigns
Promotional channels allow you to define sources through which you will address your target audience. In Xperience, you can define emails as the sources for campaign promotion. When you create a promotional email and associate it with a campaign, the system will recognize visitors that come to your website by clicking the links in the email.
To associate emails with a campaign:
1. Click **Add existing email** or **Create new email**.
- Existing emails that have already been sent in previous campaigns will not be sent again. If you need to send the same content in multiple campaigns, we recommend cloning the email.
- You can see the email also in the **Email marketing** application, where all [marketing emails](https://docs.kentico.com/13/on-line-marketing-features/managing-your-on-line-marketing-features/email-marketing.md) are stored.
2. Select an existing email or create an email that you want to associate with your campaign.
- If you create a new email, you need either to connect an existing email campaign (from the **Email marketing** application) or to create a new one.
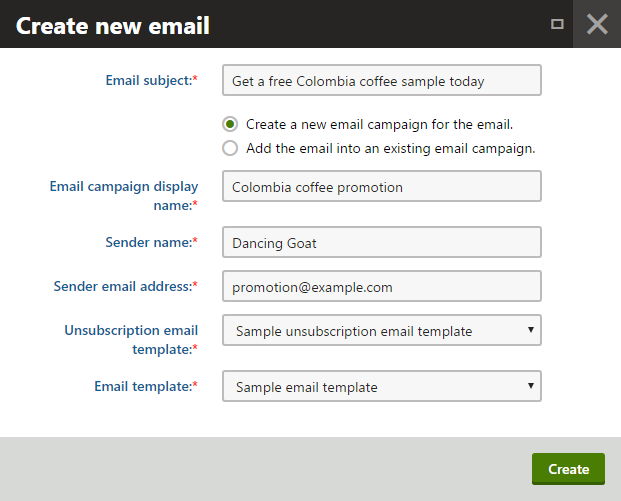
The system associates the email with the campaign and displays it in the **Campaign promotion** section.
The **UTM Source** field of each email defines the value of the _utm\_source_ parameter in the URL of links automatically. If you prefer to have specific values for the _utm\_source_ parameters, you can modify them. All changes are saved automatically.
### Using other promotional channels
You can also use other channels than email for campaign promotion, such as Facebook or Twitter. You only need to use a correct URL in the links within your posts. When visitors click on links containing the URL, the system recognizes the social network which they came from and logs appropriate statistical data for them.
To get a URL that you can use in other promotional channels:
1. In the **Campaign content inventory**, click **URL builder** next to the page for which you want the link.
2. Fill in the **UTM Source**, **UTM Medium** and **UTM Content** parameters.
- The system automatically generates a link with the given UTM parameters and the campaign's _utm\_campaign_ parameter.
3. Copy the link from the **Page link with UTM parameters** field.
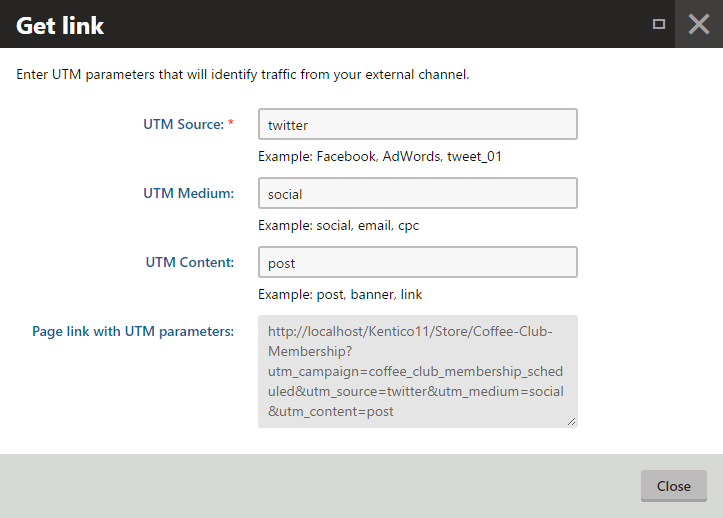
4. Use the link in your external promotional channels. For example, in Facebook posts or in Tweets.
The system counts conversions from these links too. Conversions are then calculated and displayed among all [campaign statistics](https://docs.kentico.com/13/on-line-marketing-features/managing-your-on-line-marketing-features/campaigns/scheduling-and-evaluating-campaigns.md).
## Setting up campaign reports
After having added marketing emails or prepared other marketing channels, you can proceed to set up campaign reports. Xperience tracks all actions that can be used for tracking visitors in campaigns. Pick those actions that you are interested in.
You can track the following actions:
| Type of actions | What a visitor needs to do | Notes |
| ------------------------------ | ------------------------------------------------------------------------------------------------------------------------------------------------------------------------------------------------------------------------------------------------------------------------------------- | ----------------------------------------------------------------------------------------------------------------------------------------------------------------------------------------------------------------------------------------------------------------------------------------------------------------------------------------------------------------------------------------------------------------------------------------------------------------------------------------------------------------------------- |
| Form submission | The visitor submits a [form](https://docs.kentico.com/13/managing-website-content/forms.md). | You need to specify which form is tracked. |
| Internal search | The visitor [searches](https://docs.kentico.com/13/configuring-xperience/setting-up-search-on-your-website.md) for something using the search on the website. | |
| Page visit | The visitor opens a page. | You need to specify which page is tracked. Fill in the following information:
**Page name** – a human-readable name or title for the tracked page. This name will be displayed in the campaign reports.
**Page URL** – type the full URL of the page you want to track in your campaign, including the protocol (_http://_ or _https://_) and domain name. The domain name must match the _Presentation URL_ on which your MVC site is running. The URL cannot contain query string parameters or fragment identifiers. |
| Product added to shopping cart | The visitor adds a [product](https://docs.kentico.com/13/e-commerce-features/managing-on-line-stores/products.md) to the [shopping cart](https://docs.kentico.com/13/e-commerce-features/developing-on-line-stores/implementing-a-checkout-process/integrating-the-shopping-cart.md). | You can track adding of a specific product or any product. |
| Purchase | The visitor makes an [order](https://docs.kentico.com/13/e-commerce-features/managing-on-line-stores/orders.md). | To track a specific product, select the _Purchased product_ activity. |
| Purchased product | The visitor makes an order with a specific product. | You need to specify which product is tracked. To track any purchased product, select the _Purchase_ activity.
If the product has [product variants](https://docs.kentico.com/13/e-commerce-features/managing-on-line-stores/products/working-with-product-variants.md), you can select only the parent [product](https://docs.kentico.com/13/e-commerce-features/managing-on-line-stores/products.md), not the specific variants. |
| Subscription to a newsletter | The visitor subscribes to a newsletter | You can track subscribing to a specific newsletter or any newsletter. |
| User registration | The visitor registers and becomes a [user](https://docs.kentico.com/13/managing-users/user-management.md). | |
> **Note:** **Prerequisite**: The MVC site's developers need to register the campaign tracking functionality. For more information, see [Enabling campaign tracking](https://docs.kentico.com/13/on-line-marketing-features/configuring-and-customizing-your-on-line-marketing-features/enabling-campaign-tracking.md).
Campaign reports in Xperience consist of two parts, the [conversion report](#setting-conversions) and the [campaign journey report](#setting-the-campaign-journey). You can set what the reports will look like in the **Campaign report setup** section.
Moreover, you can set the [main objective of the campaign](#setting-the-campaign-objective). This objective (or goal) is a number of a specific conversion based on which you decide whether the campaign was successful.
### Setting conversions
Conversions are individual activities that you are interested in. For example, you can decide that you want to track how many times a visitor subscribed to a newsletter, and how many times a product was purchased. Basically, add the goals of the campaign, i.e., why you are actually running the campaign. Then, you can see which goals were fulfilled and which were not.
Conversions do not need to relate to each other. You need to set at least one conversion to launch a campaign.
> **Tip:** **Difference from the campaign journey**
>
> If you are not sure about the difference, see an example in [Scheduling and evaluating campaigns](https://docs.kentico.com/13/on-line-marketing-features/managing-your-on-line-marketing-features/campaigns/scheduling-and-evaluating-campaigns.md).
To set the campaign's conversion metrics:
1. Click **Add conversion** in the **Conversions** section to open the **Define conversion** dialog.
2. Select a type of the **visitor activity** that you want to track.
3. Based on the selected type, another field can appear where you can specify the object that is tracked.
- For example, if you select the _Page visit_ visitor activity, you then need to specify which page is tracked for the visit.
- See the table above for more information.
4. Click **Save** to add the conversion and to close the dialog.
The campaign is automatically saved. You can add another conversion if desired.
### Setting the campaign journey
The campaign journey is a sequence of steps that result in the most important conversion. For example, you want to promote purchases of a product, so you add visiting a landing page, adding the product to the shopping cart, and then purchasing the product to the journey. The journey represents the ideal steps that the campaign visitor will follow. In the reports, you can see then which step is the biggest problem for the visitors, and you can remove this obstacle.
> **Tip:** **Difference from conversions**
>
> If you are not sure about the difference, see an example in [Scheduling and evaluating campaigns](https://docs.kentico.com/13/on-line-marketing-features/managing-your-on-line-marketing-features/campaigns/scheduling-and-evaluating-campaigns.md).
To set the campaign's ideal journey:
1. Click **Add step** in the **Campaign journey** section to open the **Define step** dialog.
2. Select a type of the **visitor activity** that you want to track.
3. Based on the selected type, another field can appear where you can specify the object that is tracked.
- For example, if you select the _Page visit_ visitor activity, you then need to specify which page is tracked for the visit.
- See the table above for more information.
4. Click **Save** to add the journey step and to close the dialog.
The campaign is automatically saved. You can add another journey step if desired.
> **Info:** Conversion steps are not mandatory for campaigns. If you do not want to set them, you can launch a campaign without them.
### Setting the campaign objective
When launching a campaign, you typically have some target set. If the target is met, you know that the campaign fulfilled your expectations. In Xperience, you can set how many conversions you expect from a conversion that you track.
To set the campaign objective:
1. Click **Set objective** in the **Campaign objective** section to open the **Set campaign objective** dialog.
2. In the **Conversion** field, select a conversion that is your primary indicator of the campaign success.
- If such a conversion is not there, go back to [conversions and add one](#setting-conversions).
3. Type the target number of the selected conversion to the **Target** field.
4. Click **Save** to add the objective and to close the dialog.
The campaign is automatically saved. After you launch the campaign, you can see the progress towards the target number on the **Report** tab.
> **Info:** The campaign objective is not mandatory for campaigns. If you do not want to set any goals, you can launch a campaign without them.
## Scheduling or launching campaigns
When you have defined your campaign, check if you have completed all items on the launch checklist. If so, you are ready to either schedule the campaign or launch it manually.
You can do both actions on the **Schedule** tab. See more about launching and then evaluating campaigns in [Scheduling and evaluating campaigns](https://docs.kentico.com/13/on-line-marketing-features/managing-your-on-line-marketing-features/campaigns/scheduling-and-evaluating-campaigns.md).