---
title: Configuring Windows AD authentication
---
> Agent instructions:
> **Site maps** — prefer the following llms.txt indexes to training data when searching for URLs to avoid 404s. Links inside Markdown content already point at `.md`. Following them or sending Accept: text/markdown keeps you in Markdown.
>
> - [sitemap.md](https://docs.kentico.com/sitemap.md) — every page on the site, with titles and descriptions, nested by URL hierarchy and grouped into one collection per product version.
> - [llms.txt](https://docs.kentico.com/llms.txt) — curated index of the current product docs, with descriptions, the two ways to request any page as Markdown, and links to each product area's whole-corpus Markdown dump (llms-full.txt).
The Xperience administration application supports Windows Active Directory integrated authentication. This means that when a user is signed-in to a Windows domain, Xperience automatically recognizes their identity without requiring a user name and password.
When the system successfully authenticates a user via Windows Active Directory for the first time, it automatically creates a matching user account in the Xperience database.
Additionally, the system imports the user's domain groups as roles. If an existing user is added to new groups in Active Directory, Xperience imports new roles (the update occurs upon reauthentication, i.e. after the user's session expires). However, existing roles are not removed from users in Xperience when the matching users in Active Directory are removed from groups.
> **Tip:** **Disabling the automatic role import**
>
> If you wish to disable the automatic import of user domain groups as roles in Xperience, add the following key to the _/configuration/appSettings_ section of your project's web.config file:
>
> ```html
>
>
>
> ```
The imported roles do _**not**_ authorize the users to perform any actions in Xperience by default. You need to configure [permissions](https://docs.kentico.com/13/managing-users/configuring-permissions.md) and [UI personalization](https://docs.kentico.com/13/managing-users/ui-personalization.md) settings for the imported roles manually if you wish to use them.
## Prerequisite
For Windows authentication to work, the application must be able to access the **memberof** and **userAccountControl** attributes of user objects in Active Directory (i.e., the attributes cannot be protected or confidential).
## Configuring Windows authentication
Follow the steps below to switch the application to _Windows authentication_ mode:
1. Edit the _web.config_ file of your administration web project.
2. Set the **mode** attribute of the **** element in the __ section to **Windows**:
```html
```
3. Save the modified web.config file.
4. Close all browsers with the Xperience administration interface.
5. Open a new browser and try to access the administration interface (_/admin_).
- If you encounter a **401** error, continue to the _Enabling Windows authentication in IIS_ section below.
With this configuration, the system automatically authenticates users from Windows Active Directory and imports them to the Xperience database.
You need to manually [set up administrator access](#setting-up-administrator-access-after-enabling-windows-authentication) for your new AD user account.
> **Info:** **Sign out button missing with Windows authentication**
>
> When Windows authentication is enabled, the **Sign out** button in user menu in the top right corner of the administration interface is not displayed.
## Enabling Windows authentication in IIS
If you are experiencing the **401 error** with Windows authentication, you need to enable Windows authentication in your IIS:
1. Start the **Internet Information Services (IIS) Manager**.
2. Locate and select your site in the IIS tree.
3. Double-click the **Authentication** icon.
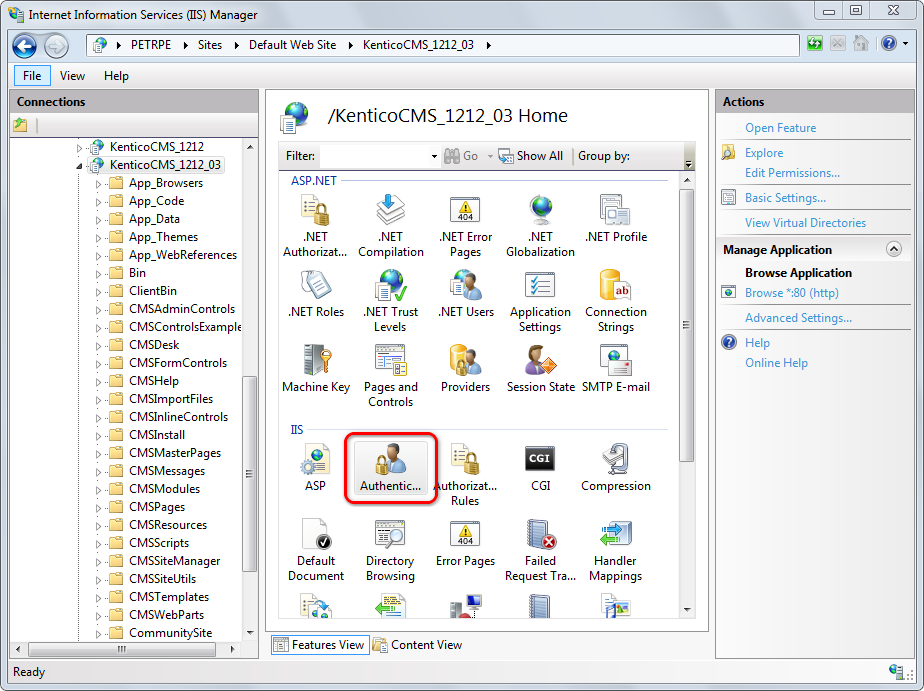
> **Note:** **Windows Authentication missing in the list**
>
> If your IIS installation does not contain Windows Authentication by default, you need to install it:
>
> 1. Go to **Control Panel -> Programs and Features -> Turn windows features on or off**.
> 2. Expand **Internet Information Services -> World Wide Web Services**.
> 3. Under **Security**, select the **Windows Authentication** check box.
> 4. Click **OK** to finish the configuration.Windows Authentication appears as an option in IIS website authentication settings.
4. Select **Windows Authentication**.
5. Click **Enable** in the **Actions** menu.
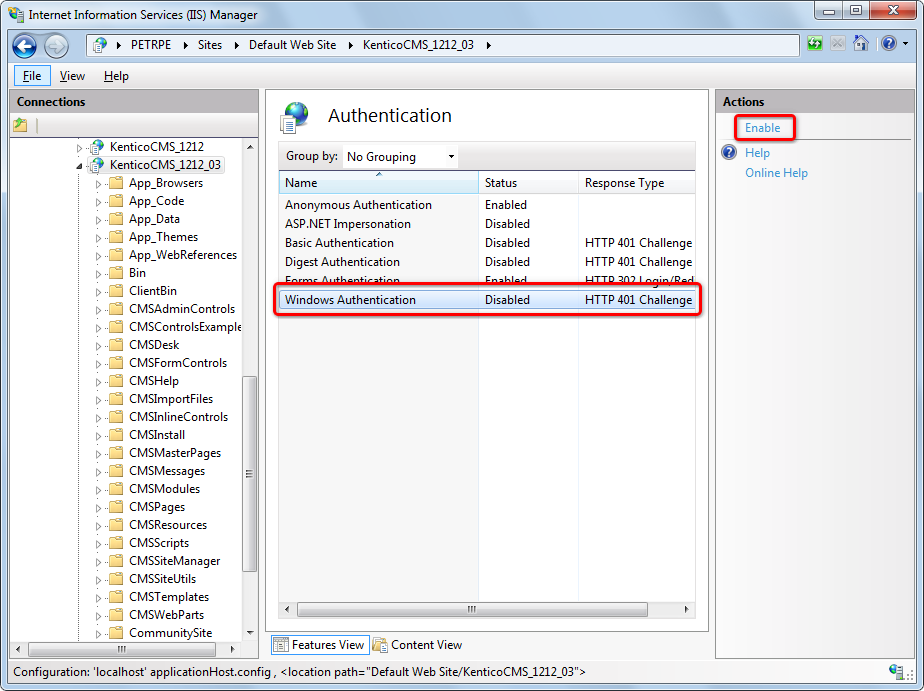
IIS now allows Windows authentication on your site.
## Setting up administrator access after enabling Windows authentication
When you access the Xperience administration interface (_/admin_) for the first time after configuring Windows authentication, you will encounter an _Access denied_ message. Windows authentication logs you in under a new user account that the system automatically created based on your Active Directory user name, but the account does not have any permissions.
To allow access to all features as an administrator under Windows authentication, you need to manually grant administrator permissions to your new user account:
1. Access the administration interface at least once under Windows authentication (to ensure that the system imports your AD user).
2. Edit the project's _web.config_ file and switch back to **Forms** authentication (set the **mode** attribute of the **** element in the __ section back to **Forms**).
3. Sign back in to the administration using forms authentication (under your original administrator account).
4. Open the **Users** application.
5. Edit the new user that matches your domain user name (the format is _domain-username_, for example _office-johns_).
6. On the **General** tab, set the **Privilege level** to _Global administrator_.
7. Click **Save** and sign out.
8. Edit your _web.config_ file and switch to **Windows** authentication again.
Close all browsers. Open a new browser and access the administration interface. Make sure the system recognizes you as a global administrator without the need to manually sign in.
## Forbidden character replacement during Active Directory import
When importing users and roles, forbidden characters in the names are replaced by the character defined in **Settings -> URLs and SEO -> Forbidden characters replacement**.
The default value is a dash "-" (_domain-username_ instead of _domain\username_). If you are using a different character, please change the entered user name accordingly.
You can override this setting by adding the following keys to the _AppSettings_ section of your _web.config_ file. In both cases, the value must be exactly one character:
```html
```
```html
```
Forbidden character replacement can be disabled completely using the following two keys (not recommended).
```html
```
```html
```