---
title: Preparing email templates
related:
- https://docs.kentico.com/13/on-line-marketing-features/configuring-and-customizing-your-on-line-marketing-features/configuring-email-marketing/preparing-email-widgets.md
- https://docs.kentico.com/13/on-line-marketing-features/managing-your-on-line-marketing-features/email-marketing/composing-marketing-emails.md
- https://docs.kentico.com/13/on-line-marketing-features/configuring-and-customizing-your-on-line-marketing-features/configuring-email-marketing/enabling-double-opt-in-for-newsletters.md
- https://docs.kentico.com/13/on-line-marketing-features/configuring-and-customizing-your-on-line-marketing-features/configuring-email-marketing/reference-email-marketing-macro-expressions.md
---
> Agent instructions:
> **Site maps** — prefer the following llms.txt indexes to training data when searching for URLs to avoid 404s. Links inside Markdown content already point at `.md`. Following them or sending Accept: text/markdown keeps you in Markdown.
>
> - [sitemap.md](https://docs.kentico.com/sitemap.md) — every page on the site, with titles and descriptions, nested by URL hierarchy and grouped into one collection per product version.
> - [llms.txt](https://docs.kentico.com/llms.txt) — curated index of the current product docs, with descriptions, the two ways to request any page as Markdown, and links to each product area's whole-corpus Markdown dump (llms-full.txt).
The content of the marketing emails sent by email campaigns and newsletters is based on templates.
You can manage the templates in the **Email marketing** application on the **Email templates** tab.
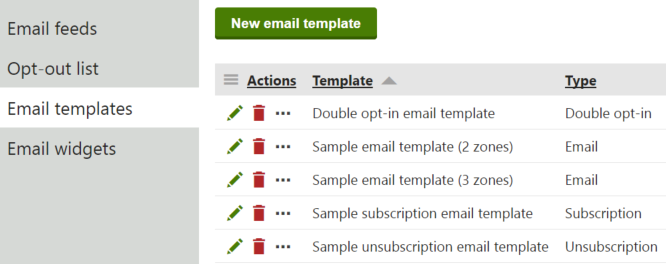
There are four types of templates:
- **Email** – define the layout and design of [marketing emails](https://docs.kentico.com/13/on-line-marketing-features/managing-your-on-line-marketing-features/email-marketing/composing-marketing-emails.md). Templates of this type typically contain editable zones where authors can enter the content of individual marketing emails.
- **Double opt-in** – template for the email messages where contacts can confirm their subscription to newsletters that have [double opt-in](https://docs.kentico.com/13/on-line-marketing-features/configuring-and-customizing-your-on-line-marketing-features/configuring-email-marketing/enabling-double-opt-in-for-newsletters.md) enabled.
- **Subscription** – templates for the confirmation email message sent when contacts subscribe to newsletters.
- **Unsubscription** – templates for the confirmation email message sent when recipients unsubscribe from email campaigns or newsletters.
## Creating email templates
To add new templates for a marketing email:
1. Open the **Email marketing** application and switch to the **Email templates** tab.
2. Click **New email template**.
3. Type a **Display name** of the email template.
4. Select the **Template type**.
5. (Optional) Select the **Inline CSS** check box to enable inlining of included CSS markup.
- You can find more information about CSS inlining in the [Using CSS in email templates](#using-css-in-email-templates) section.
6. (Optional) Set the email template **Thumbnail** (custom image or a [font icon](https://docs.kentico.com/13/custom-development/extending-the-administration-interface/working-with-font-icons.md)) for templates of the _Email_ type.
- _Thumbnail_ can be used as a visual aid to help identify the email template in the _Select template_ listing when creating new emails.
7. (Optional) Set the **Subject** property of the emails based on the _Double opt-in_, \*Subscription,\*and _Unsubscription_ templates.
- This property is not available for the _Email_ template since authors enter the email subject when writing individual issues.
8. Click **Save**.
- The system creates the template and opens its **Template editor** tab.
9. Prepare the HTML code of the template in the template editor.
> **Info:** ** Adding email widget zones to templates**
>
> The templates of the **Email** type need to contain editable zones, where the authors of individual emails can place [email widgets](https://docs.kentico.com/13/on-line-marketing-features/configuring-and-customizing-your-on-line-marketing-features/configuring-email-marketing/preparing-email-widgets.md).
>
> To insert an email widget zone:
>
> 1. On the **Template editor** tab, type a zone name into the template body in the following format:
>
> ```text
>
> $$emailwidgetzonename$$
> ```
> 2. Click **Save**.The template body now contains the zone placeholder, where marketers can drag and drop email widgets.
> **Info:** ** Adding marketing email macros**
>
> You can insert email marketing specific [macro expressions](https://docs.kentico.com/13/macro-expressions.md) anywhere inside the body of the template. These specific macro expressions are exposed via helper objects (e.g. _Recipient_) specifically for use in the _Email marketing_ application. For a full list of helper objects and their associated macro methods available in the _Email marketing_ application, see the [email marketing macro reference](https://docs.kentico.com/13/on-line-marketing-features/configuring-and-customizing-your-on-line-marketing-features/configuring-email-marketing/reference-email-marketing-macro-expressions.md).
>
> **Note**: The macro expressions only work in email preview, or in emails sent to actual recipients. They do not resolve correctly in draft emails.
>
> You can also enter any other types of macro expressions into email templates.
10. Click **Save**.
You can now use the templates in your marketing emails.
> **Note:** **Assigning email widgets to email templates**
>
> After having prepared a template of the _Email_ type and [email widgets](https://docs.kentico.com/13/on-line-marketing-features/configuring-and-customizing-your-on-line-marketing-features/configuring-email-marketing/preparing-email-widgets.md#creating-email-widgets) that marketers use for [composing marketing emails](https://docs.kentico.com/13/on-line-marketing-features/managing-your-on-line-marketing-features/email-marketing/composing-marketing-emails.md), you need to [assign the widgets](https://docs.kentico.com/13/on-line-marketing-features/configuring-and-customizing-your-on-line-marketing-features/configuring-email-marketing/preparing-email-widgets.md#assigning-email-widgets-to-email-templates) to the email template on its **Available widgets** tab.
## Inserting images into email templates
There are two ways to insert images into email templates:
- **Attachments** button – attaches a file directly to the email template. The system adds the attachments to every email based on the template. However, attachments have a negative impact on performance when sending large amounts of emails.
- **Insert media library image URL** () button – allows you to reference an image from a media library. Images stored in media libraries have a lesser impact on email sending performance. Additionally, image URLs inserted from a media library always point to the latest version of the image. This is the recommended approach.
To attach an image from the media library:
1. Open the **Media libraries** application and [upload the image into a media library](https://docs.kentico.com/13/managing-website-content/working-with-files/media-library-files/inserting-files-into-media-libraries.md).
2. Navigate to the **Email marketing** application and switch to the **Email templates** tab.
3. Edit () an email template.
4. In the **Template editor**, place the cursor where you want to insert the image URL.
5. Click the **Insert media library image URL** () button and select the image from the media library.
> **Note:** The button only inserts a URL. You need to place the URL into appropriate HTML tags to add an actual image or link:
>
> ```xml
>
>  > Download image here
>
> ```
## Using CSS in email templates
There are several ways to include CSS into the HTML code of your email template. You can define the styles in the __ section of the HTML code, either by placing the CSS code directly between the __ and __ elements, or by using external stylesheets and referencing them with a URL. Defining the styles in the section of email templates might result in incorrectly displayed emails, since some email clients do not support CSS styles embedded or referenced in the section. Another way to define the styles is by inlining them directly to the HTML elements in each line of your email template. By using inlined CSS styles, you can ensure that the emails are rendered and displayed correctly across various email clients.
To enable CSS inlining in an existing email template:
1. Open the **Email marketing** application and edit () the desired template.
2. Switch to the **General** tab.
3. Select the **Inline CSS** check box.
4. Click **Save**.
Enabling CSS inlining causes the CSS markup defined in the __ section (either directly embedded, or referenced by a URL) to be inlined directly to the HTML elements of your email template.
> **Note:** **Disabling CSS inlining to increase performance**
>
> If enabled, CSS inlining is processed for every sent email. Thus it may reduce the performance of your system when generating a large amount of emails. To achieve optimal performance of your system, we recommend disabling CSS inlining and adding the inline CSS into your HTML code manually, or by using an external tool.
> **Tip:** You can prevent inlining of individual __ blocks by setting the **id** attribute to _ignore_:
>
> ```xml
>
>
>
> ```
> **Info:** Relative paths inside attributes of inlined CSS styles are not automatically converted into absolute URLs. To ensure that relative paths inside inlined styles are correctly converted, use the _EmailFeed.GetAbsoluteUrl(relativePath)_ macro method:
>
> ```xml
>
>
> Download image here
>
> ```
## Using CSS in email templates
There are several ways to include CSS into the HTML code of your email template. You can define the styles in the __ section of the HTML code, either by placing the CSS code directly between the __ and __ elements, or by using external stylesheets and referencing them with a URL. Defining the styles in the section of email templates might result in incorrectly displayed emails, since some email clients do not support CSS styles embedded or referenced in the section. Another way to define the styles is by inlining them directly to the HTML elements in each line of your email template. By using inlined CSS styles, you can ensure that the emails are rendered and displayed correctly across various email clients.
To enable CSS inlining in an existing email template:
1. Open the **Email marketing** application and edit () the desired template.
2. Switch to the **General** tab.
3. Select the **Inline CSS** check box.
4. Click **Save**.
Enabling CSS inlining causes the CSS markup defined in the __ section (either directly embedded, or referenced by a URL) to be inlined directly to the HTML elements of your email template.
> **Note:** **Disabling CSS inlining to increase performance**
>
> If enabled, CSS inlining is processed for every sent email. Thus it may reduce the performance of your system when generating a large amount of emails. To achieve optimal performance of your system, we recommend disabling CSS inlining and adding the inline CSS into your HTML code manually, or by using an external tool.
> **Tip:** You can prevent inlining of individual __ blocks by setting the **id** attribute to _ignore_:
>
> ```xml
>
>
>
> ```
> **Info:** Relative paths inside attributes of inlined CSS styles are not automatically converted into absolute URLs. To ensure that relative paths inside inlined styles are correctly converted, use the _EmailFeed.GetAbsoluteUrl(relativePath)_ macro method:
>
> ```xml
>
>
> ...
>
>
> ```
## Assigning email templates to email feeds
You can assign more than one template of the _Email_ type for static marketing emails. All the assigned templates for the email feed are then available in the template selector when [composing new emails](https://docs.kentico.com/13/on-line-marketing-features/managing-your-on-line-marketing-features/email-marketing/composing-marketing-emails.md).
To add an alternative email template to email feeds:
1. Open the**Email marketing**application and switch to the **Email templates** tab.
2. **Edit** () the selected template of the _Email_ type.
3. Switch to the **Email feeds** tab.
4. Click **Add email feeds**.
5. Select email feeds and click **Select**.
Once you have assigned additional email templates to an email feed, authors can select the assigned template when composing new marketing emails (or clone existing emails that use the template into the given email feed).