---
title: Organizing contacts into accounts
related:
- https://docs.kentico.com/13/on-line-marketing-features/managing-your-on-line-marketing-features/contact-management/working-with-contacts/merging-contacts.md
---
> Agent instructions:
> **Site maps** — prefer the following llms.txt indexes to training data when searching for URLs to avoid 404s. Links inside Markdown content already point at `.md`. Following them or sending Accept: text/markdown keeps you in Markdown.
>
> - [sitemap.md](https://docs.kentico.com/sitemap.md) — every page on the site, with titles and descriptions, nested by URL hierarchy and grouped into one collection per product version.
> - [llms.txt](https://docs.kentico.com/llms.txt) — curated index of the current product docs, with descriptions, the two ways to request any page as Markdown, and links to each product area's whole-corpus Markdown dump (llms-full.txt).
> **Info:** **Enterprise license required**
>
> Features described on this page require the **Kentico Xperience Enterprise** license.
Accounts represent organizations, i.e. companies or other commercial or non-commercial bodies. You can use accounts to categorize your [contacts](https://docs.kentico.com/13/on-line-marketing-features/managing-your-on-line-marketing-features/contact-management/working-with-contacts.md) based on their affiliations. You can create accounts as subsidiaries of other accounts.
## Managing accounts
You can manage accounts on the **Accounts** tab of the **Contact management** application:
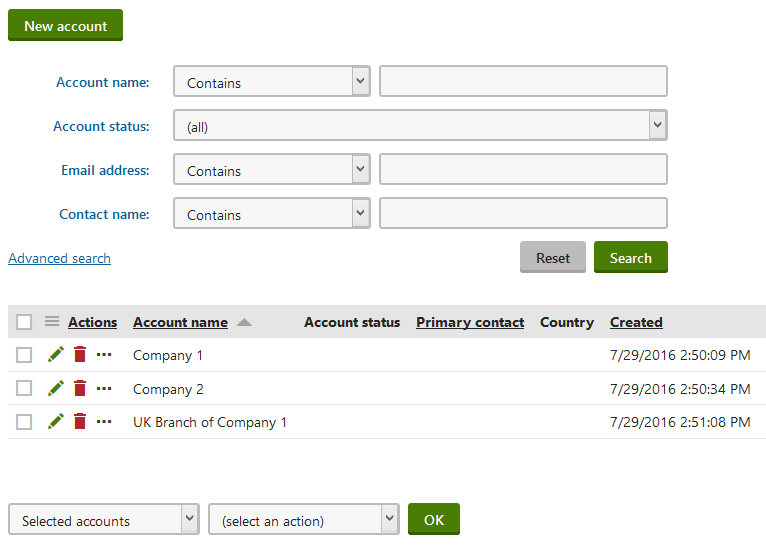
Click **New account** to manually create new accounts.
When editing an account, you can fill in the following default fields on the **General** tab:
| Section | Fields |
| ------- | ----------------------------------------------------------------------------------------------------------------------------------------------------------------------------------------------------------------------------------------------------------------------------------------------------------------------- |
| General | **Account name**
**Account status** – allows you to select an [account status](#assigning-statuses-to-accounts).
**Subsidiary of** – you can set the account as a [subsidiary](#creating-subsidiaries) of a different account.
**Account owner** – you can select a user responsible for managing the account. |
| Address | **Address line 1**
**Address line 2**
**City**
**ZIP code**
**Country**
**Phone**
**Fax**
**Email address**
**Website URL** |
You can leave **Notes** about the account. Click **Insert timestamp** to insert your timestamp into the notes – the default stamp contains the full name of your user account and the current date and time.
> **Tip:** **Adding custom fields to accounts**
>
> If you need to store data for accounts in addition to the default fields, you can define custom fields:
>
> 1. Open the **Modules** application.
> 2. **Edit** () the **Contact management** module.
> 3. Open the **Classes** tab.
> 4. **Edit** () the **Contact management - Account** class.
> 5. Switch to the **Fields** tab.
> 6. [Create a new field](https://docs.kentico.com/13/custom-development/extending-the-administration-interface/developing-form-controls/reference-field-editor.md#creating-new-fields) based on your needs.
>
> You can view and edit the values of your new fields on the **Custom fields** tab of the account editing interface.
## Creating subsidiaries
You can organize accounts into a hierarchical structure of subsidiaries. Each account can have any number of child accounts as subsidiaries.
To set an account as a subsidiary of a different account:
1. Open the **Contact management** application on the **Accounts** tab.
2. **Edit** () an account.
3. Select the parent account in the **Subsidiary of** field on the **General** tab.
4. Click **Save**.
You can view all subsidiaries of an account on the **Subsidiaries** tab of the account editing interface.
- Click **Add accounts** to set other accounts as subsidiaries of the edited account
- Click **View account details** () to open the editing interface of individual subsidiary accounts
- You can **Remove** () subsidiaries (does not delete the account itself, only cancels the subsidiary relationship between the accounts)

## Assigning statuses to accounts
You can label accounts with statuses to reflect their relationship with your organization or to indicate how you perceive them from a marketing point of view.
You can create, rename or delete the statuses in the **Contact management** application on the **Configuration -> Account status** tab.
To set a status for an account:
1. Open the **Contact management** application on the **Accounts** tab.
2. **Edit** () an account.
3. Select an **Account status** on the **General** tab.
- Accounts can only have one status at a time.
4. Click **Save**.
The status appears in lists of accounts and you can use it when filtering.
## Adding contacts to accounts
To add contacts to an account:
1. Open the **Contact management** application on the **Accounts** tab.
2. **Edit** () an account.
3. Open the **Contacts** tab.
4. Click **Add contacts**.
5. Select contacts.
6. (Optional) Select [contact role](#assigning-contact-roles-to-contacts-in-accounts) for the contacts in accounts.
7. Click **OK**.
The **Contacts** tab shows a list of all contacts in the account.
- Click **View contact details** () to open the editing interface of individual contacts.
- Click **Select contact role** () to open the interface for selecting contact roles.
- You can **Remove** () contacts from the account.
You can also view and manage the accounts of individual contacts on the **Accounts** tab of the [contact editing interface](https://docs.kentico.com/13/on-line-marketing-features/managing-your-on-line-marketing-features/contact-management/working-with-contacts.md).
> **Tip:** **Tip**: You can create [marketing automation](https://docs.kentico.com/13/on-line-marketing-features/managing-your-on-line-marketing-features/marketing-automation.md) processes that [add or remove](https://docs.kentico.com/13/on-line-marketing-features/managing-your-on-line-marketing-features/marketing-automation/working-with-the-automation-process-designer/adding-marketing-actions-to-automation-processes.md) contacts to/from accounts.
> **Note:** **Primary and secondary contacts**
>
> You can designate a primary and secondary contact for each account. For example, you can use these contacts to identify the company's CEO or any other relevant employee.
>
> 1. Open the account's **General** tab.
> 2. Select a **Primary** and **Secondary contact** from the list of the account's contacts.
> 3. (Optional) Set the [contact roles](#assigning-contact-roles-to-contacts-in-accounts) of the primary and secondary contacts.
> 4. Click **Save**.
## Assigning contact roles to contacts in accounts
You can specify roles for [contacts](https://docs.kentico.com/13/on-line-marketing-features/managing-your-on-line-marketing-features/contact-management/working-with-contacts.md) in accounts. Roles typically represent the job position or other type of competence that the contact has within the organization, such as _CEO_, _CFO_, _Decision maker_. Contacts can have only one role in each account.
To set roles for contacts within accounts:
1. Open the **Contact management** application on the **Accounts** tab.
2. **Edit** () the account.
3. Open the **Contacts** tab.
4. Click **Select contact role** for specific contacts.
5. Select the role.
6. Click **OK**.
You can add roles to multiple contacts using the options below the list:
1. Select the contacts:
1. _All contacts_
2. _Selected contacts_ - mark specific contacts using the checkboxes on the left side of the list.
2. Choose the _Select contact role_ action.
3. Click **OK**.
4. Select the target contact role.
The roles appear in the account's contact lists.
> **Tip:** **Tip**: You can also assign roles when editing specific contacts on the **Accounts** tab of the [contact editing interface](https://docs.kentico.com/13/on-line-marketing-features/managing-your-on-line-marketing-features/contact-management/working-with-contacts.md).
### Managing contact roles
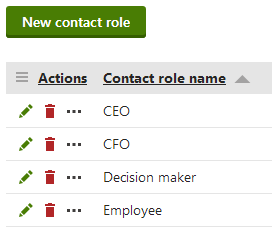
Contacts in accounts can be assigned a role from a predefined set of contact roles. Each contact can only have one role in an account. You can create, rename or delete the roles in the **Contact management** application on the **Configuration -> Contact role** tab.
Click **New contact role** to create new roles.