---
title: Configuring Salesforce integration
related:
- https://docs.kentico.com/13/on-line-marketing-features/managing-your-on-line-marketing-features/contact-management/working-with-contacts.md
- https://docs.kentico.com/13/on-line-marketing-features/managing-your-on-line-marketing-features/contact-management/scoring-contacts.md
---
> Agent instructions:
> **Site maps** — prefer the following llms.txt indexes to training data when searching for URLs to avoid 404s. Links inside Markdown content already point at `.md`. Following them or sending Accept: text/markdown keeps you in Markdown.
>
> - [sitemap.md](https://docs.kentico.com/sitemap.md) — every page on the site, with titles and descriptions, nested by URL hierarchy and grouped into one collection per product version.
> - [llms.txt](https://docs.kentico.com/llms.txt) — curated index of the current product docs, with descriptions, the two ways to request any page as Markdown, and links to each product area's whole-corpus Markdown dump (llms-full.txt).
> **Info:** **Enterprise license required**
>
> Features described on this page require the **Kentico Xperience Enterprise** license.
You can access the Salesforce integration configuration in the **Settings** application under the **Integration → Salesforce.com** category. These settings allow you to authorize access to your Salesforce organization and modify how the system maps the attributes of Xperience [contacts](https://docs.kentico.com/13/on-line-marketing-features/managing-your-on-line-marketing-features/contact-management/working-with-contacts.md) to leads in Salesforce.
## Prerequisites
To configure the Salesforce authorization and use the synchronization, your Xperience **administration application** must have [HTTPS](https://docs.kentico.com/13/securing-websites/deploying-websites-to-a-secure-environment/configuring-ssl.md) set up.
If you wish to use synchronization of data from Salesforce leads back into Xperience contacts, your Xperience administration must also run on a **publicly accessible** domain.
Additionally, your server (IIS) must support the **TLS 1.1** protocol or newer. For more information, see the [IIS documentation](https://docs.microsoft.com/en-us/iis/manage/configuring-security/how-to-set-up-ssl-on-iis).
## Salesforce Sandbox organizations
**Note**: Sandbox support is an experimental feature, and may not work in all possible Salesforce integration scenarios.
If you wish to set up and test the Salesforce integration without affecting your production organization, you can use a [Sandbox](https://help.salesforce.com/s/articleView?id=sf.deploy_sandboxes_parent.htm\&type=5) organization. To connect to a Sandbox org, you need to add the **CMSSalesForceUseSandbox** key to the _web.config_ file of your Xperience administration project.
```html
```
The key ensures that the system connects to Salesforce using the _https://test.salesforce.com_ domain.
Once you are ready to connect to your production organization, remove the key or set its value to _false_, and re-authorize access to Salesforce.
## Authorizing access to Salesforce
You need to authorize access of Xperience to your organization on behalf of a specific Salesforce user. This process requires you to generate a **Consumer key** and **Consumer secret** in Salesforce itself.
> **Note:** The following instructions apply to **Salesforce Classic**. The steps may be different if using Salesforce Lightning Experience.
1. Log in to [Salesforce.com](http://www.salesforce.com/).
2. Navigate to **App Setup → Create → Apps**.
3. Under **Connected Apps**, click **New**.
4. Enter the following values for the remote access application:
- **Basic Information**
- **Connected App Name**: Type a name for the application. This name allows you to identify your application as the source of the request when authorizing access to your organization.
- **API Name**: The application's name is filled in automatically.
- **Contact Email**: Enter an email address where you want to be contacted.
- **API (Enable OAuth Settings)**
- **Enable OAuth Settings**: Select the checkbox.
- **Callback URL**: Add the full URL of the _AuthorizationSetup.aspx_ endpoint of your Xperience administration application. For example:\
__
- **Use digital signatures**: Do not select the checkbox. The Salesforce integration does not use digital signatures for logging in.
- **Select OAuth Scopes** :
- _Full access (full)_
- _Perform requests at any time (refresh\_token, offline\_access)_
5. Click **Save**, and copy the **Consumer Key** and **Consumer Secret** provided by Salesforce for your remote access application.
6. Modify the OAuth policies for your application:
1. Under **Connected Apps**, click **Manage** next to your application.
2. In the **Connected App Detail** section, click **Edit Policies**.
3. Under **OAuth Policies**, set **Permitted Users** to: _All users may self-authorize_
4. Click **Save**.
7. Open the **Settings** application in the Xperience administration.
8. Navigate to the **Integration → [Salesforce.com](http://Salesforce.com)** category.
9. Click **Authorize** next to the **Organization access** setting.
10. Paste your consumer values into the corresponding fields in the authorization dialog and click **Authorize**.
- A Salesforce login screen opens in the current window.
11. Log in and click **Allow** to grant permission to your Xperience application.
> **Info:** **Security**
>
> The system uses the OAuth 2.0 protocol to authorize access to Salesforce. Your Salesforce login and password are never disclosed to Xperience. Access tokens are stored in encrypted format and the communication itself is encrypted over HTTPS.
12. **Save** the settings to finish the authorization process.
The **Organization access** section now shows the user and company name that the application uses to authorize access to Salesforce.
## Configuring the replication of contacts
Once the authorization is complete, you need to configure how the system replicates contacts into Salesforce leads. Access the settings in the Xperience **Settings** application under the **Integration → Salesforce.com** category.
| Replication of contacts into Salesforce leads | |
| --------------------------------------------- | -------------------------------------------------------------------------------------------------------------------------------------------------------------------------------------------------------------------------------------------------------------------------------------------------------------------------------------------------------------------------------------------------------------------------------------------------------------------------------------------------------------------------------------------------------------------------------------------------------------------------------------------------------------------------------------------------------------------------------------------------------------------------------------------------------------------------------------------------------------------------------- |
| Enabled | Enables or disables synchronization between Xperience contacts and Salesforce leads:
[Replication of Xperience contacts into Salesforce leads](https://docs.kentico.com/13/integrating-3rd-party-systems/salesforce-integration/replicating-contacts-to-salesforce.md)
[Synchronization of Salesforce lead data back into Xperience contacts that were previously replicated](#setting-up-synchronization-of-salesforce-leads-to-contacts) |
| Keep Salesforce leads updated | If enabled, the replication process includes contacts that have already been replicated before. This ensures that the system updates the corresponding Salesforce leads based on the current contact data.
If disabled, contacts are only replicated once. |
| Mapping of contacts to Salesforce leads | Allows you to map contact fields to the fields of Salesforce leads. The synchronization process transfers data between contacts and leads according to the mappings.
See the [Mapping contact fields to Salesforce lead fields](#mapping-contact-fields-to-salesforce-lead-fields) section below for details. |
| Batch size | Applications can only make a limited number of API calls to Salesforce within a 24 hour window. To minimize the number of calls, the replication process handles contacts in batches. Each batch only requires one API call.
This setting specifies the maximum number of contacts that the system replicates in a single batch. |
| Score | Allows you to select the score that determines which contacts are replicated. The system only replicates contacts that reach a certain value in the given score (specified via the **Minimum number of points for replication** setting).
If you do not choose a score (_None_), the system replicates all contacts.
To learn more about scoring, refer to [Scoring contacts](https://docs.kentico.com/13/on-line-marketing-features/managing-your-on-line-marketing-features/contact-management/scoring-contacts.md). |
| Minimum number of points for replication | Specifies the amount of points that contacts must reach in the score selected through the **Score** setting. Once a contact reaches this value, the system marks it for replication as a Salesforce lead. |
| Lead description | Defines a custom description for replicated contacts. To map the description to a specific field of Salesforce leads, select the **Generated lead description** source in the field mappings.
You can insert the values of contact fields into the description using [macro expressions](https://docs.kentico.com/13/macro-expressions.md).
The default description adds the **Last name** of the contact that is being replicated:
`
{% Contact.ContactLastName %}
`
For example, to use the **Business phone** value instead of the last name, enter the following expression:
`
{% Contact.ContactBusinessPhone %}
` |
| Default company name | All Salesforce leads require a company name value.
This setting allows you to specify a default company name, which the replication process uses for contacts who are not associated with any company.
The system attempts to retrieve the company name value from sources in Xperience in the following order:
The value of the contact's **Company name** field
The name of the [account](https://docs.kentico.com/13/on-line-marketing-features/managing-your-on-line-marketing-features/contact-management/working-with-contacts/organizing-contacts-into-accounts.md) in which the contact is listed as a _primary contact_
The account that lists the contact as a _secondary contact_
The first account that contains the contact as a regular contact
The value of the **Default company name** setting (if none of the above steps are successful) |
## Mapping contact fields to Salesforce lead fields
The synchronization process transfers data between Xperience contacts and Salesforce leads based on field mapping settings.
> **Note:** **Note**: You need to authorize [Organization access](#authorizing-access-to-salesforce) before you can adjust the field mappings.
### Preparing the Salesforce mapping identifier field
Xperience stores the bindings between Salesforce leads and contacts in a custom Salesforce field. You need to create a dedicated field for your Salesforce leads for this purpose.
> **Note:** The following instructions apply to **Salesforce Classic**. The steps may be different if using Salesforce Lightning Experience.
1. Log in to [Salesforce.com](http://www.salesforce.com/).
2. Navigate to **App Setup → Customize → Leads → Fields**.
3. Click **New** in the **Lead Custom Fields & Relationships** section.
4. Choose **Text** as the field type and click **Next**.
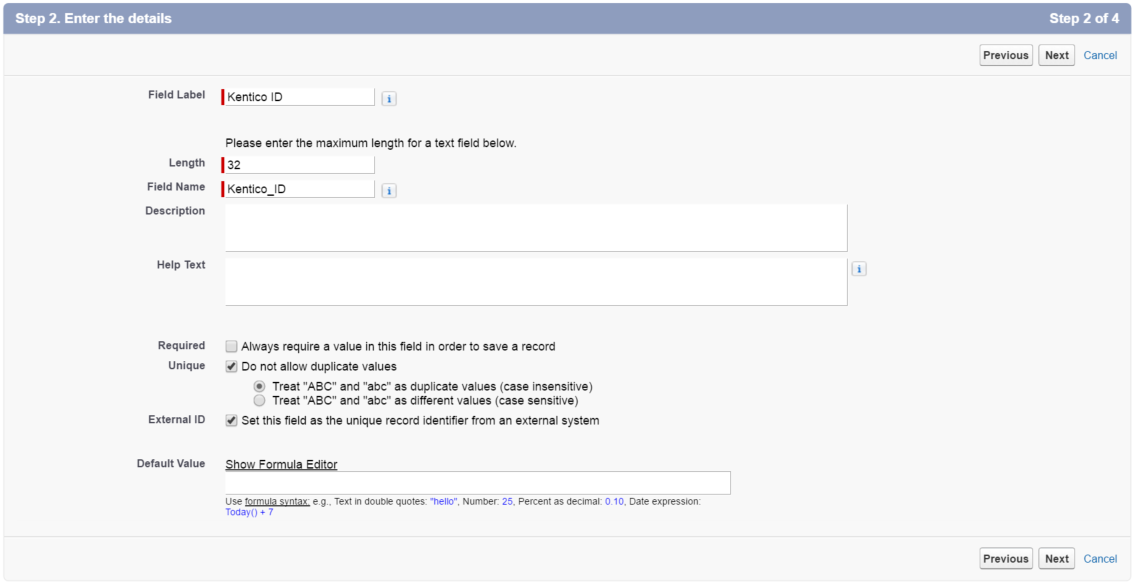
5. In the **Enter the details** step, fill in the following values:
- **Field Label**: type any label for the field, for example: _Xperience ID_
- **Length**: 32
- **Field Name**: type any name for the field, for example: _Xperience\_ID_
- **Unique**: select the checkbox
- Select _Treat "ABC" and "abc" as duplicate values (case insensitive)_.
- **External ID**: select the checkbox
6. Fill in the rest of the information as required and finish the **New Custom Field** wizard.
7. In Xperience, go to **Settings → Integration → Salesforce.com** and click **Edit** below the **Mapping of contacts to Salesforce leads** section.
8. Select your new Salesforce lead field as the **External identifier field**.
9. Click **Save & Close**.
10. **Save** the settings.
You can now configure the mappings between the fields of Xperience contacts and Salesforce leads.
### Setting up the field mappings
To access the field mapping dialog, go to **Settings → Integration → Salesforce.com** in the Xperience administration and click **Edit** below the **Mapping of contacts to Salesforce leads** section.
The mapping dialog offers a list of all standard and custom fields defined for your Salesforce leads. You can select the following items as the source for the fields:
- Fields – the fields of Xperience contacts. Only fields containing relevant data are available (internal system fields of contacts are hidden).
- Custom – related values that cannot be loaded directly from contact fields, including the following:
- _Company name_ – ensures that each contact has a company name value. See the description of the [Default company name](#configuring-the-replication-of-contacts) setting for details about the process.
- _Generated lead description_ – loads the value of the _Lead description_ setting.
- _Country_ _name_ – provides the name of the contact's country as a text value.
- _State name_ – provides the name of the contact's state as a text value.
- Picklist entry – allows you to select from the values predefined in Salesforce for picklist type fields.
- **(macro)** – a dynamic data source based on a [macro expression](https://docs.kentico.com/13/macro-expressions/macro-syntax.md). Allows you to get values that are related to the contact, but not directly available in a contact field. For example, the following macro gets the names of all [contact groups](https://docs.kentico.com/13/on-line-marketing-features/managing-your-on-line-marketing-features/contact-management/segmenting-contacts-into-contact-groups.md) to which the contact belongs:
```csharp
{% Contact.ContactGroups.DisplayNames %}
```
> **Note:** If you have the _Keep Salesforce leads updated_ setting enabled, changes are only propagated after the contacts themselves are updated. Keep this in mind when using **(macro)** data sources for lead fields. Changes of other objects used in the macro (such as contact groups) do not trigger the replication until the contact itself is updated.
You can only select contact fields that fit the data type of the target Salesforce field. The following table shows which types of Xperience fields are supported by the available Salesforce data types:
| Salesforce Data type | Supported Xperience field data types |
| --------------------------------- | --------------------------------------------------------------------------------- |
| Checkbox | Boolean (Yes/No) |
| Currency | _Replication does not support the Currency data type at this time._ |
| Date | Date and time |
| Date/Time | Date and time |
| Email | Text, Long text |
| Geolocation | Floating point number _(requires two separate fields for latitude and longitude)_ |
| Number | Decimal number, Floating point number, Integer number, Long integer number |
| Percent | Decimal number, Floating point number, Integer number, Long integer number |
| Phone | Text, Long text |
| Picklist | Text, Long text |
| Picklist (Multi-Select) | Text, Long text |
| Text | Text, Long text |
| Text Area (Long, Rich, Encrypted) | Text, Long text |
| Time | Date and time |
| URL | Text, Long text |
> **Note:** The system may modify values during the replication process according to the parameters of the target fields in Salesforce.
>
> - **Text values** – the replication process may shorten long text values (strings) to fit the maximum length of the target field.
> - **Decimal numbers** – the fractional part of decimal numbers may be truncated based on the data type settings of the target field. For example, the number _2.45397_ could be shortened to _2.45_. The same also applies to Floating point numbers.
> - **Large numbers** – replication of large numbers may result in an error if the target field has an insufficient length. Such errors block the related contact from replication until the contact's values are updated, or the field mapping settings change.
Once you configure all field mappings as required, you can start [Replicating contacts to Salesforce](https://docs.kentico.com/13/integrating-3rd-party-systems/salesforce-integration/replicating-contacts-to-salesforce.md).
### Implementing custom data sources for fields
If the options available when [setting up the Salesforce lead field mappings](#setting-up-the-field-mappings) are not sufficient for your scenario, developers can implement custom sources for fields.
1. Open your Xperience solution in Visual Studio.
2. [Add a custom assembly](https://docs.kentico.com/13/custom-development/adding-custom-assemblies.md) (_Class Library_ project) with class discovery enabled to the solution (or reuse an existing custom assembly).
3. Reference the custom project from the Xperience administration project _(CMSApp_).
4. Create a new class within the custom project.
5. Set the class to inherit from the **LeadReplicationHelper** class.
6. Override the following methods:
- **GetCustomizedFieldsInternal** – return an _IEnumerable_ collection of strings with the names of the Salesforce lead fields for which you want to implement a custom data source.
- **PrepareLeadForReplicationInternal** – call the method's base implementation, and then set values for the fields declared in _GetCustomizedFieldsInternal_. You can also perform any required modifications of the _Entity_ object representing the lead, before the system runs the replication to Salesforce.
7. Add the **RegisterCustomHelper** assembly attribute above the class declaration to register the provider.
8. Save the changes and rebuild your solution.
```csharp
using System.Collections.Generic;
using CMS;
using CMS.ContactManagement;
using CMS.SalesForce;
// Registers the custom helper
[assembly: RegisterCustomHelper(typeof(CustomLeadReplicationHelper))]
public class CustomLeadReplicationHelper : LeadReplicationHelper
{
// Prepares a collection of Salesforce lead fields
// The values of the fields are set within the code of the 'PrepareLeadForReplicationInternal' override
protected override IEnumerable GetCustomizedFieldsInternal()
{
return new string[] { "SFLeadField" };
}
// Modifies the Salesforce lead entity based on contact mappings and performs further customization
protected override void PrepareLeadForReplicationInternal(Entity lead, ContactInfo contact)
{
// Calls the base implementation
base.PrepareLeadForReplicationInternal(lead, contact);
// Sets the value for the 'SFLeadField' field
lead["SFLeadField"] = "Custom value";
}
}
```
When replicating contacts, the system uses the custom helper to fill the values of fields handled by your implementation (such as _SFLeadField_ in the example above).
> **Note:** If you have the _Keep Salesforce leads updated_ setting enabled, changes are only propagated after the contacts themselves are updated. Keep this in mind when using custom data sources for lead fields. Changes of custom source data do not trigger replication until the contact itself is updated.
## Setting up synchronization of Salesforce leads to contacts
After you [authorize access to Salesforce](#authorizing-access-to-salesforce) and [configure replication of contacts](#configuring-the-replication-of-contacts), you can additionally set up synchronization of Salesforce lead data back into Xperience contacts. This ensures that your leads and contacts are up-to-date whenever you update the data in either system.
Only leads that were previously replicated from Xperience can be synchronized back to the corresponding contacts. Currently, the feature does not allow "export" of existing Salesforce lead data into new contacts.
Synchronization from Salesforce to Xperience works via [Outbound Messaging](https://developer.salesforce.com/docs/atlas.en-us.210.0.api.meta/api/sforce_api_om_outboundmessaging_understanding.htm).
> **Note:** The following instructions apply to **Salesforce Classic**. The steps may be different if using Salesforce Lightning Experience.
1. Log in to [Salesforce.com](http://www.salesforce.com/).
2. Navigate to **App Setup → Create → Workflow & Approvals → Outbound Messages**.
3. Click **New outbound message**.
4. In the **Object** drop-down, select **Lead** and click **Next**.
5. Fill in the following details:
- **Name**: Type a name for the outbound message.
- **Unique name**: The unique name is filled in automatically.
- **Endpoint URL**: Add the full URL of the _LeadOutboundMessageHandler.ashx_ endpoint of your Xperience administration application. For example:\
_https://administration.example.com/CMSModules/ContactManagement/Pages/Tools/SalesForce/LeadOutboundMessageHandler.ashx_
- **Send Session ID**: Select the checkbox.
- **Lead fields to send**: Add all fields that you want to update in Xperience contacts when a lead is modified in Salesforce.
> **Note:** The synchronization uses the [field mappings](#setting-up-the-field-mappings) configured in Xperience.
>
> Only Salesforce lead fields that are mapped directly from a contact field are supported. You cannot synchronize fields whose source in Xperience is a macro or [custom code](#implementing-custom-data-sources-for-fields).
6. Click **Save**.
Next, you need to create a Salesforce flow:
1. In Salesforce, navigate to **App Setup → Create → Workflow & Approvals → Flows**.
2. Click **New flow**.
3. Under the **Core** tab, select **Record-Triggered Flow** and click **Create**.
4. Select the following options:
- **Object**: Lead
- **Trigger the Flow When**: A record is updated
- **Condition Requirements**: All conditions are met (AND)
- Add the following condition:
- Field: your [mapping identifier field](#preparing-the-salesforce-mapping-identifier-field)
- Operator: Is Null
- Value: False
- **When to Run the Flow for Updated Records**: Every time a record is updated and meets the condition requirements
- **Optimize the Flow for**: Actions and Related Records
5. Click **Done**.
6. In the **Flow Builder**, click the **+** button (Add element).
7. Search for the name of your Outbound Message and select it.
8. Enter a suitable **Label** for the flow element and click **Done**.
9. Click **Save** in the top-right of the Flow Builder.
10. In the **Save the flow** dialog, fill in the following details:
1. **Flow Label**: Type a name.
2. **Show advanced > API Version for Running the Flow**: 54
11. Click **Save**.
12. **Activate** the flow once you are ready to start synchronizing leads to Xperience contacts.
When a lead is updated in your Salesforce organization, a message is sent to your Xperience administration application and the fields of the corresponding contact are updated.
## Optimizing performance
By default, the Xperience on-line marketing features are optimized for the most common configurations (with Salesforce integration disabled). If you are using the Salesforce integration with a large number of contacts, we recommend that you optimize database operations by manually creating a **database index** with the following columns on the **OM\_Contact** table:
1. ContactSalesForceLeadID
2. ContactSalesForceLeadReplicationDisabled
3. ContactSalesForceLeadReplicationSuspensionDateTime
The index should be non-clustered and non-unique. See the [Create Nonclustered Indexes](https://docs.microsoft.com/en-us/sql/relational-databases/indexes/create-nonclustered-indexes) article for more information.