---
title: Configuring content staging
related:
- https://docs.kentico.com/13/custom-development/handling-global-events/excluding-content-from-staging-and-integration.md
- https://docs.kentico.com/13/custom-development/handling-global-events/deploying-objects-with-custom-id-fields.md
---
> Agent instructions:
> **Site maps** — prefer the following llms.txt indexes to training data when searching for URLs to avoid 404s. Links inside Markdown content already point at `.md`. Following them or sending Accept: text/markdown keeps you in Markdown.
>
> - [sitemap.md](https://docs.kentico.com/sitemap.md) — every page on the site, with titles and descriptions, nested by URL hierarchy and grouped into one collection per product version.
> - [llms.txt](https://docs.kentico.com/llms.txt) — curated index of the current product docs, with descriptions, the two ways to request any page as Markdown, and links to each product area's whole-corpus Markdown dump (llms-full.txt).
Configuration of staging consists of the following parts:
1. [Source server configuration](#configuring-the-source-server) – configuration of the server from which changes will be transferred to the target servers.
2. [Target server configuration](#configuring-the-target-servers) – configuration of the server to which changes will be transferred from the source servers.
3. [Configuring servers to correctly stage data with macros](#configuring-servers-to-stage-data-containing-macros)
You also need to ensure that all instances use the same settings, code files, and that both servers use the same version of Xperience.
## Configuring the source server
To configure an Xperience instance as a source server, you first need to enable logging of staging tasks. Open the **Settings** application, and adjust the settings in the **Versioning & synchronization -> Staging** category.
- **Log content changes** – if enabled, synchronization tasks are automatically logged when content (a page) is modified.
- **Log data changes** – if enabled, synchronization tasks are automatically logged when custom tables data is modified.
- **Log object changes** – if enabled, synchronization tasks are automatically logged when supported objects are modified.
- **Log staging changes** – if enabled, synchronization tasks are logged for changes made by synchronization from another server to this server. See [Bi-directional content staging](https://docs.kentico.com/13/deploying-websites/content-staging/bi-directional-content-staging.md) for more details.
- **Log export tasks** – if enabled, tasks are logged for the [export](https://docs.kentico.com/13/deploying-websites/exporting-and-importing-sites.md) feature when an object is deleted (incremental update support).
With these settings enabled, the system logs all changes to the corresponding content as staging tasks. These tasks can then be transferred to the target servers and performed there to synchronize the content.
### Defining target servers
To specify the target servers, open the **Staging** application and select the **Servers** tab.
> **Note:** **Notes**:
>
> - The system only logs staging tasks if at least one target server is created and enabled.
> - **Multi-site source servers** – on instances with multiple sites, you need to define target servers separately for each site whose content or objects you plan to stage. Use the site selector in the main header of the administration interface to switch between sites.
> - **Target sites running in a web farm** – if the target site is running in a [web farm environment](https://docs.kentico.com/13/configuring-xperience/setting-up-web-farms.md), only register one of the web farm's instances as a target server for staging. Staged changes automatically apply to all servers in the web farm due to the shared database and synchronization mechanisms. If possible, set the service URL of the staging server using a direct connection to the selected web farm server rather than the load balancer covering the entire web farm.
Add servers by clicking **New server**. Set the following properties for each staging server:
| Staging server properties | Description |
| ------------------------- | ------------------------------------------------------------------------------------------------------------------------------------------------------------------------------------------------------------------------------------------------------------------------------------------------------------------------------------------------------------------------------------------------------------------------------------------------------------------------------------------------------------------------------------------------------------------------------------------------------------------------------------------------------------------------------------------------------------------------------------------------------------------------------------------------------ |
| Display name | Name of the server displayed to users in the administration interface. |
| Code name | Unique identifier of the server. |
| Server service URL | Enter the root URL of the target Xperience instance, i.e. the protocol, domain, and virtual directory (if necessary). For example: _http://www.targetserver.com_
The system automatically builds the full service URL by appending _/CMSPages/Staging/syncserver.asmx_ to the value.
Click **Check server availability** to confirm whether the entered URL is available.
**Important**:
Always use the domain name of the Xperience administration application, not the presentation URL of the live site.
When defining servers on instances with multiple sites, the service URLs of each site's servers must use the administration domain name of the matching site on the target server. |
| Enabled | If selected, the system generates synchronization tasks for the server. You can temporarily disable the server by disabling this flag, for example during server maintenance. |
| Server authentication | Determines the type of authentication used to connect to the server, along with related credentials and settings. Configure according to the authentication settings of the given target server (described below).
When using **User name / password** authentication, enter the credentials configured in the staging settings of the target server. The default user name is **admin** and the default password is **pass**.
**Note**: After you enter and save a password, the field always displays 8 "masking" characters, even if the password is longer or shorter. This measure helps protect your password.
If you want to use X.509 authentication, see [Using X.509 authentication](https://docs.kentico.com/13/deploying-websites/content-staging/using-x-509-authentication.md). |
## Configuring the target servers
On the target server, the staging service is disabled by default. You need to adjust the following settings in **Settings -> Versioning & synchronization -> Staging**:
- **Enable staging service** – enables the staging service for the given site.
- **Staging service authentication** – we recommend starting with _Username and password_ authentication first, testing the synchronization, and then optionally configuring the site for _X509_ certificates.
- _USERNAME_ - username/password authentication (fast, recommended for data without high security requirements).
- _X509_ - X509 certificate authentication (more secure, slower, requires certificates). See: [Using X.509 authentication](https://docs.kentico.com/13/deploying-websites/content-staging/using-x-509-authentication.md)
- **Staging service username** and **password** – the username and password for _Username and password_ authentication. You can set any required values (these are unrelated to users within the system).
- **Server key ID** and **Client key ID** – certificate keys for the _X509_ authentication.
> **Tip:** **Setting administration domain aliases**
>
> You may want to make each staging environment "instance" editable from an administration interface, each accessible under a unique administration domain alias. For each _Administration domain name_ alias you can specify a unique _Preview presentation URL_ which is then used when previewing live site content within the scope of the administration interface. You can use this, for example, to allow content editors to edit a testing instance of your site only via a specific administration domain alias.
>
> See [Setting domain names for sites](https://docs.kentico.com/13/configuring-xperience/managing-sites/setting-domain-names-for-sites.md) for more information.
## Configuring servers to stage data containing macros
The system uses signatures to ensure the security of [macro expressions](https://docs.kentico.com/13/macro-expressions.md). Macro signatures contain an identifier of the macro's author and a hash of the given expression. The hash function used to create the signatures appends a [salt](http://en.wikipedia.org/wiki/Salt_%28cryptography%29) to the input. The salt value depends on the configuration of individual applications, so the signatures are only valid in the environment where the macros were originally saved.
To allow macros to work correctly on all staging servers, you need to assign the same custom hash salt to all servers:
- Set the **CMSHashStringSalt** key in the _appSettings_ section of the web.config file to the same value on all staging servers. You can use any string as the value, but the salt should be random and at least 16 characters long. For example, a randomly generated [GUID](http://en.wikipedia.org/wiki/GUID) is a strong salt:
```html
```
The best option is to set the hash salt value before you start creating content for your website. Changing the salt causes all current hash values to become invalid. To fix existing macro expressions in the system after changing the hash salt, you need to re-sign the macros. See [Working with macro signatures](https://docs.kentico.com/13/macro-expressions/troubleshooting-macros/working-with-macro-signatures.md) for more information.
> **Note:** **Warning**: In addition to macro signatures, the system uses the **CMSHashStringSalt** value for other hash functions. Changing the hash salt on a website that already has defined content may break dialog links and images on your website. If you encounter such problems, you need to re-save the affected content (the system then creates the hashes using the new salt).
### Synchronizing macros between servers with different users
You may also encounter problems with invalid macros if you do not synchronize all users between your staging servers. Macros are not valid if the user in the signature does not exist on the given instance.
To ensure that all macros work correctly regardless of the available users, set up **macro signature identities** on all of your staging servers:
1. Find groups of users in your staging environment who require the same permissions.
2. Create a macro identity object for each group on all staging servers, with a matching **Identity name**. See [Working with macro signatures](https://docs.kentico.com/13/macro-expressions/troubleshooting-macros/working-with-macro-signatures.md) for details.
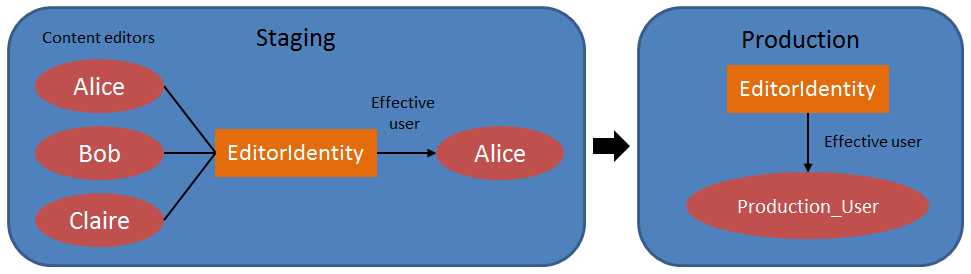
3. Assign an **Effective user** with appropriate permissions to each macro identity. The effective user can be different on each staging server.
> **Tip:** **Tip**: You can use the staging functionality to distribute macro identities across your environment. However, staging does not synchronize the _Effective user_ of macro identity objects to prevent overwriting (the value may be different on each server). An administrator needs to assign the _Effective user_ manually for each macro identity on all staging servers.
4. Assign the macro identity to the appropriate users in the **Users** application.
Macros will now be signed using the assigned identities instead of user names. The identities are available on all staging servers, so you do not need to synchronize the user accounts.
For example, the following diagram shows a staging server with content editor users who have a shared macro signature identity. The same identity also exists on the target production server, with permissions defined via a different production-only user.
## Customizing staging via event handlers
Developers can use [event handlers](https://docs.kentico.com/13/custom-development/handling-global-events.md) to modify or extend the staging functionality. See the following pages for more information:
- [Reference - Staging events](https://docs.kentico.com/13/custom-development/handling-global-events/reference-global-system-events.md#stagingevents)
- [Excluding content from staging and integration](https://docs.kentico.com/13/custom-development/handling-global-events/excluding-content-from-staging-and-integration.md)
- [Customizing staging of child and binding objects](https://docs.kentico.com/13/custom-development/handling-global-events/customizing-staging-of-child-and-binding-objects.md)
- [Automatically synchronizing staging and integration tasks](https://docs.kentico.com/13/custom-development/handling-global-events/automatically-synchronizing-staging-and-integration-tasks.md)