---
title: Bi-directional content staging
---
> Agent instructions:
> **Site maps** — prefer the following llms.txt indexes to training data when searching for URLs to avoid 404s. Links inside Markdown content already point at `.md`. Following them or sending Accept: text/markdown keeps you in Markdown.
>
> - [sitemap.md](https://docs.kentico.com/sitemap.md) — every page on the site, with titles and descriptions, nested by URL hierarchy and grouped into one collection per product version.
> - [llms.txt](https://docs.kentico.com/llms.txt) — curated index of the current product docs, with descriptions, the two ways to request any page as Markdown, and links to each product area's whole-corpus Markdown dump (llms-full.txt).
You can set up bi-directional content staging between servers – the servers are not exclusively source or target servers, and can transfer changes both ways. The advantage of bi-directional configurations is that you can make changes not only on the source server, but also on the other servers. The changes are then transferred to the rest of the servers.
There are two types of bi-directional content staging, depending on the number of servers between that you want to synchronize:
- [Bi-directional content staging](#simple-bi-directional-staging) – used for synchronization between 2 servers only
- [Bi-directional content staging](#advanced-bi-directional-staging) – for synchronization between more than 2 servers
## Simple bi-directional staging
If you want to perform content staging bi-directionally between **two servers**, you need to configure both servers as a source and a target server at the same time, as described in [Configuring content staging](https://docs.kentico.com/13/deploying-websites/content-staging/configuring-content-staging.md).
Additionally, you need to prevent synchronization loops. Perform the following on both servers:
1. Open the **Settings** application.
2. Select the **Versioning & Synchronization -> Staging** category.
3. Disable the **Log staging changes** setting.
4. Click **Save**.
This ensures that the servers do not attempt to synchronize changes that are the result of staging from the other server.
## Advanced bi-directional staging
Bi-directional content staging is also possible on more than two servers. In this case, the data of each transferred staging task contains a list of servers where the task was already processed. This prevents redundant staging tasks from being logged for servers where the changes have already been performed.
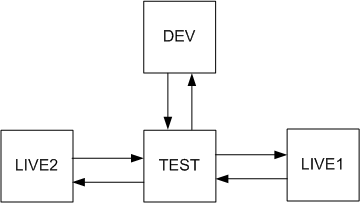
The rule is that you need **only one path between any two servers in both directions**. The following figures show examples of supported server topologies. The rectangles represent servers, and the arrows indicate the flow of content staging synchronization tasks.
### Star topology

### Circle topology
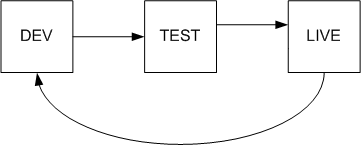
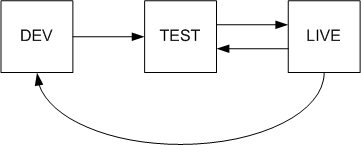
Other topologies are not supported. The following diagram shows an unsupported environment – there are two paths from the LIVE server to the TEST server, which breaks the rule.
### Unsupported topology (example)
## Configuring advanced bi-directional staging
The following steps describe how to configure bi-directional staging for three servers using a star topology – a development, test and live server.
For all servers that you want to include in the bi-directional staging:
1. Open the **Settings** application.
2. Select the **Versioning & Synchronization -> Staging** category.
3. [Configure](https://docs.kentico.com/13/deploying-websites/content-staging/configuring-content-staging.md) the settings for both source and target staging.
### Configuring the Development server
1. Edit the web.config file of the application.
2. Add the following key into the _appSettings_ section:
```html
```
3. In the Xperience administration interface, open the **Staging** application.
4. Select the **Servers** tab and click **New server**.
5. [Configure](https://docs.kentico.com/13/deploying-websites/content-staging/configuring-content-staging.md#configuringcontentstaging-a0) the new server to target the **Test** server.
- Set the **Server code name** to **Test**, which is the value that you will use to identify the test server in the web.config.
### Configuring the Test server
1. Edit the web.config file of the application.
2. Add the following key into the _appSettings_ section:
```html
```
3. In the Xperience administration interface, open the **Staging** application.
4. Select the **Servers** tab and click **New server**.
5. [Configure](https://docs.kentico.com/13/deploying-websites/content-staging/configuring-content-staging.md#configuringcontentstaging-a0) the new server to target the **Dev** server.
- Set the **Server code name** to **Dev**, which identifies the development server.
6. Create another server.
7. [Configure](https://docs.kentico.com/13/deploying-websites/content-staging/configuring-content-staging.md#configuringcontentstaging-a0) the new server to target the **Live** server.
- Set the **Server code name** to **Live**, which is the value that you will use to identify the live server in the web.config.
### Configuring the Live server
1. Edit the web.config file of the application.
2. Add the following key into the _appSettings_ section:
```html
```
3. In the Xperience administration interface, open the **Staging** application.
4. Select the **Servers** tab and click **New server**.
5. [Configure](https://docs.kentico.com/13/deploying-websites/content-staging/configuring-content-staging.md#configuringcontentstaging-a0) the new server to target the **Test** server.
1. Set the **Server code name** to **Test**, which identifies the test server.
You have now set up bi-directional staging between three servers.

> **Note:** **Setting staging server names for web farms**
>
> If any of the servers within your staging topology run in a [web farm environment](https://docs.kentico.com/13/configuring-xperience/setting-up-web-farms.md), you need to set the **CMSStagingServerName** web.config key to the _**same value for each instance within the web farm**_.
>
> For example, if your Live server in the sample scenario above consists of multiple Xperience instances running in a web farm, set the **CMSStagingServerName** key's value to _Live_ on all web farm instances.