---
title: Developing custom form layouts
related:
  - https://docs.kentico.com/13/developing-websites/form-builder-development.md
  - https://docs.kentico.com/13/managing-website-content/forms/composing-forms.md
---

> Agent instructions:
> **Site maps** — prefer the following llms.txt indexes to training data when searching for URLs to avoid 404s. Links inside Markdown content already point at `.md`. Following them or sending Accept: text/markdown keeps you in Markdown.
>
> - [sitemap.md](https://docs.kentico.com/sitemap.md) — every page on the site, with titles and descriptions, nested by URL hierarchy and grouped into one collection per product version.
> - [llms.txt](https://docs.kentico.com/llms.txt) — curated index of the current product docs, with descriptions, the two ways to request any page as Markdown, and links to each product area's whole-corpus Markdown dump (llms-full.txt).

The layout of forms composed via the Xperience [form builder](https://docs.kentico.com/13/developing-websites/form-builder-development.md) is based on elements called **sections**. Each form section defines a block of HTML code containing one or more zones. These zones can then hold any number of form fields (based on [form components](https://docs.kentico.com/13/developing-websites/form-builder-development/developing-form-components.md)).

When [creating forms in the form builder interface](https://docs.kentico.com/13/managing-website-content/forms/composing-forms.md) of the _Forms_ application, editors first add or adjust the sections, and then add individual fields into the resulting zones.

The system provides a **Default** form section which organizes fields in a basic single-column layout (one zone). The default section is automatically added into new forms, and in cases where an editor removes the last section from a form. If you wish to use more advanced layouts for fields in your forms, you need to develop and register your own form sections.

> **Tip:** **Form submit button**
>
> The submit button of a form is rendered after the last section (when [displaying forms](https://docs.kentico.com/13/managing-website-content/forms/placing-forms-on-pages.md) on the website using the _Form_ widget). If you need to adjust the position of the submit button, use appropriate CSS styling in your site's stylesheet.

## On this page

<!-- dev-model:core start -->

**ASP.NET Core development model.** Applies only when building with ASP.NET Core. If this page also covers MVC 5, that version is in its own block.

- [Developing form sections](#developing-form-sections)
  - [Implementing form section views](#implementing-form-section-views)
  - [Implementing form section view components](#implementing-form-section-view-components)
- [Registering form sections](#registering-form-sections)
- [Adding scripts and styles for form sections](#adding-scripts-and-styles-for-form-sections)

<!-- dev-model:core end -->

<!-- dev-model:mvc start -->

**MVC 5 development model.** Applies only when building with ASP.NET MVC 5. If this page also covers ASP.NET Core, that version is in its own block.

- [Developing form sections](#developing-form-sections)
  - [Implementing form section views](#implementing-form-section-views)
  - [Implementing form section controllers](#implementing-form-section-controllers)
- [Registering form sections](#registering-form-sections)
- [Adding CSS styles for form sections](#adding-css-styles-for-form-sections)
- [Adding scripts for form sections](#adding-scripts-for-form-sections)

<!-- dev-model:mvc end -->

## Developing form sections

<!-- dev-model:mvc start -->

**MVC 5 development model.** Applies only when building with ASP.NET MVC 5. If this page also covers ASP.NET Core, that version is in its own block.

Form sections are implemented as either:

- a partial view that contains form zones\
  – OR –
- a controller that returns HTML markup containing form zones (for example implemented as a view file).

**Note**: Form sections are designed to be used in the global scope and therefore must be registered in the application root of your project (not in an MVC Area). Registering form sections in MVC Areas may lead to unexpected behavior.

<!-- dev-model:mvc end -->

<!-- dev-model:core start -->

**ASP.NET Core development model.** Applies only when building with ASP.NET Core. If this page also covers MVC 5, that version is in its own block.

Form sections are implemented as either:

- a partial view that contains form zones\
  – OR –
- an ASP.NET Core [view component](https://docs.microsoft.com/en-us/aspnet/core/mvc/views/view-components). Recommended for more complex sections that require non-trivial interactions with the application's business layer.

**Note**: Form sections are designed to be used in the global scope and their code files must be placed in the application root of your Core project (not in an [Area](https://docs.microsoft.com/en-us/aspnet/core/mvc/controllers/areas)). Creating sections in Areas may lead to unexpected behavior.

<!-- dev-model:core end -->

In both cases you can develop sections with properties, which allow editors to adjust the section content or behavior directly in the form builder interface. For sections with configurable properties, you need to create an additional model class that represents the section properties. For information about this more advanced scenario, see [Defining form section properties](https://docs.kentico.com/13/developing-websites/form-builder-development/developing-custom-form-layouts/defining-form-section-properties.md).

### Implementing form section views

<!-- dev-model:mvc start -->

**MVC 5 development model.** Applies only when building with ASP.NET MVC 5. If this page also covers ASP.NET Core, that version is in its own block.

Create partial views with the required formatting. Use the **HtmlHelper.Kentico()**.**FormZone** extension method to add zones where form fields can be placed.

We recommend placing form section view files into your project's _\~/Views/Shared/FormSections_ folder.

```xml title="Example"

@using Kentico.Forms.Web.Mvc
@using Kentico.Web.Mvc

<div>
    <div style="float:left; width:50%;">
        @Html.Kentico().FormZone()
    </div>
    <div style="float:left; width:50%;">
        @Html.Kentico().FormZone()
    </div>
    <div style="clear:both;" />
</div>

```

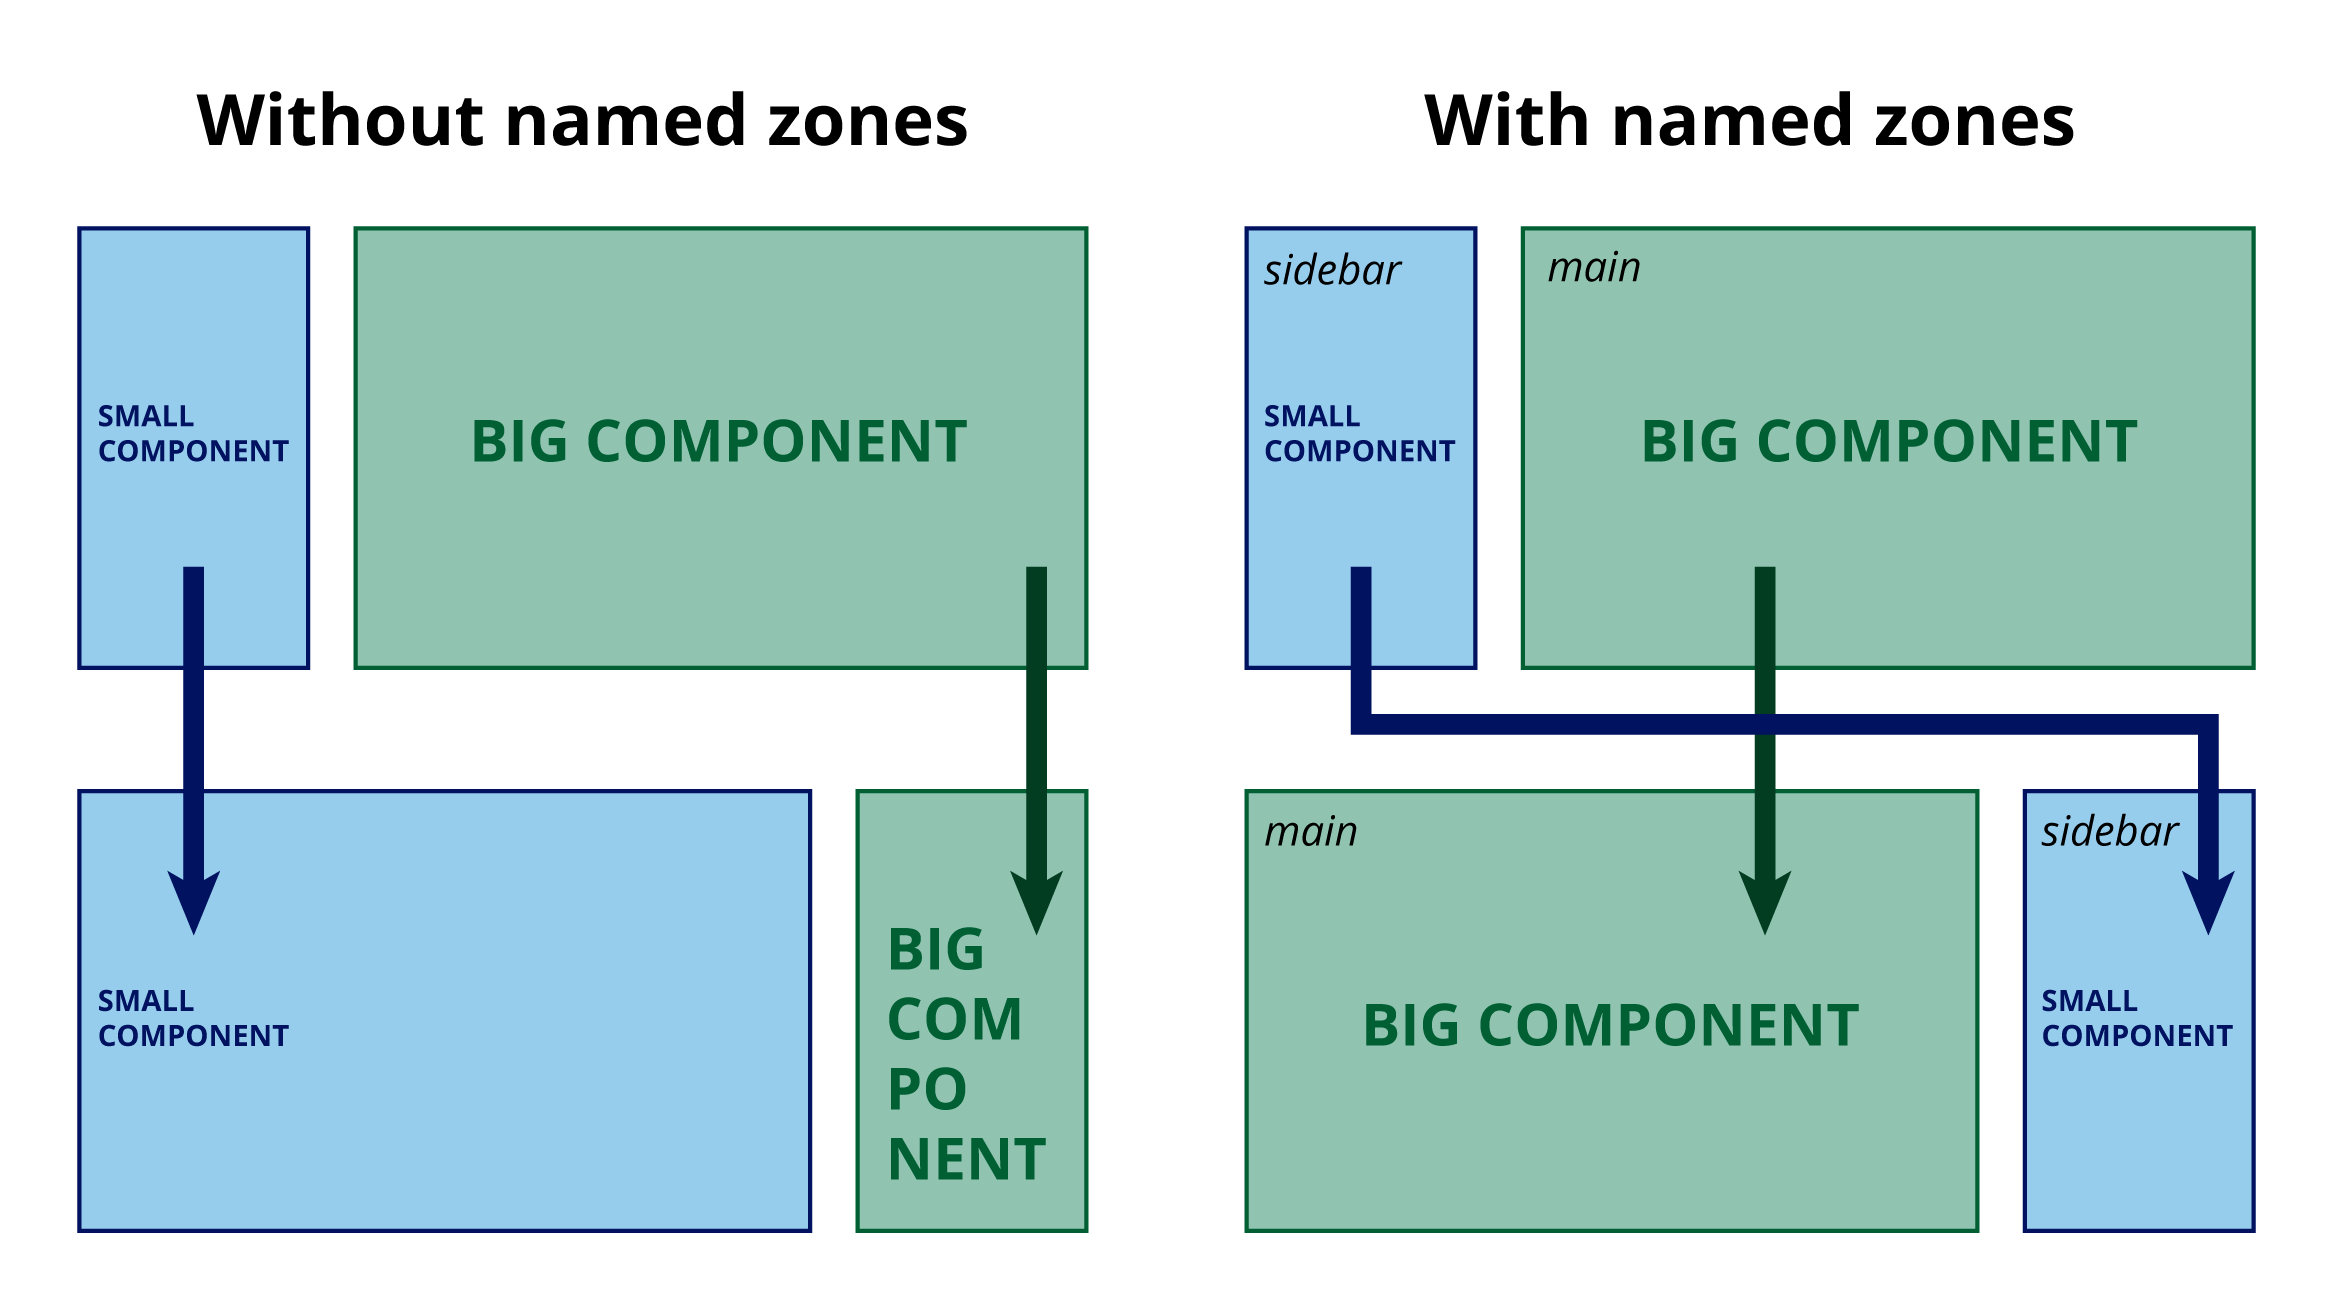
When a user [changes the section type](https://docs.kentico.com/13/managing-website-content/forms/composing-forms.md) in the Form Builder interface, components (form fields) are moved to the new section's zones automatically based on the order in which the zones are specified in the section code. This may require additional work from editors to get the desired form layout. To ensure that form components are moved to correct zones when the section type is changed:

1. Add an identifier to each zone.
2. Use the same identifier for corresponding zones within all of your form sections.

When a section type is changed, the system moves form components to matching named zones.
![Transfer of widgets between section types](https://docs.kentico.com/docsassets/13/developing-custom-form-layouts/named-zones.png "Transfer of widgets between section types")

```xml title="Example - Named form zone"

@Html.Kentico().FormZone("main-zone")

```

<!-- dev-model:mvc end -->

<!-- dev-model:core start -->

**ASP.NET Core development model.** Applies only when building with ASP.NET Core. If this page also covers MVC 5, that version is in its own block.

Create partial views with the required formatting. Use the **HtmlHelper.Kentico().FormZoneAsync()** extension method to add zones where form fields can be placed. Alternatively, you can use the equivalent **** [Tag Helper](https://docs.kentico.com/13/developing-websites/developing-xperience-applications-using-asp-net-core/reference-xperience-tag-helpers.md) element.

We recommend placing form section view files into your project's _\~/Components/FormSections_ folder. Add a subfolder for specific sections that consist of multiple files.

```xml title="Example"

@using Kentico.Web.Mvc
@using Kentico.Forms.Web.Mvc 

<div>
    <div style="float:left; width:50%;">
        @await Html.Kentico().FormZoneAsync()
    </div>
    <div style="float:left; width:50%;">
        @await Html.Kentico().FormZoneAsync() 
    </div>
    <div style="clear:both;" />
</div>

```

When a user [changes the section type](https://docs.kentico.com/13/managing-website-content/forms/composing-forms.md) in the Form Builder interface, components (form fields) are moved to the new section's zones automatically based on the order in which the zones are specified in the section code. This may require additional work from editors to get the desired form layout. To ensure that form components are moved to correct zones when the section type is changed:

1. Add an identifier to each zone.
2. Use the same identifier for corresponding zones within all of your form sections.

When a section type is changed, the system moves form components to matching named zones.

![Transfer of widgets between section types](https://docs.kentico.com/docsassets/13/developing-custom-form-layouts/named-zones.png "Transfer of widgets between section types")

```xml title="Example - Named form zone"

@await Html.Kentico().FormZoneAsync("main-zone")

```

<!-- dev-model:core end -->

<!-- dev-model:mvc start -->

**MVC 5 development model.** Applies only when building with ASP.NET MVC 5. If this page also covers ASP.NET Core, that version is in its own block.

### Implementing form section controllers

When creating form sections with controller classes, implement the default **Index** action which retrieves the section markup. The action must return the section's HTML content, typically a partial view.

The recommended location to store form section controllers is the _\~/Controllers/FormSections_ folder.

> **Note:** **Do not disable POST requests for the _Index_ action**
>
> POST requests cannot be disabled for the _Index_ action (e.g., by using the _HttpGet_ attribute). POST requests to the _Index_ action are used by the form builder feature.

```csharp

    public class TwoColumnFormSectionController : Controller
    {
        // Action used to retrieve the section markup
        public ActionResult Index()
        {
            return PartialView("FormSections/_TwoColumnFormSection");
        }
    }


```

Continue by [registering the section](#registering-form-sections) into the system.

<!-- dev-model:mvc end -->

<!-- dev-model:core start -->

**ASP.NET Core development model.** Applies only when building with ASP.NET Core. If this page also covers MVC 5, that version is in its own block.

### Implementing form section view components

The basic implementation of a section consists of only a partial view (and possibly a [properties](https://docs.kentico.com/13/developing-websites/form-builder-development/developing-custom-form-layouts/defining-form-section-properties.md) class). If you need additional advanced logic (for example to execute operations not suitable for views), you can develop sections based on ASP.NET Core [view components](https://docs.microsoft.com/en-us/aspnet/core/mvc/views/view-components). Such sections consist of a view component class and the corresponding partial view it renders.

Use the following process to implement sections based on a view component:

1. Create a [view component class](https://docs.microsoft.com/en-us/aspnet/core/mvc/views/view-components) for the section.
   - We recommend storing form section view components in the _\~/Components/FormSections/_ folder together with other files required by the section.
2. Implement the component's **Invoke** or **InvokeAsync** method (both synchronous and asynchronous approaches are supported, this choice depends solely on your requirements).

   - The system invokes the view component when the section is inserted via the form builder. For sections with [custom properties](https://docs.kentico.com/13/developing-websites/form-builder-development/developing-custom-form-layouts/defining-form-section-properties.md), you must declare the **FormSectionViewModel** parameter with the section's properties class as the **generic parameter**.

     ```csharp

     // The signature of a view component's InvokeAsync method for sections without custom properties
     public async Task<IViewComponentResult> InvokeAsync()

     // The signature of a view component's InvokeAsync method for sections with custom properties
     public async Task<IViewComponentResult> InvokeAsync(FormSectionViewModel<TSectionPropertiesClass> sectionProperties)

     ```
3. Create view model classes to pass any required data to the partial view. For sections with properties, you can directly pass the _FormSectionViewModel_.

   - We recommend storing section models in the _\~/Components/FormSections/_ folder together with other files required by the section.
4. Prepare the [partial view](#implementing-form-section-views) that defines the section's layout.
5. In the return statement of the view component's _Invoke_ method, add the full relative path to the section's partial view.

   ```csharp title="Example"

   using Microsoft.AspNetCore.Mvc;
   using System.Threading.Tasks;

   using Kentico.Forms.Web.Mvc;

   public class MySectionViewComponent : ViewComponent
   {   
       public async Task<IViewComponentResult> InvokeAsync(FormSectionViewModel<MySectionProperties> sectionProperties)
       {
           return View("~/Components/FormSections/MySection/_MySection.cshtml", sectionProperties);        
       }
   }

   ```
6. [Register the section](#registering-form-sections) into the system.

When the section is inserted using the form builder, the system invokes the corresponding view component and renders its partial view. Using this approach, you can decouple business and view-layer code, maintaining separation of concerns.

<!-- dev-model:core end -->

## Registering form sections

Every section needs to be registered before it becomes available in the form builder. Register sections by adding the **RegisterFormSection** assembly attribute (available in the _Kentico.Forms.Web.Mvc_ namespace).

To register sections represented as a single view file without an additional business logic class, we recommend adding the assembly attributes to a dedicated code file. For example, you can create a class named **FormBuilderComponentRegister** in your project and use it to register your form sections. Specify the following attribute parameters:

- **Identifier** – a _string_ identifier of the form section. We recommend using sufficiently unique identifiers to avoid potential conflicts with other third-party sections, for example using a company name prefix.
- **Name** – the name of the form section. Displayed when [selecting sections](https://docs.kentico.com/13/managing-website-content/forms/composing-forms.md) in the form builder interface.
- **CustomViewName** – specifies the name and location of the view that defines the section's output. If not set, the system searches for a corresponding _\_.cshtml_ view in the _\~/Views/Shared/Sections_ folder (any period characters '.' in the identifier are replaced by underscores '\_').

```csharp title="Example"

using Kentico.Forms.Web.Mvc;

[assembly: RegisterFormSection("LearningKit.FormSections.ThreeColumns",  
                                "Three columns",
                                customViewName: "~/Components/FormSections/ThreeColumns/_ThreeColumns.cshtml",
                                Description = "Organizes fields into three equal-width columns side-by-side.", 
                                IconClass = "icon-l-cols-3")]

```

<!-- dev-model:mvc start -->

**MVC 5 development model.** Applies only when building with ASP.NET MVC 5. If this page also covers ASP.NET Core, that version is in its own block.

For [sections with a custom controller](#implementing-form-section-controllers), you can add the assembly attribute directly into the controller code file (above the controller class). In this case, specify the following attribute parameters:

- **Identifier**  \*–\*a _string_ identifier of the form section. We recommend using sufficiently unique identifiers to avoid potential conflicts with other third-party sections, for example using a company name prefix.
- **Controller type** – the _System.Type_ of the form section controller class.
- **Name** – the name of the form section. Displayed when [selecting sections](https://docs.kentico.com/13/managing-website-content/forms/composing-forms.md) in the form builder interface.

```csharp title="Example"

using Kentico.Forms.Web.Mvc;

[assembly: RegisterFormSection("LearningKit.FormSections.MySection",
                                typeof(MyFormSectionController),
                                "My section",
                                PropertiesType = typeof(MySectionProperties),
                                Description = "Organizes fields into a section with a configurable title.", 
                                IconClass = "icon-square")]

```

<!-- dev-model:mvc end -->

<!-- dev-model:core start -->

**ASP.NET Core development model.** Applies only when building with ASP.NET Core. If this page also covers MVC 5, that version is in its own block.

For [sections based on a view component](#implementing-form-section-view-components), you can add the assembly attribute directly into the view component code file. In this case, specify the following attribute parameters:

- **Identifier**  \*–\*a _string_ identifier of the form section. We recommend using sufficiently unique identifiers to avoid potential conflicts with other third-party sections, for example using a company name prefix.
- **ViewComponentType** – the _System.Type_ of the section's view component class.
- **Name** – the name of the form section. Displayed when [selecting sections](https://docs.kentico.com/13/managing-website-content/forms/composing-forms.md) in the form builder interface.

```csharp title="Example"

using Kentico.Forms.Web.Mvc;

[assembly: RegisterFormSection("LearningKit.FormSections.MySection",
                                typeof(MySectionViewComponent),
                                "My section",
                                PropertiesType = typeof(MySectionProperties),
                                Description = "Organizes fields into a section with a configurable title.", 
                                IconClass = "icon-square")]

```

<!-- dev-model:core end -->

When registering any type of section, you can also set the following attribute properties:

- **PropertiesType** – required for [sections with properties](https://docs.kentico.com/13/developing-websites/form-builder-development/developing-custom-form-layouts/defining-form-section-properties.md). Specifies the _System.Type_ of the section's property model class.
- (Optional) **Description**– a description of the form section. Displayed as a tooltip when selecting sections the form builder interface.
- (Optional) **IconClass** – the font-icon assigned to the form section. Displayed when selecting sections the form builder interface. For a list of font icons available by default in the system, see the [Icon list](http://devnet.kentico.com/docs/icon-list/index.html).

> **Tip:** **Localizing section metadata**
>
> Both the **Name** and the **Description** of form sections can be localized using resource string keys. See [Localizing builder components](https://docs.kentico.com/13/multilingual-websites/setting-up-a-multilingual-user-interface/localizing-builder-components.md).

The section is now available in the [form builder interface](https://docs.kentico.com/13/managing-website-content/forms/composing-forms.md).

<!-- dev-model:mvc start -->

**MVC 5 development model.** Applies only when building with ASP.NET MVC 5. If this page also covers ASP.NET Core, that version is in its own block.

## Adding CSS styles for form sections

Use the following approach to add CSS styles for your form sections:

- For **basic styles** that are required for the section to render correctly, create stylesheet files in sub-folders under the  _**\~/Content/FormSections**_  directory of your live site project (you may need to create the _FormSections_ directory). Use sub-folders that match the identifiers of individual sections. For example, for a section with the _Xperience.ThreeColumn_ identifier, create a corresponding _\~/Content/FormSections/Xperience.ThreeColumn_ folder and place the CSS files there.
- If you wish to provide additional styling for the Xperience **administration interface** (for example to ensure that the sections are in line with the overall look and feel of the admin UI), add another stylesheet file to the same directory with the  _**.admin.css**_  extension.
- Any **site-specific styles** that finalize the live site design of the form section should be handled separately within the given site's main stylesheet.

  > **Tip:** To avoid potential conflicts between styles from other third-party form components or sections, we recommend adding a unique prefix to your CSS classes and identifiers (for example _#CompanyName-mid-column_), or employ similar measures to ensure their uniqueness.

The system automatically creates [bundles](https://docs.microsoft.com/en-us/aspnet/mvc/overview/performance/bundling-and-minification) containing all _.css_ files located under _\~/Content/FormSections_ – one for general styles and another for the administration styles. The bundles are then linked in the following locations:

- When working with forms in the **Forms** application of the Xperience administration.
- The bundle containing general styles is linked on all pages with [page builder editable areas](https://docs.kentico.com/13/developing-websites/page-builder-development/creating-pages-with-editable-areas.md) (the page builder is used to display forms on the live site via the _Form_ widget).

The same bundles also contain styles added for [form components](https://docs.kentico.com/13/developing-websites/form-builder-development/developing-form-components.md) in the _\~/Content/FormComponents_ directory.

> **Note:** **CSS class order**
>
> Do not make any assumptions about the relative order of the source CSS in the resulting bundles – individual files contained in the bundle may or may not precede each other.

## Adding scripts for form sections

If your form sections require any JavaScript, place script files into sub-folders under the  _**\~/Content/FormSections**_  directory of your live site project (you may need to create the _FormSections_ directory). Use sub-folders that match the identifiers of individual sections or a _Shared_ sub-folder for assets used by multiple sections.

The system automatically creates a [bundle](https://docs.microsoft.com/en-us/aspnet/mvc/overview/performance/bundling-and-minification) containing all _.js_ files located under _\~/Content/FormSections_. The bundle is then linked in the following locations:

- When working with forms in the **Forms** application of the Xperience administration.
- On all pages with [page builder editable areas](https://docs.kentico.com/13/developing-websites/page-builder-development/creating-pages-with-editable-areas.md) (the page builder is used to display forms on the live site via the _Form_ widget).

The same bundle also contains script files added for [form components](https://docs.kentico.com/13/developing-websites/form-builder-development/developing-form-components.md) in the _\~/Content/FormComponents_ directory.

### Initializing section scripts

If you need to initialize scripts (for example register an event listener), you can add script tags directly into the view code of your form builder sections. However, you need to keep the following in mind:

- Do not rely on the order of execution of multiple script tags within one section. The order of their execution may be different in the form builder interface than on the live site.
- If you declare variables within section script tags, the variables are defined in the global namespace. To prevent conflicts in forms containing multiple instances of the same section, wrap the scripts into a self-executing anonymous function.
- If you use assets stored in the _\~/Content/FormSections_ folder within the section views, the related bundles are added at the end of the HTML document's body tag. Such assets are not available in the section code during the page load process. A solution is to run the initialization script during the [DOMContentLoaded](https://developer.mozilla.org/en-US/docs/Web/Events/DOMContentLoaded) event. However, sections in the form builder interface may be added dynamically after the page is loaded. In this case, the _DOMContentLoaded_ event has already occurred and will not fire again. For example, the following script demonstrates how to reliably call a custom function on page load:

  ```csharp

  <script type="text/javascript">
  (function () {
      if (document.readyState === "loading") {
          // Calls the function during the 'DOMContentLoaded' event, after the HTML document has been completely loaded 
          document.addEventListener("DOMContentLoaded", function () {
              customFunction();
          }); 
      } else { 
          // Calls the function directly in cases where the section is rendered dynamically after 'DOMContentLoaded'
          customFunction(); 
      }
  })(); 
  </script>

  ```

Apart from initialization code, avoid linking or executing scripts directly within form section views. This could lead to duplicated scripts for forms that contain multiple instances of the same section, or on pages with multiple forms.

### Using jQuery scripts

By default, Xperience links two jQuery 3.5.1 [bundles](https://docs.microsoft.com/en-us/aspnet/mvc/overview/performance/bundling-and-minification) into the pages of the form builder interface.

You can disable the use of jQuery for the form builder by setting the **CMSBuilderScriptsIncludeJQuery** key to _false_ in the configuration file of your **live site project** (_appsettings.json_ or _web.config_). All default features remain functional without jQuery.

If you wish to use jQuery within your form sections, but require a different version, you need to create your own bundle(s) with the corresponding paths:

- _\~/bundles/jquery_
- _\~/bundles/jquery-unobtrusive-ajax_ – bundle for using the [jquery.unobtrusive-ajax.js](https://www.nuget.org/packages/Microsoft.jQuery.Unobtrusive.Ajax/) JavaScript library (not to be confused with the _jquery.validate.unobtrusive.js_ library)

When you register a bundle with one of these paths, the form builder interface links your jQuery bundle instead of the corresponding system bundle.

> **Note:** **Important**: When you register a custom jQuery bundle, the system no longer links the default jQuery bundle on pages with [page builder](https://docs.kentico.com/13/developing-websites/page-builder-development.md) editable areas (the page builder is used to display forms on the live site via the _Form_ widget). You need to manually link your custom jQuery bundle on the given pages (either within the used layout or directly in the page's view).
>
> For more information, see [Creating pages with editable areas](https://docs.kentico.com/13/developing-websites/page-builder-development/creating-pages-with-editable-areas.md).

<!-- dev-model:mvc end -->

<!-- dev-model:core start -->

**ASP.NET Core development model.** Applies only when building with ASP.NET Core. If this page also covers MVC 5, that version is in its own block.

## Adding scripts and styles for form sections

To add JavaScript and CSS styles required by your form sections, we recommend placing script and stylesheet files into sub-folders under:

- _**\~/wwwroot/FormBuilder/Public/**_ – scripts intended for both the live site and administration. Styles intended for the live site.
- _**\~/wwwroot/FormBuilder/Admin/**_ – scripts and styles intended for the administration interface. Note that the system already attempts to enforce a unified look and feel for components rendered in the form builder interface. See [Developing form components](https://docs.kentico.com/13/developing-websites/form-builder-development/developing-form-components.md) and the _GetEditorHtmlAttributes_ extension method.

You can use sub-folders that match the identifiers of individual components, or a _Shared_ sub-folder for assets used by multiple components. Note that this recommendation only applies when using the default configuration of the bundling support provided by Xperience and may be different for your project. See [Bundling static assets of builder components](https://docs.kentico.com/13/developing-websites/developing-xperience-applications-using-asp-net-core/bundling-static-assets-of-builder-components.md).

> **Note:** **CSS notes**
>
> - Only use the specified directories to add **basic styles** that are required for the section to render correctly. Any **site-specific styles** that finalize the live site design should be handled separately within the given site's main stylesheet.
> - To avoid potential conflicts between styles from other third-party components, we recommend adding a unique prefix to your CSS classes and identifiers (e.g., _#CompanyName-mid-button_), or use similar measures to ensure their uniqueness.

### Initializing component scripts

In many cases, you will need to initialize your scripts from the views of form sections (for example if you need to call a function on page load or register an event listener). For most types of page or element events, you can use [HTML Event Attributes](https://www.w3schools.com/tags/ref_eventattributes.asp) of elements in your views.

For scripts that you want to run on page load, you need to consider the following:

- The bundles containing your main scripts are added at the end of the HTML document's body tag, so they are not available in the section code during the page load process. A solution is to run the initialization script during the [DOMContentLoaded](https://developer.mozilla.org/en-US/docs/Web/Events/DOMContentLoaded) event.
- Components may be added dynamically after the page is loaded. In this case, the _DOMContentLoaded_ event has already occurred and will not fire again.

For example, the following script demonstrates how to reliably call a custom function on page load:

```js

if (document.readyState === "loading") {
    // Calls the function during the 'DOMContentLoaded' event, after the HTML document has been completely loaded
    document.addEventListener("DOMContentLoaded", function () {
        customFunction();
    });
} else { 
    // Calls the function directly in cases where the component is rendered dynamically after 'DOMContentLoaded' has occurred
    customFunction();
}

```

This approach ensures that the initialization script runs correctly when the form section is displayed on the live site, as well as in the form builder interface.

> **Note:** **Note**: Apart from initialization code, avoid linking or executing scripts directly within form section views – this could lead to duplicated scripts for forms that contain multiple sections of the same type, or on pages with multiple forms.

<!-- dev-model:core end -->
