---
title: Creating machine translation services
---
> Agent instructions:
> **Site maps** — prefer the following llms.txt indexes to training data when searching for URLs to avoid 404s. Links inside Markdown content already point at `.md`. Following them or sending Accept: text/markdown keeps you in Markdown.
>
> - [sitemap.md](https://docs.kentico.com/sitemap.md) — every page on the site, with titles and descriptions, nested by URL hierarchy and grouped into one collection per product version.
> - [llms.txt](https://docs.kentico.com/llms.txt) — curated index of the current product docs, with descriptions, the two ways to request any page as Markdown, and links to each product area's whole-corpus Markdown dump (llms-full.txt).
> **Info:** **Enterprise license required**
>
> Features described on this page require the **Kentico Xperience Enterprise** license.
To develop a custom machine translation service, you need to define a class that inherits from **AbstractMachineTranslationService** (found in the **CMS.TranslationServices** namespace).
The service class must override and implement the following abstract methods:
| Method | Description |
| ----------- | --------------------------------------------------------------------------------------------------------------------------------------------------------------------------------------------------------------------------------------------------------------------------------------------------------------------------------------------------------------------------------------------------------------------------------------------------- |
| Translate | The main translation method which calls the appropriate web service (Google Translator, Microsoft Translator etc.) or otherwise translates the specified text from the source language into a target language.
When a user submits a translation to the service, the system calls the **Translate** method for every translation unit (__ element) in the XLIFF source data. The method's _text_ parameter contains the source text of the unit. |
| Detect | You can use this method to call the logic of the translation service to automatically determine the language of the source text.
Xperience does not use the _Detect_ method by default, but you can implement it if you need language detection functionality in your custom API. |
| Speak | Converts text to a stream of sound using the given service's text-to-speech engine.
Xperience does not use the _Speak_ method by default, but you can implement it if you need text-to-speech functionality in your custom API. If your service does not support such an option, throw a not implemented exception. |
| IsAvailable | Checks whether the service is appropriately configured and ready to be used. For example, you can confirm that the target service is currently online, or load any credentials and API keys required by the service from the website settings and confirm their validity.
The system only offers the service when translating pages and resource strings if the _IsAvailable_ method returns a _true_ value. |
## Defining machine service classes
The following example demonstrates how to write a class providing functionality for a machine translation service. The sample class does not use a real translation service, it only converts the source text to upper case. When creating your own classes, replace the code of the methods with your own translation logic or call the API of the appropriate web service.
1. Open your Xperience administration solution in Visual Studio.
2. Create a new _Class Library_ project in the solution (or reuse an existing custom project).
- The project in the example is named _Custom_, but you can use any other name (e.g. with a unique company prefix).
3. Add references to the required Xperience libraries (DLLs) for the new project:
1. Right-click the project and select **Add -> Reference**.
2. Select the **Browse** tab of the **Reference manager** dialog, click **Browse** and navigate to the _**Lib**_ folder of your administration project.
3. Add references to the following libraries (and any others that you may need in your custom code):
- **CMS.Base.dll**
- **CMS.Core.dll**
- **CMS.DataEngine.dll**
- **CMS.TranslationServices.dll**
4. Reference the custom project from the administration project _(CMSApp)_.
5. Create a new class under your custom project. For example, name the class **SampleMachineTS.cs**.
6. Edit the class and change its code to the following:
```csharp
using System;
using System.IO;
using CMS.TranslationServices;
namespace Custom
{
public class SampleMachineTS : AbstractMachineTranslationService
{
///
/// Translates the specified text from the source language to the target language.
/// Must return the translated text as a string.
///
/// Text to translate
/// Source language culture code
/// Target language culture code
public override string Translate(string text, string sourceLang, string targetLang)
{
// "Translates" the text to upper case.
return text.ToUpper();
}
///
/// Automatically attempts to detect the language of the source text.
/// Returns the culture code of the detected language.
///
/// Text to be processed
public override string Detect(string text)
{
// Use your service to detect the language. This example always returns English.
return "en-US";
}
///
/// Returns a stream of sound generated by text-to-speech services (if supported).
///
/// Text to be processed
/// Culture code of the text's language
public override Stream Speak(string text, string lang)
{
// This service provider does not support Text-to-speech.
throw new NotImplementedException();
}
///
/// Checks the necessary prerequisities needed for the service to work,
/// e.g. availability of credentials for connecting to the service etc.
///
public override bool IsAvailable()
{
// This service provider does not require any settings and does not depend on
// any other services, therefore is always available.
return true;
}
}
}
```
The system calls the methods of the class as needed when the given translation service is used.
7. Save all changes and Rebuild your solution.
## Registering machine services in the system
Once you have implemented the class with the required functionality, you need to register the translation service:
1. Sign in to the administration interface.
2. Open the **Translation services** application.
3. Click **New translation service**.
4. Enter the following values into the service's [properties](https://docs.kentico.com/13/multilingual-websites/developing-custom-translation-services/reference-translation-service-properties.md):
- **Display name**: Sample machine service
- **Code name**: Leave the _(automatic)_ option. The system generates the code name as _SampleMachineService_ (based on the display name).
- **Service provider - Assembly name**: Custom _(the name of the assembly containing your translation service class)_
- **Service provider - Class**: Custom.SampleMachineTS
- **Is machine translation service**: Yes (selected)
- **Service is enabled**: Yes (selected)
5. Click **Save**.
The service is now ready to be used.
## Result
When submitting pages for translation, users can select the **Sample machine service** as one of the translation service options. Using this option creates the new language version of the page as a copy of the original content, with all characters converted to upper case.
Users can also call the custom translation service when localizing [resource strings](https://docs.kentico.com/13/multilingual-websites/setting-up-a-multilingual-user-interface/working-with-resource-strings.md).
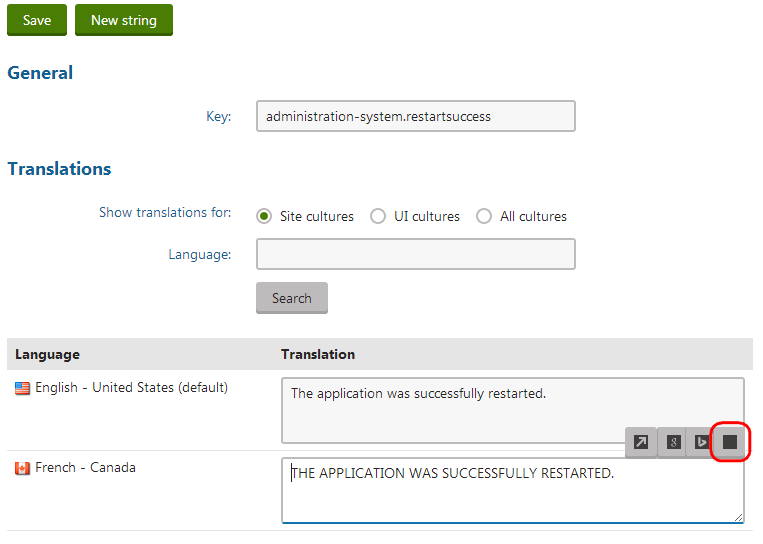
> **Info:** **Changing the translation service icon**
>
> The system uses font icons for the graphics representing machine translation services in the localization dialog. If you wish to change the icon of your custom machine service, [add a font icon](https://docs.kentico.com/13/custom-development/extending-the-administration-interface/working-with-font-icons.md) using a class name in the following format: _**icon-**_