Troubleshooting installation issues
If you encounter issues during or after the installation, the following topics may help you solve them:
Disk permission problems
Xperience performs most operations without writing to the disk. However, there are situations when the administration or live site application needs to access the disk, such as:
- Storing uploaded files in the file system
- Importing/exporting sites and other objects
- Updating local search indexes
If you receive an error message stating that the application cannot write to the disk, you need to:
- Identify the user account under which your application is running.
- Grant the Modify and Write permissions for the web project folder to the account.
For applications hosted in IIS, the user account is based on the used application pool. You can find the user account name in one of the following locations:
The encountered error/information message.
The Xperience administration interface, in the System application under ASP.NET account.
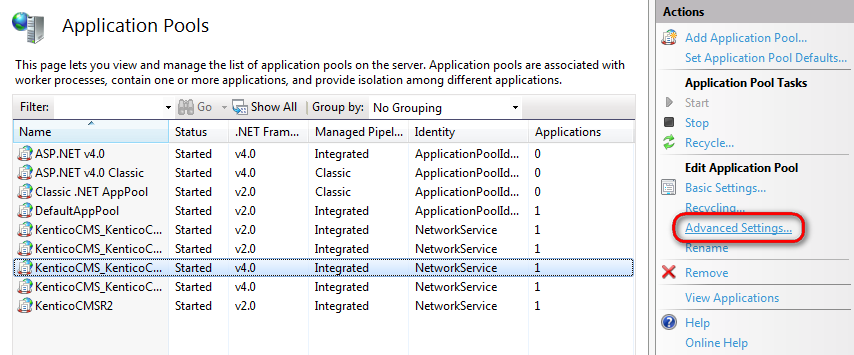
In IIS Manager, under the Application Pools section. Determine the user account according to the value in the Identity column:
Application pool identity
User account name
Local Service
Service
LocalSystem
System
NetworkService
Network Service
ApplicationPoolIdentity
IIS AppPool\<app pool name>
If you are using Visual Studio’s built-in web server, the application runs under your Windows user account.
See also: Set, View, Change, or Remove Permissions on Files and Folders (Microsoft documentation)
Database connection problems
If you encounter problems when connecting to the SQL server database during the installation or at a later point, make sure that:
- The target server has Microsoft SQL Server 2012, 2014, 2016, 2017, 2019, or 2022 installed and running.
- You are using the correct instance of the SQL server if the server has multiple instances. The instance name must be entered in format server\instance.
- The TCP/IP protocol is enabled on the SQL server. You can check using the SQL Server Configuration Manager utility, under SQL Server Network Configuration/SQL Native Client Configuration -> Client Protocols.
- Access to the database server is not blocked by a firewall (the default port number for the TCP/IP protocol is 1433).
If the connection fails with the “Login failed for user ‘username’.” error message, check the following troubleshooting sections, depending on the used authentication type.
SQL Server accounts
If you are using an SQL Server account with a password to authenticate against the database, make sure that:
- You are using a valid username and password.
- The login exists on the server, is enabled and has permissions to connect to the server (check the logins on your server using SQL Server Management Studio in the Server -> Security -> Logins section of the Object Explorer).
- Your server supports SQL Server authentication (check that the SQL Server and Windows Authentication mode option is enabled in the Server Properties -> Security dialog in SQL Server Management Studio).
Windows authentication mode
To resolve problems with database connections that utilize Windows authentication, you may need to contact your network administrator. The Xperience application runs under a specific local or domain account, depending on your environment (for example NetworkService).
When running the application on IIS, the account depends on the Identity of the assigned application pool. If your SQL server is located on a different machine than your web server, you may need to configure the application pool to run under a domain account rather than a local account.
The account must have its own login created on the SQL server, configured for Windows authentication and with the appropriate permissions. You can manage the logins using SQL Server Management Studio, in the Server -> Security -> Logins section of the Object Explorer.
Application stops after being idle
In the default IIS configuration, the application pool in which applications run stops the worker process after a 20-minute period of inactivity. This behavior causes the Xperience Event log to log warnings with the following message: HostingEnvironment initiated shutdown
This shutdown period is determined by the Idle time-out setting in the application pool’s advanced settings. To change or disable the time-out period:
Open IIS Manager and select Application Pools in the Connections tree.
Click the application pool in which your Xperience site runs and click Advanced Settings.

In the Process Model section, locate the Idle Time-out setting and change its value.
- To disable the time-out completely, enter 0 (zero).
- Alternatively, you can set the Start Mode property in the (General) section to AlwaysRunning (ensures that the application’s worker process does not shut down).
Click OK to save the settings.
If you set the Idle time-out setting to a non-zero value, IIS stops your application if the application does not receive any requests in the specified time period. If you set the value to zero or enable AlwaysRunning mode, the application will run without shutting down even if it is idle.