
Additional database installation
If you chose not to install the database during the installation process, you can install it later. To trigger the database installation, access the Xperience administration web project in a browser. The system redirects you to the database installation wizard.
Note: The database installation wizard only runs when you access the administration project in your browser (not the live site).
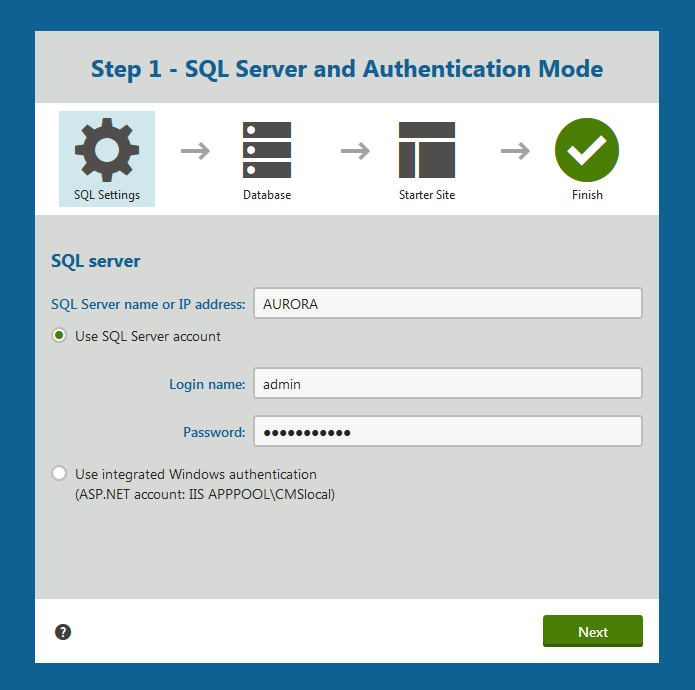
Step 1 - SQL Server and Authentication Mode
Specify the SQL Server and authentication mode used to access the server:
- SQL Server name or IP address – enter the name of the server. You will typically use one of these:
- the name of the server (such as DBSERVER1)
- the IP address of the server (such as 192.168.1.105)
- (local)<SERVERNAME>\sqlexpress (if you’re using Microsoft SQL Server Express Edition)
- Use SQL Server account – use this option if your server is configured for SQL Server Authentication with SQL logins.
- Use integrated Windows authentication (ASP.NET account) – use this option if your SQL Server is configured for Windows integrated authentication. In this case, you need to use SQL Server Management Studio to create a new login for user account under which you currently run the web application (for example, the NT AUTHORITY\NETWORK SERVICE for Windows – the actual ASP.NET account name is displayed on the screen).
Click Next.
Step 2 - Database Instance
Decide if you want to use an existing database or create a new database. In both cases, you need to enter the name of the database into the appropriate field.
In case you are using an existing database, you can choose if you want to Create Kentico Xperience database objects.
- If the existing database already contains Xperience objects (tables, stored procedures, views), then clear the check box.
- If the database does not contain these objects (typically when you are installing into an empty database), leave the check box enabled.
Database Collation
When using an existing database, you may also come across the Database Collation dialog. The dialog appears if the database collation is different than Latin1_General_CI_AS or SQL_Latin1_General_CP1_CI_AS. The dialog allows you to choose if you want to change the collation or leave the original one.
We recommend changing the collation to Latin1_General_CI_AS.
Step 3 - Database Creation Log
The installer displays a log, showing the progress of database creation.
Step 4 - License Key
If you run Xperience on a domain other than localhost or 127.0.0.x (where x is between 1 and 255), you will be asked to insert a license key. Since the trial version works only with http://localhost and http://127.0.0.x (where x is between 1 and 255), the same dialog is displayed if your trial period has expired.
Enter a valid license key and click Next. Alternatively, you can click Skip this dialog and continue to the New site wizard. You can enter a license key later in the License keys application. See License management for more information.
The installer redirects you to the Sites application within the administration interface, where you can:
- Create a new site
- Import an existing site (for example on a production server), if you have already created an export package with a website
Finished
Once the website is created, the installer displays a confirmation.
Default user name and password
To sign in to the administration interface after the installation, use the administrator username with a blank password. We strongly recommend setting a new password for the administrator account after the installation.
Important: You need to manually set up your site and project after installing the database. See the steps in Starting with MVC development for more information.