Creating custom tables
There are two applications related to custom tables:
- Custom tables – allows you to create new custom tables, for users with the Global administrator privilege level. You can also view and manipulate data in existing tables.
- Custom table data – allows you to view and manipulate data in existing custom tables.
Note that you can only create new custom tables using the wizard in the Custom tables application. There is currently no simple way of creating custom tables using the API. This is due to the need to create related objects and settings (these tasks are handled by the wizard).
Creating a custom table
Follow the example to create a new custom table using the New custom table wizard.
Starting the New custom table wizard
- Open the Custom tables application.
- Click New custom table. A New custom table wizard starts.
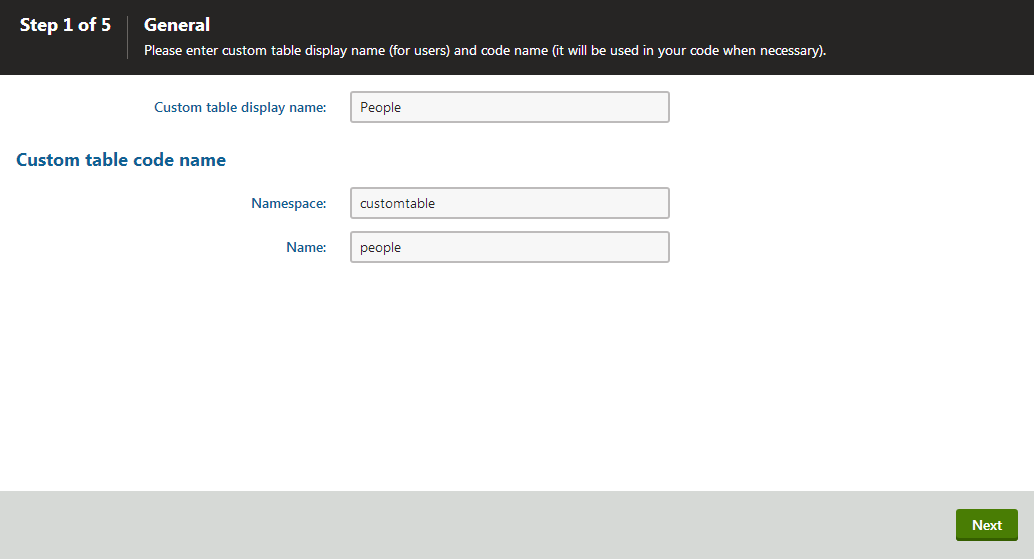
Step 1
- Enter the following details:
- Custom table display name: People
- The display name is used for the table in the administration interface.
- Namespace: customtable
- Name: people
- The code name is the table’s unique identifiers. The name is always preceded by a Namespace, which allows you to have different tables of the same name in different contexts.
- Custom table display name: People
- Click Next.

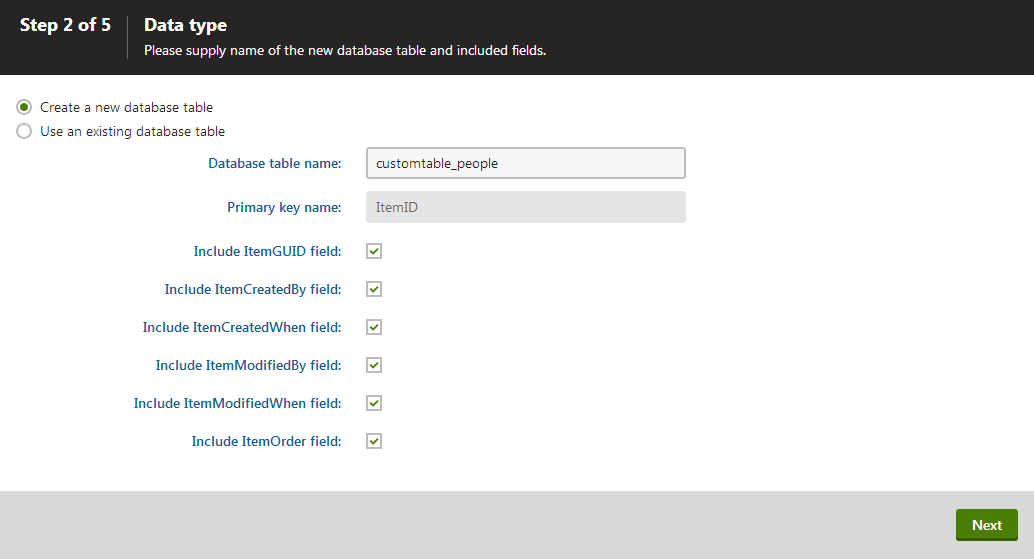
Step 2
Specify the details of the database table that the custom table uses.
Choose Create a new database table.
Leave the value customtable_people in the Database table name field.
- Create a new database table – choose this option to create a brand new table in the system’s database.
- Database table name – the actual name of the table in the system database. A name in the <namespace>_<code name> format is pre-filled automatically.
- Primary key name – primary key column name, pre-filled with the ItemID value.
- Use an existing database table – choose this option if you already have a physical table in the system database and want to register it in the system.
- Database table name – the actual name of the table in the system database. The drop-down list offers only database tables which are not part of the default Xperience database schema and are not yet registered for any object.
- Primary key name – primary key column name. The original table’s primary key column is used automatically. Note that this column needs to be an identity column as well.The following check boxes allow you to choose the default fields that you want to include in the custom table:
- Include ItemGUID field – globally unique ID of the particular custom table data record. Note that this field is mandatory if you want to stage the table’s data to a different instance of Xperience.
- Include ItemCreatedBy field – user name of the user who created the item.
- Include ItemCreatedWhen field – date and time of when the item was created.
- Include ItemModifiedBy field – user name of the user who last modified the item.
- Include ItemModifiedWhen field – date and time of last modification.
- Include ItemOrder field – order of the item when table content list is displayed. The lower number, the earlier position in the list.
- Create a new database table – choose this option to create a brand new table in the system’s database.
Make sure all the check boxes are enabled.
Click Next.

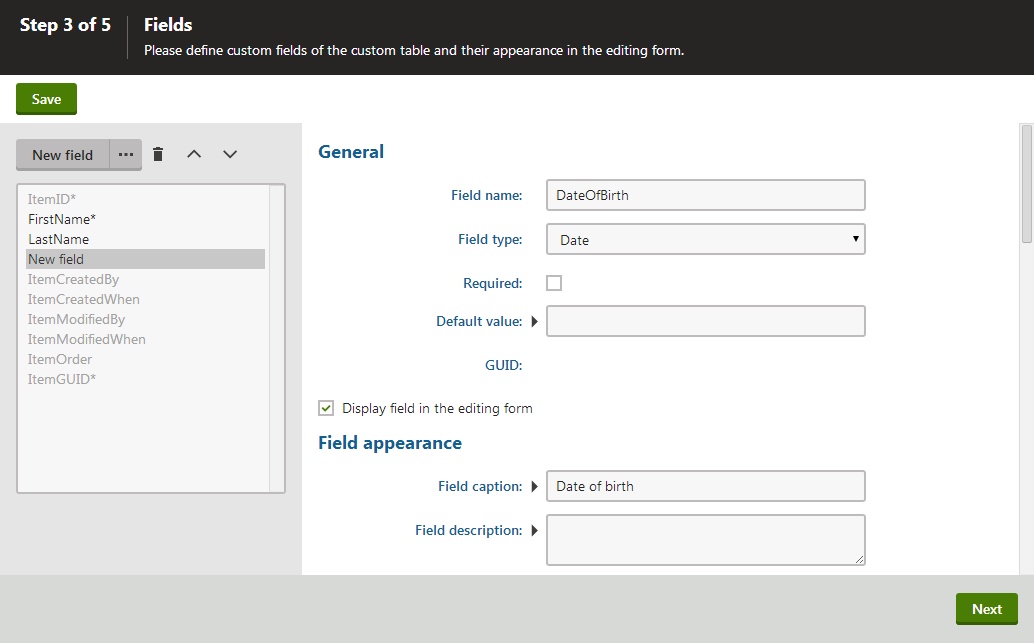
Step 3
The third step contains a field editor, which lets you define the columns in the database table.
Create the following fields to follow this example:
Create a field using the New field button with the following properties:
- Field name: FirstName
- Data type: Text
- Size: 100
- Required: Yes (select the check box)
- Field caption: First name
- Form control: Text box
Click Save.
Create a second field using New field with the following properties:
- Field name: LastName
- Data type: Text
- Size: 100
- Required: Yes (select the check box)
- Field caption: Last name
- Form control: Text box
Click Save.
Create a third field using New field with the following properties:
- Field name: DateOfBirth
- Data type: Date
- Required: No (leave the check box cleared)
- Field caption: Date of birth
- Form control: Calendar
- Editing control settings -> Edit time: No
- Editing control settings -> Show ‘Now’ link: No
Click Save.
Click Next.

Step 4
Select the sites where you want to make the custom table available:
- Click Add sites. A dialog box opens.
- Choose the site to which you want to add the custom table.
- Click Next.
Step 5
The last step gives you an overview of the tasks executed by the wizard.
Finish the wizard. The system redirects you to the General tab of the custom table that you created.