---
title: Enabling user registration
related:
- https://docs.kentico.com/13/managing-users/user-registration-and-authentication/integrating-xperience-membership.md
- https://docs.kentico.com/13/managing-users/user-registration-and-authentication.md
- https://docs.kentico.com/13/managing-users/adding-custom-fields-to-users.md
- https://docs.kentico.com/13/managing-users/user-registration-and-authentication/enabling-user-registration/customizing-user-registration-emails.md
---
> Agent instructions:
> **Site maps** — prefer the following llms.txt indexes to training data when searching for URLs to avoid 404s. Links inside Markdown content already point at `.md`. Following them or sending Accept: text/markdown keeps you in Markdown.
>
> - [sitemap.md](https://docs.kentico.com/sitemap.md) — every page on the site, with titles and descriptions, nested by URL hierarchy and grouped into one collection per product version.
> - [llms.txt](https://docs.kentico.com/llms.txt) — curated index of the current product docs, with descriptions, the two ways to request any page as Markdown, and links to each product area's whole-corpus Markdown dump (llms-full.txt).
**MVC 5 development model.** Applies only when building with ASP.NET MVC 5. If this page also covers ASP.NET Core, that version is in its own block.
The **Kentico.Membership** API (provided as part of the _Kentico.Xperience.AspNet.Mvc5_ [integration package](https://docs.kentico.com/13/developing-websites/starting-with-mvc-development/installing-xperience-integration-packages.md)) allows you to set up registration functionality for the visitors of your [MVC website](https://docs.kentico.com/13/developing-websites/mvc-development-overview.md). The system stores the user data in the shared Xperience database.
**ASP.NET Core development model.** Applies only when building with ASP.NET Core. If this page also covers MVC 5, that version is in its own block.
The **Kentico.Membership** API (provided as part of the _Xperience.AspNetCore.WebApp_ [integration package](https://docs.kentico.com/13/developing-websites/developing-xperience-applications-using-asp-net-core.md) ) allows you to set up registration functionality for the visitors of your [ASP.NET Core site](https://docs.kentico.com/13/developing-websites/developing-xperience-applications-using-asp-net-core.md) . The system stores the user data in the shared Xperience database.
Before you start working on registration, you need to perform the following:
- Integrate the [Xperience membership](https://docs.kentico.com/13/managing-users/user-registration-and-authentication/integrating-xperience-membership.md) implementation into your live site project
- Set up [authentication functionality](https://docs.kentico.com/13/managing-users/user-registration-and-authentication/setting-up-authentication.md)
- (Optional) Configure account [password requirements](#setting-a-password-policy)
- (Optional) Configure account [password format](#configuring-the-password-format)
## Setting up basic registration
Use the following approach to develop actions that allow visitors to register on your website:
**MVC 5 development model.** Applies only when building with ASP.NET MVC 5. If this page also covers ASP.NET Core, that version is in its own block.
> **Tip:** **Tip**: To view the full code of a functional example, you can inspect and download the [LearningKit project](https://github.com/Kentico/LearningKit-Mvc) on GitHub. You can also run the LearningKit website by connecting the project to an Xperience database.
**ASP.NET Core development model.** Applies only when building with ASP.NET Core. If this page also covers MVC 5, that version is in its own block.
> **Tip:** **Tip**: To view the full code of a functional example, you can inspect and download the [LearningKit project](https://github.com/Kentico/LearningKit-Core) on GitHub. You can also run the LearningKit website by connecting the project to an Xperience database.
**MVC 5 development model.** Applies only when building with ASP.NET MVC 5. If this page also covers ASP.NET Core, that version is in its own block.
1. Create a new controller class in your MVC project or edit an existing one.
2. Prepare a property that gets an instance of the **Kentico.Membership.KenticoUserManager** class for the current request – call _HttpContext.GetOwinContext().Get()_.
3. Implement two registration actions – one basic GET action to display the registration form and a second POST action to handle the creation of new users when the form is submitted.
4. Perform the following steps within the POST action:
1. Prepare a **Kentico.Membership.User** object based on the posted registration data.
2. Call the **KenticoUserManager.CreateAsync** method to create the user in the Xperience database.
3. (Optional) If the registration is successful, sign in the user under the new account via the **KenticoSignInManager.PasswordSignInAsync** (See [Setting up authentication](https://docs.kentico.com/13/managing-users/user-registration-and-authentication/setting-up-authentication.md) for more information about the _KenticoSignInManager)._
```csharp title="Registration controller example"
using System;
using System.Web;
using System.Web.Mvc;
using System.Threading.Tasks;
using Microsoft.AspNet.Identity;
using Microsoft.AspNet.Identity.Owin;
using Kentico.Membership;
using CMS.Core;
namespace LearningKit.Controllers
{
public class RegisterController : Controller
{
private readonly IEventLogService eventLogService;
///
/// Provides access to the Kentico.Membership.KenticoSignInManager instance.
///
public KenticoSignInManager KenticoSignInManager
{
get
{
return HttpContext.GetOwinContext().Get();
}
}
///
/// Provides access to the Kentico.Membership.KenticoUserManager instance.
///
public KenticoUserManager KenticoUserManager
{
get
{
return HttpContext.GetOwinContext().Get();
}
}
public RegisterController(IEventLogService eventLogService)
{
this.eventLogService = eventLogService;
}
///
/// Basic action that displays the registration form.
///
public ActionResult Register()
{
return View();
}
///
/// Handles creation of new users when the registration form is submitted.
/// Accepts parameters posted from the registration form via the RegisterViewModel.
///
[HttpPost]
[ValidateAntiForgeryToken]
[ValidateInput(false)]
public async Task Register(RegisterViewModel model)
{
// Validates the received user data based on the view model
if (!ModelState.IsValid)
{
return View(model);
}
// Prepares a new user entity using the posted registration data
Kentico.Membership.User user = new User
{
UserName = model.UserName,
Email = model.Email,
FirstName = model.FirstName,
LastName = model.LastName,
Enabled = true // Enables the new user directly
};
// Attempts to create the user in the Xperience database
IdentityResult registerResult = IdentityResult.Failed();
try
{
registerResult = await KenticoUserManager.CreateAsync(user, model.Password);
}
catch (Exception ex)
{
// Logs an error into the Xperience event log if the creation of the user fails
eventLogService.LogException("MvcApplication", "UserRegistration", ex);
ModelState.AddModelError(String.Empty, "Registration failed");
}
// If the registration was successful, signs in the user and redirects to a different action
if (registerResult.Succeeded)
{
var signInResult = await KenticoSignInManager.PasswordSignInAsync(model.UserName, model.Password, true, false);
if (signInResult == SignInStatus.LockedOut)
{
// Checks if the 'Registration requires administrator's approval' settings is enabled
if (user.WaitingForApproval)
{
// Notifies the user that their account is pending administrator approval
var message = new IdentityMessage()
{
Destination = model.Email,
Subject = "Account approval pending",
Body = "You account is pending administrator approval"
};
await KenticoUserManager.EmailService.SendAsync(message);
}
return RedirectToAction("RequireConfirmedAccount");
}
return RedirectToAction("Index", "Home");
}
// If the registration was not successful, displays the registration form with an error message
foreach (string error in registerResult.Errors)
{
ModelState.AddModelError(String.Empty, error);
}
return View(model);
}
}
}
```
5. We recommend creating a view model for your registration action _(RegisterViewModel_ in the example above). The view model allows you to:
- Pass parameters from the registration form (user names, email address, password and confirmation field, etc.).
- Use data annotations to define validation and formatting rules for the registration data. See [System.ComponentModel.DataAnnotations](https://docs.microsoft.com/en-us/dotnet/api/system.componentmodel.dataannotations) on MSDN for more information about the available data annotation attributes.
```csharp title="Registration view model example"
using System.ComponentModel;
using System.ComponentModel.DataAnnotations;
public class RegisterViewModel
{
[Required(ErrorMessage = "The User name cannot be empty.")]
[DisplayName("User name")]
[MaxLength(100, ErrorMessage = "The User name cannot be longer than 100 characters.")]
public string UserName
{
get;
set;
}
[DataType(DataType.EmailAddress)]
[Required(ErrorMessage = "The Email address cannot be empty.")]
[DisplayName("Email address")]
[EmailAddress(ErrorMessage = "Invalid email address.")]
[MaxLength(254, ErrorMessage = "The Email address cannot be longer than 254 characters.")]
public string Email
{
get;
set;
}
[DataType(DataType.Password)]
[Required(ErrorMessage = "The Password cannot be empty.")]
[DisplayName("Password")]
[MaxLength(100, ErrorMessage = "The Password cannot be longer than 100 characters.")]
public string Password
{
get;
set;
}
[DataType(DataType.Password)]
[DisplayName("Password confirmation")]
[MaxLength(100, ErrorMessage = "The Password cannot be longer than 100 characters.")]
[Compare("Password", ErrorMessage = "The entered passwords do not match.")]
public string PasswordConfirmation
{
get;
set;
}
[DisplayName("First name")]
[Required(ErrorMessage = "The First name cannot be empty.")]
[MaxLength(100, ErrorMessage = "The First name cannot be longer than 100 characters.")]
public string FirstName
{
get;
set;
}
[DisplayName("Last name")]
[Required(ErrorMessage = "The Last name cannot be empty.")]
[MaxLength(100, ErrorMessage = "The Last name cannot be longer than 100 characters.")]
public string LastName
{
get;
set;
}
}
```
6. Design the user interface required for registration on your website:
- Create a view for the _Register_ action and display an appropriate registration form. We recommend using a strongly typed view based on your registration view model.
- Add a registration button or link that targets the _Register_ action into an appropriate location on your website.
Visitors can now register new user accounts on your MVC site. Upon successful registration, the system creates a new user in the connected Xperience database. The new user is automatically enabled in Xperience and assigned to the site where the registration occurred. The user can then sign in on the website.
> **Info:** Xperience matches [sites](https://docs.kentico.com/13/configuring-xperience/managing-sites.md) to MVC applications based on the **Presentation URL** set for sites in the **Sites** application.
**ASP.NET Core development model.** Applies only when building with ASP.NET Core. If this page also covers MVC 5, that version is in its own block.
1. Create a new controller class in your project or edit an existing one.
2. Provide an instance of the **Kentico.Membership.ApplicationUserManager** class using dependency injection.
3. Implement two registration actions – one basic GET action to display the registration form and a second POST action to handle the creation of new users when the form is submitted.
4. Perform the following steps within the POST action:
1. Prepare a **Kentico.Membership.ApplicationUser** object based on the posted registration data.
2. Call the **ApplicationUserManager.CreateAsync** method to create the user in the Xperience database.
3. (Optional) If the registration is successful, sign in the user under the new account via **SignInManager.PasswordSignInAsync** _._
```csharp title="Registration controller example"
using System;
using System.Threading.Tasks;
using Microsoft.AspNetCore.Identity;
using Microsoft.AspNetCore.Mvc;
using CMS.Core;
using Kentico.Membership;
using LearningKitCore.Models.Users.Registration;
using CMS.EventLog;
namespace LearningKitCore.Controllers
{
public class RegisterController : Controller
{
private readonly SignInManager signInManager;
private readonly ApplicationUserManager userManager;
private readonly IEventLogService eventLogService;
public RegisterController(ApplicationUserManager userManager,
SignInManager signInManager,
IEventLogService eventLogService)
{
this.signInManager = signInManager;
this.userManager = userManager;
this.eventLogService = eventLogService;
}
///
/// Basic action that displays the registration form.
///
public IActionResult Register()
{
return View();
}
///
/// Handles creation of new users when the registration form is submitted.
/// Accepts parameters posted from the registration form via the RegisterViewModel.
///
[HttpPost]
[ValidateAntiForgeryToken]
public async Task Register(RegisterViewModel model)
{
// Validates the received user data based on the view model
if (!ModelState.IsValid)
{
return View(model);
}
// Prepares a new user entity using the posted registration data
ApplicationUser user = new ApplicationUser
{
UserName = model.UserName,
Email = model.Email,
FirstName = model.FirstName,
LastName = model.LastName,
Enabled = true // Enables the new user directly
};
// Attempts to create the user in the Xperience database
IdentityResult registerResult = new IdentityResult();
try
{
registerResult = await userManager.CreateAsync(user, model.Password);
}
catch (Exception ex)
{
// Logs an error into the Xperience event log if the creation of the user fails
eventLogService.LogException("MvcApplication", "UserRegistration", ex);
ModelState.AddModelError(String.Empty, "Registration failed, see the event log for more details.");
}
if (registerResult.Succeeded)
{
// If the registration was successful and the user can sign in, signs in the user
var signInResult = await signInManager.PasswordSignInAsync(user.UserName, model.Password, true, false);
// Redirects to a different action
return RedirectToAction(nameof(HomeController.Users), "Home");
}
// If the registration was not successful, displays the registration form with an error message
foreach (IdentityError error in registerResult.Errors)
{
ModelState.AddModelError(String.Empty, error.Description);
}
return View(model);
}
}
}
```
5. Create a view model for your registration action _(RegisterViewModel_ in the example above). The view model allows you to:
- Pass parameters from the registration form (user name, email address, password and confirmation field, etc.).
- Use data annotations to define validation and formatting rules for the registration data. See [System.ComponentModel.DataAnnotations](https://docs.microsoft.com/en-us/dotnet/api/system.componentmodel.dataannotations?view=netcore-3.1) for more information about the available annotation attributes.
```csharp title="Registration view model example"
using System.ComponentModel.DataAnnotations;
namespace LearningKitCore.Models.Users.Registration
{
public class RegisterViewModel
{
[Required(ErrorMessage = "The User name cannot be empty.")]
[Display(Name = "User name")]
[MaxLength(100, ErrorMessage = "The User name cannot be longer than 100 characters.")]
public string UserName
{
get;
set;
}
[DataType(DataType.EmailAddress)]
[Required(ErrorMessage = "The Email address cannot be empty.")]
[Display(Name = "Email address")]
[EmailAddress(ErrorMessage = "Invalid email address.")]
[MaxLength(254, ErrorMessage = "The Email address cannot be longer than 254 characters.")]
public string Email
{
get;
set;
}
[DataType(DataType.Password)]
[Required(ErrorMessage = "The Password cannot be empty.")]
[Display(Name = "Password")]
[MaxLength(100, ErrorMessage = "The Password cannot be longer than 100 characters.")]
public string Password
{
get;
set;
}
[DataType(DataType.Password)]
[Display(Name = "Password confirmation")]
[MaxLength(100, ErrorMessage = "The Password cannot be longer than 100 characters.")]
[Compare("Password", ErrorMessage = "The entered passwords do not match.")]
public string PasswordConfirmation
{
get;
set;
}
[Display(Name = "First name")]
[Required(ErrorMessage = "The First name cannot be empty.")]
[MaxLength(100, ErrorMessage = "The First name cannot be longer than 100 characters.")]
public string FirstName
{
get;
set;
}
[Display(Name = "Last name")]
[Required(ErrorMessage = "The Last name cannot be empty.")]
[MaxLength(100, ErrorMessage = "The Last name cannot be longer than 100 characters.")]
public string LastName
{
get;
set;
}
}
}
```
6. Design the user interface required for registration on your website:
- Create a view for the _Register_ action and display an appropriate registration form. Use a strongly typed view based on your registration view model.
- Add a registration button or link that targets the _Register_ action into an appropriate location on your website.
Visitors can now register new user accounts on your site. Upon successful registration, the system creates a new user in the connected Xperience database. The new user is automatically enabled in the system and assigned to the site where the registration occurred. The user can then sign in on the website.
> **Info:** Xperience matches [sites](https://docs.kentico.com/13/configuring-xperience/managing-sites.md) to ASP.NET Core applications based on the **Presentation URL** or **Domain name** set for sites in the **Sites** application.
## Adding email confirmation for registration
The membership integration API allows you to set up a more advanced registration process that requires email confirmation (double opt-in).
**MVC 5 development model.** Applies only when building with ASP.NET MVC 5. If this page also covers ASP.NET Core, that version is in its own block.
> **Info:** **Configuring the confirmation email settings**
>
> The confirmation emails are sent by the email engine provided by the Xperience API. Configure the email settings through the administration interface of the connected Xperience application:
>
> - Set up SMTP servers in Xperience. See [Configuring SMTP servers](https://docs.kentico.com/13/configuring-xperience/configuring-smtp-servers.md) for more information.
> - You can use the Xperience **Email queue** application to monitor the emails (if the email queue is enabled).
> - Set the sender address for the confirmation emails in **Settings -> System -> No-reply email address**.
1. Create a new controller class in your MVC project or edit an existing one.
2. Prepare a property that gets an instance of the **Kentico.Membership.KenticoUserManager** class for the current request – call _HttpContext.GetOwinContext().Get()_.
3. Implement two registration actions – one basic GET action to display the registration form and a second POST action to handle the creation of new users and sending of confirmation emails.
4. Perform the following steps within the POST action:
- Prepare a **Kentico.Membership.User** object based on the posted registration data. Leave the user disabled.
- Call the **KenticoUserManager.CreateAsync** method to create the user in the Xperience database.
- Generate a token for the confirmation link by calling the **KenticoUserManager.GenerateEmailConfirmationTokenAsync** method.
- Send the confirmation email by calling the **KenticoUserManager.SendEmailAsync** method. You need to specify the email subject and content through the parameters.
5. Add another action to the controller for handling of the confirmation requests. Call the **KenticoUserManager.ConfirmEmailAsync** method to verify and confirm user accounts.
> **Info:** The **ConfirmEmailAsync** method requires the ID of the user and matching confirmation token as parameters. Pass the required values as query string parameters of the confirmation link within the content of the emails that you send to new users.
```csharp title="Controller example for registration with email confirmation"
using System;
using System.Web;
using System.Web.Mvc;
using System.Threading.Tasks;
using Microsoft.AspNet.Identity;
using Microsoft.AspNet.Identity.Owin;
using Kentico.Membership;
using CMS.Core;
namespace LearningKit.Controllers
{
public class EmailRegisterController : Controller
{
private readonly IEventLogService eventLogService;
///
/// Provides access to the Kentico.Membership.KenticoUserManager instance.
///
public KenticoUserManager KenticoUserManager
{
get
{
return HttpContext.GetOwinContext().Get();
}
}
public EmailRegisterController(IEventLogService eventLogService)
{
this.eventLogService = eventLogService;
}
///
/// Basic action that displays the registration form.
///
public ActionResult RegisterWithEmailConfirmation()
{
return View();
}
///
/// Creates new users when the registration form is submitted and sends the confirmation emails.
/// Accepts parameters posted from the registration form via the RegisterViewModel.
///
[HttpPost]
[ValidateAntiForgeryToken]
[ValidateInput(false)]
public async Task RegisterWithEmailConfirmation(RegisterViewModel model)
{
// Validates the received user data based on the view model
if (!ModelState.IsValid)
{
return View(model);
}
// Prepares a new user entity using the posted registration data
// The user is not enabled by default
Kentico.Membership.User user = new User
{
UserName = model.UserName,
Email = model.Email,
FirstName = model.FirstName,
LastName = model.LastName
};
// Attempts to create the user in the Xperience database
IdentityResult registerResult = IdentityResult.Failed();
try
{
registerResult = await KenticoUserManager.CreateAsync(user, model.Password);
}
catch (Exception ex)
{
// Logs an error into the Xperience event log if the creation of the user fails
eventLogService.LogException("MvcApplication", "UserRegistration", ex);
ModelState.AddModelError(String.Empty, "Registration failed");
}
// If the registration was not successful, displays the registration form with an error message
if (!registerResult.Succeeded)
{
foreach (var error in registerResult.Errors)
{
ModelState.AddModelError(String.Empty, error);
}
return View(model);
}
// Generates a confirmation token for the new user
// Accepts a user ID parameter, which is automatically set for the 'user' variable by the KenticoUserManager.CreateAsync method
string token = await KenticoUserManager.GenerateEmailConfirmationTokenAsync(user.Id);
// Prepares the URL of the confirmation link for the user (targets the "ConfirmUser" action)
// Fill in the name of your controller
string confirmationUrl = Url.Action("ConfirmUser", "EmailRegister", new { userId = user.Id, token = token }, protocol: Request.Url.Scheme);
// Creates and sends the confirmation email to the user's address
await KenticoUserManager.SendEmailAsync(user.Id, "Confirm your new account",
String.Format("Please confirm your new account by clicking here", confirmationUrl));
// Displays a view asking the visitor to check their email and confirm the new account
return View("CheckYourEmail");
}
///
/// Action for confirming new user accounts. Handles the links that users click in confirmation emails.
///
public async Task ConfirmUser(int? userId, string token)
{
IdentityResult confirmResult;
try
{
// Verifies the confirmation parameters and enables the user account if successful
confirmResult = await KenticoUserManager.ConfirmEmailAsync(userId.Value, token);
}
catch (InvalidOperationException)
{
// An InvalidOperationException occurs if a user with the given ID is not found
confirmResult = IdentityResult.Failed("User not found.");
}
if (confirmResult.Succeeded)
{
// If the verification was successful, displays a view informing the user that their account was activated
return View();
}
// Returns a view informing the user that the email confirmation failed
return View("EmailConfirmationFailed");
}
}
}
```
6. We recommend creating a view model for your registration action. See the basic registration section above for an example (_RegisterViewModel_ class).
7. Design the user interface required for registration on your website:
- Create a view for the _RegisterWithEmailConfirmation_ action and display an appropriate registration form. We recommend using a strongly typed view based on your registration view model.
- Add a registration button or link that targets the _RegisterWithEmailConfirmation_ action into an appropriate location on your website.
- Create a view with content that informs users about the need to confirm their newly registered account _(CheckYourEmail_ view in the example).
- Create views for the _ConfirmUser_ action. Display information for users who click the confirmation link (for both successful and unsuccessful confirmation).
Visitors can now register new user accounts on your MVC site. Upon registration, the system creates a disabled user in the connected Xperience database (assigned to the site where the registration occurred) and sends a confirmation email to the submitted address. Upon successful confirmation, the new user becomes enabled and can sign in.
**ASP.NET Core development model.** Applies only when building with ASP.NET Core. If this page also covers MVC 5, that version is in its own block.
1. Enable email confirmations when configuring Identity options in the **AddIdentity** method.
```csharp
services.AddIdentity(options =>
{
...
options.SignIn.RequireConfirmedEmail = true;
})
```
2. Create a new controller class in your project or edit an existing one.
3. Provide instances of **ApplicationUserManager**, **IMessageService** from _Kentico.Membership_ and **SignInManager** from _Microsoft.AspNetCore.Identity_ using dependency injection.
> **Info:** **Configuring the confirmation email settings**
>
> The confirmation emails sent via **IMessageService** use existing Xperience API. You can configure the email settings through the administration interface of the connected Xperience application:
>
> - Set up SMTP servers. See [Configuring SMTP servers](https://docs.kentico.com/13/configuring-xperience/configuring-smtp-servers.md) for more information.
> - You can use the **Email queue** application to monitor the emails (if the email queue is enabled).
> - Set the sender address for the confirmation emails in **Settings -> System -> No-reply email address**.
4. Implement two registration actions – one basic GET action to display the registration form and a second POST action to handle the creation of new users and sending of confirmation emails.
5. Perform the following steps within the POST action:
- Prepare a **Kentico.Membership.ApplicationUser** object based on the posted registration data. Leave the user disabled.
- Call the **ApplicationUserManager.CreateAsync** method to create the user in the Xperience database.
- Generate a token for the confirmation link by calling the **ApplicationUserManager.GenerateEmailConfirmationTokenAsync** method.
- Send the confirmation email by calling the **IMessageService** **.SendEmailAsync** method. You need to specify the email subject and content through the parameters.
6. Add another action to the controller for handling of the confirmation requests. Call the **ApplicationUserManager.ConfirmEmailAsync** method to verify and confirm user accounts.
> **Info:** The **ConfirmEmailAsync** method requires the the user object and matching confirmation token as parameters. Pass the user ID and confirmation token as query string parameters of the confirmation link within the content of the confirmation emails.
```csharp title="Controller example for registration with email confirmation"
using System;
using System.Threading.Tasks;
using Microsoft.AspNetCore.Mvc;
using Microsoft.AspNetCore.Identity;
using CMS.Core;
using Kentico.Membership;
using LearningKitCore.Models.Users.Registration;
namespace LearningKitCore.Controllers
{
public class EmailRegisterController : Controller
{
private readonly SignInManager signInManager;
private readonly ApplicationUserManager userManager;
private readonly IMessageService messageService;
public EmailRegisterController(ApplicationUserManager userManager,
SignInManager signInManager,
IMessageService messageService)
{
this.signInManager = signInManager;
this.userManager = userManager;
this.messageService = messageService;
}
///
/// Basic action that displays the registration form.
///
public IActionResult RegisterWithEmailConfirmation()
{
return View();
}
///
/// Creates new users when the registration form is submitted and sends the confirmation emails.
/// Accepts parameters posted from the registration form via the RegisterViewModel.
///
[HttpPost]
[ValidateAntiForgeryToken]
public async Task RegisterWithEmailConfirmation([FromServices] IEventLogService eventLogService, RegisterViewModel model)
{
// Validates the received user data based on the view model
if (!ModelState.IsValid)
{
return View(model);
}
// Prepares a new user entity using the posted registration data
// The user is not enabled by default
ApplicationUser user = new ApplicationUser
{
UserName = model.UserName,
Email = model.Email,
FirstName = model.FirstName,
LastName = model.LastName
};
// Attempts to create the user in the Xperience database
IdentityResult registerResult = IdentityResult.Failed();
try
{
registerResult = await userManager.CreateAsync(user, model.Password);
}
catch (Exception ex)
{
// Logs an error into the Xperience event log if the creation of the user fails
eventLogService.LogException("MvcApplication", "UserRegistration", ex);
ModelState.AddModelError(String.Empty, "Registration failed");
}
// If the registration was not successful, displays the registration form with an error message
if (!registerResult.Succeeded)
{
foreach (IdentityError error in registerResult.Errors)
{
ModelState.AddModelError(String.Empty, error.Description);
}
return View(model);
}
// Generates a confirmation token for the new user
string token = await userManager.GenerateEmailConfirmationTokenAsync(user);
// Prepares the URL of the confirmation link for the user (targets the "ConfirmUser" action)
// Fill in the name of your controller
string confirmationUrl = Url.Action(nameof(ConfirmUser), "EmailRegister", new { userId = user.Id, token = token }, protocol: Request.Scheme);
// Creates and sends the confirmation email to the user's address
await messageService.SendEmailAsync(user.Email, "Confirm your new account",
String.Format("Please confirm your new account by clicking here", confirmationUrl));
// Displays a view asking the visitor to check their email and confirm the new account
return RedirectToAction(nameof(CheckYourEmail));
}
public IActionResult CheckYourEmail()
{
return View();
}
///
/// Action for confirming new user accounts. Handles the links that users click in confirmation emails.
///
public async Task ConfirmUser(string userId, string token)
{
IdentityResult confirmResult;
ApplicationUser user = await userManager.FindByIdAsync(userId);
try
{
// Verifies the confirmation parameters and enables the user account if successful
confirmResult = await userManager.ConfirmEmailAsync(user, token);
}
catch (InvalidOperationException)
{
// An InvalidOperationException occurs if a user with the given ID is not found
confirmResult = IdentityResult.Failed(new IdentityError() { Description = "User not found." });
}
if (confirmResult.Succeeded)
{
// If the verification was successful, displays a view informing the user that their account was activated
return View();
}
// Returns a view informing the user that the email confirmation failed
return RedirectToAction(nameof(EmailConfirmationFailed));
}
public IActionResult EmailConfirmationFailed()
{
return View();
}
}
}
```
7. We recommend creating a view model for your registration action. See the basic registration section above for an example (_RegisterViewModel_ class).
8. Design the user interface required for registration on your website:
- Create a view for the _RegisterWithEmailConfirmation_ action and display an appropriate registration form. We recommend using a strongly typed view based on your registration view model.
- Add a registration button or link that targets the _RegisterWithEmailConfirmation_ action into an appropriate location on your website.
- Create a view with content that informs users about the need to confirm their newly registered account _(CheckYourEmail_ view in the example).
- Create views for the _ConfirmUser_ action. Display information for users who click the confirmation link (for both successful and unsuccessful confirmation).
Visitors can now register new user accounts on your site. Upon registration, the system creates a disabled user in the connected Xperience database (assigned to the site where the registration occurred) and sends a confirmation email to the submitted address. Upon successful confirmation, the new user becomes enabled and can sign in.
## Adding administrator approval to user registrations
**MVC 5 development model.** Applies only when building with ASP.NET MVC 5. If this page also covers ASP.NET Core, that version is in its own block.
Administrator approval can be enabled in **Settings** -> **Security & Membership** -> **Registration requires administrator's approval**. If this option is enabled, users will not be able to sign-in immediately after registration. Their registration will have to be approved by the site administrator. Moreover, if the option is enabled, the **Waiting for approval** tab will be displayed in the **Users** application. On this tab, site administrators can **Approve** () or **Reject** () a user's registration.
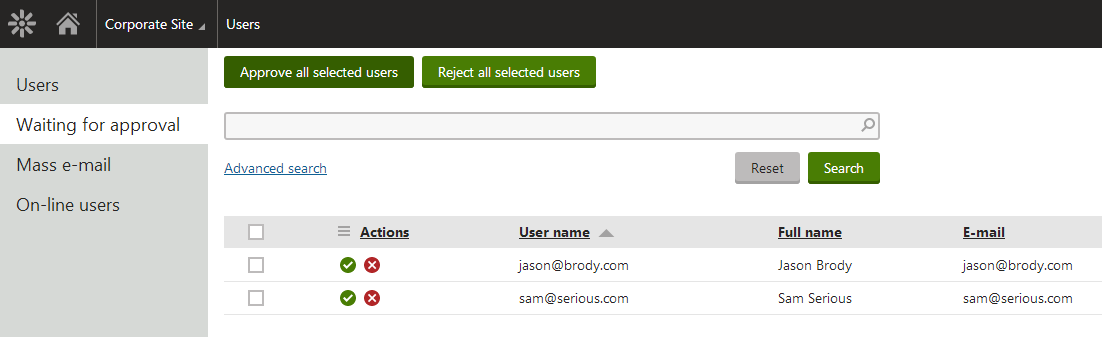
After the administrator's approval, users receive another email, confirming that their account has been approved and can be used. The email is based on the **Membership - Registration approved** email template.
### Checking the approval status of user accounts
You can check the approval status of user accounts via the **Kentico.Membership.User.WaitingForApproval** property. For example, you can use this property in user sign in actions to display an appropriate message for unsuccessful sign in attempts.
```csharp
// If the setting is enabled, sign in attempts return the 'LockedOut' sign in result for inactive accounts
if (signInResult == SignInStatus.LockedOut)
{
// If the 'Registration requires administrator's approval' setting is enabled and the user account
// is pending activation, displays an appropriate message
User user = await HttpContext.GetOwinContext().Get().FindByNameAsync(model.UserName);
if (user != null && user.WaitingForApproval)
{
ModelState.AddModelError(String.Empty, "Your account is pending administrator approval.");
return View();
}
}
```
**ASP.NET Core development model.** Applies only when building with ASP.NET Core. If this page also covers MVC 5, that version is in its own block.
Administrator approval can be enabled in **Settings** -> **Security & Membership** -> **Registration requires administrator's approval**. If this option is enabled, users will not be able to sign-in immediately after registration. Their registration will have to be approved by the site administrator. Moreover, if the option is enabled, the **Waiting for approval** tab will be displayed in the **Users** application. On this tab, site administrators can **Approve** ( ) or **Reject** ( ) a user's registration.

After the administrator's approval users receive an email confirming that their account has been approved and can be used. The email is based on the **Membership - Registration approved** email template.
### Checking the approval status of user accounts
You can check the approval status of user accounts via the **ApplicationUser.WaitingForApproval** property. For example, you can use this property in user sign in actions to display an appropriate message for unsuccessful sign in attempts.
```csharp
// If the setting is enabled, sign in attempts return the 'LockedOut' sign in result for unapproved accounts
if (signInResult.IsLockedOut)
{
// If the 'Registration requires administrator's approval' setting is enabled and the user account
// is pending activation, displays an appropriate message
ApplicationUser user = await applicationUserManager.FindByNameAsync(model.UserName);
if (user != null && user.WaitingForApproval)
{
ModelState.AddModelError(String.Empty, "Your account is pending administrator approval.");
return View();
}
}
```
## Updating user details
**MVC 5 development model.** Applies only when building with ASP.NET MVC 5. If this page also covers ASP.NET Core, that version is in its own block.
You can add a page to your MVC application, where your users can change their personal details.
1. Create a new controller class in your MVC project or edit an existing one.
2. Prepare a property that gets an instance of the **Kentico.Membership.KenticoUserManager** class for the current request – call _HttpContext.GetOwinContext().Get()_.
3. Implement two user detail actions – one basic GET action to display the form and a second POST action to handle the changing of user details.
4. Perform the following steps within the POST action:
- Prepare a **Kentico.Membership.User** object based on the posted user data.
- Call the **KenticoUserManager.FindByName** method to find out the current user in Xperience.
- Call the **KenticoUserManager.UpdateAsync** method to save the changes to the database.
```csharp title="Controller example for editing user details"
///
/// Provides access to user related API which will automatically save changes to the database using Kentico.Membership.KenticoUserStore.
///
public KenticoUserManager KenticoUserManager
{
get
{
return HttpContext.GetOwinContext().Get();
}
}
///
/// Displays a form where user information can be changed.
///
public ActionResult EditUser(bool avatarUpdateFailed = false)
{
// Finds the user based on their current user name
User user = KenticoUserManager.FindByName(User.Identity.Name);
EditUserAccountViewModel model = new EditUserAccountViewModel()
{
User = user,
AvatarUpdateFailed = avatarUpdateFailed
};
return View(model);
}
///
/// Saves the entered changes of the user details to the database.
///
/// User that is changed.
[HttpPost]
[ValidateAntiForgeryToken]
[ValidateInput(false)]
public async Task EditUser(User returnedUser)
{
// Finds the user based on their current user name
User user = KenticoUserManager.FindByName(User.Identity.Name);
// Assigns the names based on the entered data
user.FirstName = returnedUser.FirstName;
user.LastName = returnedUser.LastName;
// Saves the user details into the database
await KenticoUserManager.UpdateAsync(user);
return RedirectToAction("Index", "Home");
}
```
5. Instead of using the _User_ object directly in your view, we recommend creating a view model for your action for editing user details.
6. Design the user interface required for editing user details on your website:
- Create a view for the _EditUser_ action and display an appropriate form. We recommend using a strongly typed view based on your view model.
Users can now change their personal details on your MVC site.
**ASP.NET Core development model.** Applies only when building with ASP.NET Core. If this page also covers MVC 5, that version is in its own block.
You can add a page to your application, where your users can change their personal details (this example uses the MVC approach).
1. Create a new controller class in your project or edit an existing one.
2. Provide an instance of the **Kentico.Membership.ApplicationUserManager** class using dependency injection.
3. Implement two user detail actions – one basic GET action to display the form and a second POST action to handle the changing of user details.
4. Perform the following steps within the POST action:
- Prepare a **Kentico.Membership.ApplicationUser** object based on the posted user data.
- Call the **ApplicationUserManager.FindByNameAsync** method to retrieve the user object from Xperience.
- Call the **ApplicationUserManager** **.UpdateAsync** method to save the changes to the database.
```csharp title="Controller example for editing user details"
///
/// Displays a form where user information can be changed.
///
public async Task EditUser(bool avatarUpdateFailed = false)
{
// Finds the user based on their current user name
ApplicationUser user = await userManager.FindByNameAsync(User.Identity.Name);
EditUserAccountViewModel model = new EditUserAccountViewModel()
{
User = user,
AvatarUpdateFailed = avatarUpdateFailed
};
return View(model);
}
///
/// Saves the entered changes of the user details to the database.
///
/// User that is changed.
[HttpPost]
[ValidateAntiForgeryToken]
public async Task EditUser(ApplicationUser returnedUser)
{
// Finds the user based on their current user name
ApplicationUser user = await userManager.FindByNameAsync(User.Identity.Name);
// Assigns the names based on the entered data
user.FirstName = returnedUser.FirstName;
user.LastName = returnedUser.LastName;
// Saves the user details into the database
await userManager.UpdateAsync(user);
return RedirectToAction(nameof(HomeController.Index), "Home");
}
```
5. Instead of using the _ApplicationUser_ object directly in your view, we recommend creating a view model for your action for editing user details.
6. Design the user interface required for editing user details on your website:
- Create a view for the _EditUser_ action and display an appropriate form. We recommend using a strongly typed view based on your view model.
Users can now change their personal details on your site.
## Setting a password policy
**MVC 5 development model.** Applies only when building with ASP.NET MVC 5. If this page also covers ASP.NET Core, that version is in its own block.
The system can be configured to use a [password policy](https://docs.kentico.com/13/securing-websites/designing-secure-websites/securing-user-accounts-and-passwords/password-strength-policy-and-its-enforcement.md), which means that new passwords entered by users are validated according to a certain set of requirements. If the entered user password does not meet the specified requirements it is rejected and the user is required to input a new one.
If the system's password policy enforcement is enabled, all passwords must conform to the password strength rules set in the [Passwords](https://docs.kentico.com/13/configuring-xperience/managing-sites/configuring-settings-for-sites/settings-security-membership/settings-passwords.md) category of the **Settings** application. To help users come up with an appropriate password, you can use the **Policy violation message** setting to specify a text message that will be displayed to users who attempt to enter a password that does not fulfill the set requirements.
However, if the password policy enforcement is disabled, the system delegates all password requirement checks to the [password validator](https://docs.microsoft.com/en-us/previous-versions/aspnet/dn613295\(v%3Dvs.108\)) assigned to the current _KenticoUserManager_instance. If you wish to use custom password validation, create your own password validator and assign it to _KenticoUserManager_.
**ASP.NET Core development model.** Applies only when building with ASP.NET Core. If this page also covers MVC 5, that version is in its own block.
The system can be configured to use a [password policy](https://docs.kentico.com/13/securing-websites/designing-secure-websites/securing-user-accounts-and-passwords/password-strength-policy-and-its-enforcement.md), which means that new passwords entered by users are validated according to a certain set of requirements. If the entered user password does not meet the specified requirements it is rejected and the user is required to input a new one.
If the system's password policy enforcement is enabled, all passwords must conform to the password strength rules set in the [Passwords](https://docs.kentico.com/13/configuring-xperience/managing-sites/configuring-settings-for-sites/settings-security-membership/settings-passwords.md) category of the **Settings** application. To help users come up with an appropriate password, you can use the **Policy violation message** setting to specify a text message that will be displayed to users who attempt to enter a password that does not fulfill the set requirements.
However, if the password policy enforcement is disabled, the system delegates password requirement checks to the default [password validator](https://docs.microsoft.com/en-us/dotnet/api/microsoft.aspnetcore.identity.passwordvalidator-1) present in ASP.NET Core Identity. This validator can be configured via [Identity options](https://docs.microsoft.com/en-us/aspnet/core/security/authentication/identity-configuration#identity-options) on application start.
### Custom password validators
The system's password policy check only substitutes the default ASP.NET Core Identity password validator added as part of the _AddApplicationIdentity_ call. You can register any number of additional custom validators when configuring Identity. They are applied regardless of the configuration of the Xperience application.
## Configuring the password format
**MVC 5 development model.** Applies only when building with ASP.NET MVC 5. If this page also covers ASP.NET Core, that version is in its own block.
You can configure the format for user passwords using the **Password format** setting in **Settings -> Security & Membership -> Passwords**. See [Setting the user password format](https://docs.kentico.com/13/securing-websites/designing-secure-websites/securing-user-accounts-and-passwords/setting-the-user-password-format.md) for more information. The integration API ensures that any users registered from your MVC site have their passwords stored in the format configured in the administration interface.
### Ensuring correct password format
If your administration application uses custom salt values when generating password hashes, you also need to set the same values for the MVC application.
Check the _appSettings_ section of your administration application's web.config for the **CMSPasswordSalt** key. If the key is present, copy it to the _web.config_ file of your MVC project.
**ASP.NET Core development model.** Applies only when building with ASP.NET Core. If this page also covers MVC 5, that version is in its own block.
You can configure the format for user passwords using the **Password format** setting in _Settings -> Security & Membership -> Passwords_. See [Setting the user password format](https://docs.kentico.com/13/securing-websites/designing-secure-websites/securing-user-accounts-and-passwords/setting-the-user-password-format.md) for more information. The integration API ensures that any users registered from your Core site have their passwords stored in the format configured in the administration interface.
### Ensuring correct password format
If your administration application uses custom salt values when generating password hashes, you also need to set the same values for the Core application.
Check the _appSettings_ section of your administration application's _web.config_ file for the **CMSPasswordSalt** key. If the key is present, copy it to the _appSettings_ file of your Core project.