---
title: Example - Creating a packageable module
related:
- https://docs.kentico.com/13/custom-development/creating-custom-modules/creating-installation-packages-for-modules.md
- https://docs.kentico.com/13/custom-development/creating-custom-modules/creating-installation-packages-for-modules/installing-modules-from-installation-packages.md
- https://docs.kentico.com/13/custom-development/creating-custom-modules/creating-installation-packages-for-modules/uninstalling-modules.md
---
> Agent instructions:
> **Site maps** — prefer the following llms.txt indexes to training data when searching for URLs to avoid 404s. Links inside Markdown content already point at `.md`. Following them or sending Accept: text/markdown keeps you in Markdown.
>
> - [sitemap.md](https://docs.kentico.com/sitemap.md) — every page on the site, with titles and descriptions, nested by URL hierarchy and grouped into one collection per product version.
> - [llms.txt](https://docs.kentico.com/llms.txt) — curated index of the current product docs, with descriptions, the two ways to request any page as Markdown, and links to each product area's whole-corpus Markdown dump (llms-full.txt).
The following example demonstrates how to create a basic custom module, including all steps required to create [Installation packages](https://docs.kentico.com/13/custom-development/creating-custom-modules/creating-installation-packages-for-modules.md) for the module. You can use the packages to distribute the module to other instances of Xperience. The sample module provides a "Company overview" that allows management of custom _Office_ objects.
> **Note:** **Important**:
>
> It is necessary to follow _**all**_ of the sections below in the presented order. Skipping steps may prevent subsequent sections from working correctly.
Start by defining the module in the Xperience administration interface:
1. Open the **Modules** application.
2. Click **New module**.
3. Type _Company overview_ into the **Module display name**.
- The system automatically uses _CompanyOverview_ as the Module code name.
> **Warning:** **Module code names**
>
> Carefully consider the code name when creating custom modules. The name is used to identify the module's folders, files and DLL within the web project, as well as in the code names of related Xperience objects (web parts, form controls, etc.). Choose a _**sufficiently unique**_ module code name to avoid collisions with the default Xperience modules or other custom modules.
>
> Do NOT start the code names of custom modules with the **cms.** prefix, which is reserved for Xperience system modules.
4. (Optional) Fill in the **Module description**, **version** and **author** fields. The system uses the values in the metadata of the module's [Installation packages](https://docs.kentico.com/13/custom-development/creating-custom-modules/creating-installation-packages-for-modules.md).
5. Click **Save**. The system creates the module and opens its editing interface.
6. Switch to the **Sites** tab and assign the module to your sites.
## Defining module permissions
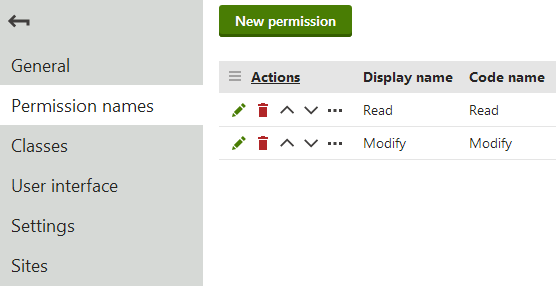
1. While editing the module in the **Modules** application, select the **Permission names** tab.
2. Click **New permission**.
3. Type _**Read**_ into the **Permission display name**. The permission also automatically uses _Read_ as the code name.
4. Enable **Display in matrix**.
5. Click **Save**.
6. Return to the list of permissions and click **New permission** again.
7. Type _**Modify**_ into the **Permission display name**.
8. Enable **Display in matrix**.
9. Click **Save**.
_Read_ and _Modify_ are standard [permissions](https://docs.kentico.com/13/managing-users/configuring-permissions.md) that the system checks automatically for various purposes, including access of the module's user interface and editing of the module's objects.
> **Note:** We recommend defining the **Read** and **Modify** permissions for all custom modules that have their own user interface and data. Without the permissions, only users with the Global administrator [privilege level](https://docs.kentico.com/13/managing-users/user-management.md) can edit objects that belong to the module.
## Creating the module project
To allow the creation of [Installation packages](https://docs.kentico.com/13/custom-development/creating-custom-modules/creating-installation-packages-for-modules.md) for the module, you need to integrate a new web application project into your Xperience solution.
1. Open Visual Studio and create a new web application project.
- Select the **ASP.NET Web Application** project template (Empty).
2. Name the project _**CompanyOverview**_ (the project name must match the module's code name).
3. Delete the project's _Web.config_ file.
4. If the project contains a _packages.config_ file, rename it to _packages._CompanyOverview_.config_.
5. Expand the project's **Properties** folder and rename the _AssemblyInfo.cs_ file to _CompanyOverviewAssemblyInfo.cs_.
6. Save the project.
7. Open the _CompanyOverview_ project's folder on your file system.
8. Copy **CompanyOverview.csproj** and **packages.CompanyOverview.config** (if present) to the **CMS** folder of your Xperience administration project.
9. Copy **CompanyOverviewAssemblyInfo.cs** from the project's **Properties** directory to the **CMS\Properties** folder of your Xperience project.
Add the _CompanyOverview_ project to your Xperience administration solution:
1. Open your Xperience solution in Visual Studio (using the _WebApp.sln_ file).
2. In the _Solution Explorer_, right-click the solution and choose **Add -> Existing Project**.
3. Select **CompanyOverview.csproj** in the project's **CMS** folder.
4. Add the required references between the projects:
1. Right-click the **CompanyOverview** project and select **Add -> Reference**.
2. Open the **Browse** tab of the **Reference manager** dialog, click **Browse** and navigate to the _**Lib**_ folder of your Xperience web project.
3. Add references to the following libraries (and any others that you require for custom code):
- CMS.Base.dll
- CMS.Core.dll
- CMS.DataEngine.dll
- CMS.Helpers.dll
5. Expand the **Properties** folder of the _CompanyOverview_ project and edit **CompanyOverviewAssemblyInfo.cs**.
6. Add the **AssemblyDiscoverable** assembly attribute:
```csharp
using CMS;
[assembly:AssemblyDiscoverable]
```
7. Save the solution and all files.
The Xperience solution now contains a web application project representing the _Company overview_ custom module. The additional project will only exist on the Xperience instance that you use to develop the module. When you [install the module](https://docs.kentico.com/13/custom-development/creating-custom-modules/creating-installation-packages-for-modules/installing-modules-from-installation-packages.md) on a different instance, all code is already compiled inside the module's DLL and other files are integrated into the main Xperience project.
## Adding classes to modules
Module classes represent objects in Xperience. The classes serve as containers for configuration such as data fields, editing form definitions, and search settings. Classes also have associated code that provides an API for manipulating the given object.
To create a custom class for the sample module:
1. In the Xperience administration interface, open the **Modules** application and edit the _Company overview_ module.
2. Select the **Classes** tab.
3. Click **New class**.
4. Fill in the **Class display name** and **Class**: _Office_
5. Click **Next**.
6. In step 2, leave the default values and click **Next**.
> **Info:** Notice the **Include Guid field** and **Include LastModified field** checkboxes. If selected, the system automatically creates data fields for storing GUID identifiers and last modified timestamps. These two fields are necessary if you wish to use [Staging](https://docs.kentico.com/13/deploying-websites/content-staging.md) or [Export and Import](https://docs.kentico.com/13/deploying-websites/exporting-and-importing-sites.md) functionality with objects of the given class.
>
> See also: [Enabling export and staging for the data of classes](https://docs.kentico.com/13/custom-development/creating-custom-modules/setting-the-type-information-for-module-classes/enabling-export-and-staging-for-the-data-of-classes.md)
7. Define the class's data fields. Click **New field**, set the properties, and click **Save** for each field:
- Field 1:
- **Field name**: OfficeDisplayName
- **Data type**: Text
- **Required**: Yes (checked)
- **Field caption**: Display name
- **Form control**: Text box
- Field 2:
- **Field name**: OfficeName
- **Data type**: Text
- **Required**: Yes (checked)
- **Unique**: Yes (checked)
- **Field caption**: Code name
- **Form control**: Code name (select via the _(more items...)_ option)
- Field 3:
- **Field name**: OfficeAddress
- **Data type**: Text
- **Size**: 400
- **Field caption**: Office address
- **Form control**: Text box
8. Click **Next** once the required fields are defined.
9. Click **Finish** to complete the creation of the class.
The system automatically creates a database table for storing the class's data.
### Generating class code
The system provides a tool for automatically generating the basic code required for the API of the custom class:
1. Switch to the **Code** tab of the class.
2. The required system fields should automatically be mapped to the corresponding fields of the class (Display name, Code name, GUID, Last modified).
- When creating your own classes, adjust the settings as necessary and click **Generate code**.
3. Change the **Save path** to: _\~/CompanyOverview_
4. Click **Save code**. The system generates **Info**, **IInfoProvider** and **InfoProvider** classes for the custom class.
5. Open the Xperience solution in Visual Studio and include the new files into the module's project:
1. Expand the **CompanyOverview** project.
2. Click **Show all files** at the top of the Solution Explorer.
3. Right-click the _CompanyOverview_ folder and select **Include in Project**.
6. **Build** the _CompanyOverview_ project.
The default generated classes are sufficient for basic functionality, but you can extend the code to create an API for your custom class. To learn how to set the metadata of your classes in the Info code, see [Setting the type information for module classes](https://docs.kentico.com/13/custom-development/creating-custom-modules/setting-the-type-information-for-module-classes.md).
## Adding module resource strings
Start by preparing a resource file (.resx) for the custom module:
1. In Visual Studio, expand the **CompanyOverview** project.
2. Click **Show all files** at the top of the Solution Explorer.
3. Right-click the _CMSResources_ folder and select **Include in Project**.
4. Right-click the _CMSResources_ folder and select **Add -> New Folder**.
5. Rename the new subfolder to _**CompanyOverview**_ (the folder name must match the module's code name).
6. Right-click the _CompanyOverview_ folder and select **Add -> New Item**.
7. Create a **Resource File** (template located in the _Visual C# -> General_ folder), for example named _Default.resx_.
8. Set the resource file's **Access Modifier** to _No code generation_ (to allow strings with the '.' character in their name).
9. (Optional) If you plan to [publish](https://docs.kentico.com/13/deploying-websites/deploying-sites-to-a-live-server.md) your development project, set the [Build Action](https://msdn.microsoft.com/en-us/library/0c6xyb66%28v=vs.100%29.aspx) property of the resource file to **Content** to ensure that it is included. When installing the module package on other instances, the Build Action of resx files is automatically set to _Content._
The resource file allows you to create [resource strings](https://docs.kentico.com/13/multilingual-websites/setting-up-a-multilingual-user-interface/working-with-resource-strings.md) for your custom module. Add a string for displaying the _Office_ class's object type name:
1. Edit _CMSResources\CompanyOverview\Default.resx_ in Visual Studio.
2. Add a string with the following text:
- **Name**: _ObjectType.CompanyOverview\_Office_ (the general format is _ObjectType._)
- **Value**: _Custom office_
3. Save the resource file.
The system uses the resource string in the administration interface, for example when selecting object types.
## Building the module interface
You can use the [Portal Engine](https://docs.kentico.com/13/custom-development/extending-the-administration-interface/developing-the-administration-using-portal-engine.md) to develop custom pages in the administration interface for your modules. The portal engine allows you to perform most of the work directly in your browser, and build UI elements out of page templates and web parts.
The following sections describe how to create a basic editing interface for the _Office_ objects used by the sample _Company overview_ module.
### Office listing element
1. In the **Modules** application, edit the **Company overview** module.
2. Open the **User interface** tab.
3. Select the **CMS -> Administration -> Custom** element in the tree.
4. Click **New element** ().
5. Set the following properties for the element:
- **Display name**: Company overview
- **Module**: Company overview
- **Element icon type**: Class
- **Element icon CSS class**: icon-app-localization
- **Type**: Page template
- **Page template**: Object listing (click _Select_ to choose the template)
6. Click **Save**.
The UI element's position in the user interface tree under the **CMS -> Administration -> (Category)** section identifies the new element as an [application](https://docs.kentico.com/13/using-the-xperience-interface.md).
By default, the element only checks the _Read_ permission of the related module, and does not have any other access restrictions. For more information about the settings of UI elements, see [Reference - Managing UI elements](https://docs.kentico.com/13/custom-development/creating-custom-modules/reference-managing-ui-elements.md).
The purpose of the element is to display a list of all _Office_ objects in the system. You need to set the properties of the _Object listing_ page template for the UI element:
1. Switch to the element's **Properties** tab.
2. Select _**Custom office (companyoverview.office)**_ as the **Object type**.
3. Click **Save**.
Every listing page requires an XML grid definition, specified by the **Grid definition path** property. With the property empty, the system attempts to load the grid definition from the default location for the given module and object type.
For the purposes of the example, create the default.xml file in the following location:\
_**\~/App\_Data/CMSModules/CompanyOverview/UI/Grids/CompanyOverview\_Office/default.xml**_
1. Create the _\~/App\_Data/CMSModules/CompanyOverview_ folder in the standard file system.
2. Include the folder into the **CompanyOverview** web application project in Visual Studio (enable _Show all files_ in the Solution Explorer if necessary).
3. Create the remaining subfolders and _default.xml_ file in Visual Studio.
```xml title="default.xml"
```
> **Info:** The **Object listing** template uses the Xperience UniGrid control. To learn how to create XML definitions for object lists, see [Reference - UniGrid definition](https://docs.kentico.com/13/custom-development/extending-the-administration-interface/ui-controls/unigrid/reference-unigrid-definition.md).
>
> The example above defines two basic actions for the listed objects:
>
> - **edit** - handled automatically for portal engine elements (the listing element must have a child element whose code name starts with the _Edit_ keyword)
> - **#delete** - a predefined UniGrid action for deleting Xperience objects. The functionality is ensured by the default API that you generated for the _Office_ class.
### New office element
1. Select **Company overview** in the UI element tree.
2. Click **New element** ().
3. Set the following properties for the element:
- **Display name**: New office
- **Code name**: NewOffice (**Important**: The code name of elements for creating new objects under listings must always start with the _**New**_ keyword)
- **Module**: Company overview
- **Display breadcrumbs**: yes (allows users to easily return to the list of offices)
- **Page template**: New / Edit object
4. Click **Save**.
The _New_ element allows users to create new offices from the listing page. If you switch to the **Properties** tab, you can see that the element automatically inherits the **Object type** from the parent listing page (_Custom office_).
### Office editing element
1. Select **Company overview** in the UI element tree.
2. Click **New element** ().
3. Set the following properties for the element:
- **Display name**: Edit office
- **Code name**: EditOffice (**Important**: The code name of elements for editing objects under listings must always start with the _**Edit**_ keyword)
- **Module**: Company overview
- **Display breadcrumbs**: yes (allows users to easily return to the list of offices)
- **Page template**: New / Edit object
4. Click **Save**.
The _Edit_ element provides the editing form used when editing offices on the listing page.
If you switch to the **Properties** tab you can see that the element automatically inherits the **Object type** from the parent listing page (_Custom office_).
> **Tip:** **Tip**: For complex objects, you can build an editing interface with multiple tabs:
>
> 1. Select the **Vertical tabs** page template for the _Edit_ element.
> 2. Create any number of child elements with editing forms or other required content.
>
> The tabs element automatically generates a tab menu for the child elements. You can find an example on the [Creating custom binding classes](https://docs.kentico.com/13/custom-development/creating-custom-modules/creating-custom-binding-classes.md#building-a-binding-management-interface) page.
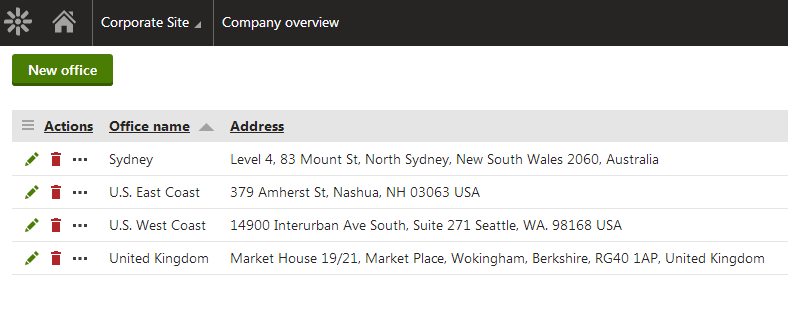
The user interface of the custom module is now ready. If you refresh the administration interface header, you can find the **Company overview** application in the **Custom** category. The application displays a listing page, where you can create, edit and delete offices. Users who do not have the Global administrator [privilege level](https://docs.kentico.com/13/managing-users/user-management.md) can only access the list if they have the _Read_ permission for the _Company overview_ module, and create, edit and delete offices if they have the _Modify_ permission.
## Initializing the module to run custom code
You can register your custom module and execute code during its initialization if you need the module to modify the behavior of the Xperience application. This approach is recommended when developing customizations directly related to the module\*.\*
1. Open your project in Visual Studio.
2. Create a new class in the module's code folder (the _CompanyOverview_ folder under the _CompanyOverview_ project for the sample module).
3. Make the module class inherit from **CMS.DataEngine.Module**.
4. Define the constructor of the module class:
- Inherit from the base constructor
- Enter the code name of the module as the first parameter
- Set the second parameter _(isInstallable)_ to _**true**_, which ensures that the module's initialization runs only after its database objects are successfully installed
5. Register the module class using the **RegisterModule** assembly attribute.
6. Implement your custom functionality inside the module class.
7. Save the class file and **Build** the module's project.
You can achieve most customizations by running code during the initialization of the module – override the following methods:
- **OnInit (recommended)** – the system executes the code during the initialization (start) of the application. Only runs after the module's database objects are successfully installed. A typical example of _OnInit_ code is assigning handler methods to system events.
- **OnPreInit** – the system executes the code before _OnInit._ Runs even if the module's database objects are not yet installed. Does _not_ support any operations that require access to the database, such as working with the data of modules. For example, you can use _OnPreInit_ to register custom implementations of interfaces.
Because you cannot manually set the initialization order of modules or define dependencies between modules, we do not recommend working with the data of other modules directly inside the _OnInit_ method\*.\* The best approach is to [assign handlers to system events](https://docs.kentico.com/13/custom-development/handling-global-events.md), and perform the actual operations inside the handler methods. For general code that is not related to a specific system event, you can use the **ApplicationEvents.Initialized.Execute** event, which occurs after all modules in the system are initialized.
For example, the following code extends the sample _Company overview_ module. The example uses event handling to log an entry in the system's [Event log](https://docs.kentico.com/13/developing-websites/troubleshooting-websites/working-with-the-system-event-log.md) whenever a new office is created.
> **Note:** **Library references**
>
> You need to add references to your module project for any Xperience libraries required by your custom code. For example, the sample code below requires an additional references to the _CMS.EventLog_ and _CMS.Core_ libraries:
>
> 1. Right-click the **CompanyOverview** project in the Visual Studio Solution Explorer.
> 2. Select **Add -> Reference**.
> 3. Open the **Browse** tab of the **Reference manager** dialog, click **Browse** and navigate to the _**Lib**_ folder of your Xperience web project.
> 4. Add references to **CMS.EventLog.dll**and **CMS.Core.dll**.
```csharp title="Example"
using CMS;
using CMS.Core;
using CMS.DataEngine;
using CMS.EventLog;
using CompanyOverview;
[assembly: RegisterModule(typeof(CompanyOverviewModule))]
namespace CompanyOverview
{
public class CompanyOverviewModule : Module
{
// Module class constructor, inherits from the base constructor
// Uses the code name of the module as the first parameter
// Sets the isInstallable parameter to true, ensures that the module's initialization runs only after its database objects are installed
public CompanyOverviewModule() : base("CompanyOverview", true)
{
}
///
/// Initializes the module. Called when the application starts.
///
protected override void OnInit()
{
base.OnInit();
// Assigns a handler to the Insert.After event for OfficeInfo objects
CompanyOverview.OfficeInfo.TYPEINFO.Events.Insert.After += Office_InsertAfter;
}
private void Office_InsertAfter(object sender, ObjectEventArgs e)
{
// Logs an information entry into the system's event log whenever a new office is created
string message = "New office '" + e.Object.GetStringValue("OfficeDisplayName", "") + "' was created in the Company overview module.";
Service.Resolve().LogInformation("Company overview module", "NEW OFFICE", message);
}
}
}
```
## Creating the module installation package
You can transfer the custom module to other instances of Xperience by [creating installation packages](https://docs.kentico.com/13/custom-development/creating-custom-modules/creating-installation-packages-for-modules.md#creating-the-module-installation-package). Edit the module in the **Modules** application and click **Create installation package** on the **General** tab. The resulting package contains the module's database objects and files, with all code compiled into a DLL.
When the package is [installed](https://docs.kentico.com/13/custom-development/creating-custom-modules/creating-installation-packages-for-modules/installing-modules-from-installation-packages.md) on another instance of Xperience, the module automatically becomes sealed and is no longer in development mode (i.e. it is not possible to edit the module's properties, or create new classes, UI elements, permissions and settings). If you view the target instance's solution in Visual Studio, the module's web application project is not present – all code is already compiled inside the module's DLL and other files are integrated into the main Xperience project.
> **Note:** **Note**: You cannot create installation packages for the module again on instances where it is sealed. You always need to prepare the module package on the original instance where the module is in development mode.