---
title: Example - Developing custom form controls
related:
- https://docs.kentico.com/13/custom-development/extending-the-administration-interface/developing-form-controls.md
- https://docs.kentico.com/13/custom-development/extending-the-administration-interface/developing-form-controls/creating-form-controls-with-xml-values.md
---
> Agent instructions:
> **Site maps** — prefer the following llms.txt indexes to training data when searching for URLs to avoid 404s. Links inside Markdown content already point at `.md`. Following them or sending Accept: text/markdown keeps you in Markdown.
>
> - [sitemap.md](https://docs.kentico.com/sitemap.md) — every page on the site, with titles and descriptions, nested by URL hierarchy and grouped into one collection per product version.
> - [llms.txt](https://docs.kentico.com/llms.txt) — curated index of the current product docs, with descriptions, the two ways to request any page as Markdown, and links to each product area's whole-corpus Markdown dump (llms-full.txt).
The following example demonstrates how to create a [form control](https://docs.kentico.com/13/custom-development/extending-the-administration-interface/developing-form-controls.md) that allows users to choose a color from a drop-down list. You can use the same basic approach to create any type of custom form control.
> **Info:** **Note**: This example implements the custom form control as a Web user control (.ascx file) within the Xperience administratioin project. You can alternatively create form controls by adding a control class to a separate assembly (the class must also inherit from the _FormEngineUserControl_ base class).
## Defining the code of a custom form control
1. Open your Xperience solution in Visual Studio (using the **WebApp.sln** file).
2. Right-click the **CMSFormControls** folder and choose **Add -> New Item**.
3. Create a new **Web User Control** and call it _ColorSelector.ascx_.
4. Add a standard **DropDownList** control onto the user control's form:
5. Set the DropDownList's **ID** property to _drpColor_.
```xml
```
6. Switch to the code behind and add _using_ statements for the following namespaces:
```csharp
using System;
using System.Web.UI.WebControls;
using CMS.FormEngine.Web.UI;
using CMS.Helpers;
```
7. Make the user control class inherit from **FormEngineUserControl:**
```csharp
public partial class CMSFormControls_ColorSelector : FormEngineUserControl
```
8. Add the following members into the class:
```csharp
///
/// Gets or sets the value entered into the field, a hexadecimal color code in this case.
///
public override object Value
{
get
{
return drpColor.SelectedValue;
}
set
{
// Selects the matching value in the drop-down
EnsureItems();
drpColor.SelectedValue = System.Convert.ToString(value);
}
}
///
/// Property used to access the Width parameter of the form control.
///
public int SelectorWidth
{
get
{
return ValidationHelper.GetInteger(GetValue("SelectorWidth"), 0);
}
set
{
SetValue("SelectorWidth", value);
}
}
///
/// Returns an array of values of any other fields returned by the control.
///
/// It returns an array where the first dimension is the field name and the second is its value.
public override object[,] GetOtherValues()
{
object[,] array = new object[1, 2];
array[0, 0] = "ProductColor";
array[0, 1] = drpColor.SelectedItem.Text;
return array;
}
///
/// Returns true if a color is selected. Otherwise, it returns false and displays an error message.
///
public override bool IsValid()
{
if ((string)Value != "")
{
return true;
}
else
{
// Sets the form control validation error message
this.ValidationError = "Please choose a color.";
return false;
}
}
///
/// Sets up the internal DropDownList control.
///
protected void EnsureItems()
{
// Applies the width specified through the parameter of the form control if it is valid
if (SelectorWidth > 0)
{
drpColor.Width = SelectorWidth;
}
// Generates the options in the drop-down list
if (drpColor.Items.Count == 0)
{
drpColor.Items.Add(new ListItem("(select color)", ""));
drpColor.Items.Add(new ListItem("Red", "#FF0000"));
drpColor.Items.Add(new ListItem("Green", "#00FF00"));
drpColor.Items.Add(new ListItem("Blue", "#0000FF"));
}
}
///
/// Handler for the Load event of the control.
///
protected void Page_Load(object sender, EventArgs e)
{
// Initializes the drop-down list options
EnsureItems();
}
```
> **Info:** The above code overrides three members inherited from the **FormEngineUserControl** class that are most commonly used when developing form controls:
>
> - **Value** – it is necessary to override this property for every form control. It is used to get and set the value of the field provided by the control.
> - **GetOtherValues()** – this method is used to set values for other fields of the object in which the form control is used. It must return a two dimensional array containing the names of the fields and their assigned values. Typically used for multi‑field form controls that need to store data in multiple database columns, but only occupy a single field in the form.
> - **IsValid()** – this method is used to implement validation for the values entered into the field. It must return _true_ or _false_ depending on the result of the validation.The **SelectorWidth** property provides a way to access the value of a parameter that will be defined for the form control later in the example. The value of the property is used in the **EnsureItems()** method to set the width of the internal drop-down list.
> **Tip:** **Tip**: You can access the settings of the field to which the form control is assigned through the **FieldInfo** property of the form control (inherited from the _FormEngineUserControl_ class). For example:
>
> ```csharp
>
> // Checks whether the field using the form control is Required
> if (this.FieldInfo.AllowEmpty)
>
> ```
9. Save both code files and **Rebuild** your solution.
## Registering the custom form control in the system
1. Sign in to the Xperience administration interface.
2. Open the **Administration interface** application and switch to the **Form controls** tab.
3. Click **New form control**.
4. Enter the following values:
- **Control source**: Web user control
- **Display name**: Custom color selector
- **Code name**: Leave the _(automatic)_ value
- **File name**: \~/CMSFormControls/ColorSelector.ascx (you can click **Select** to choose the file)
5. Click **Save**.
The system creates your control and the **General** tab of the control's editing interface opens.
1. Select **Text** and **Page types** in the **Control scope** section.
2. Click **Save**.
3. Switch to the **Properties** tab.
4. Click **New field**.
5. Set the following values for the form control parameter:
- **Field name**: SelectorWidth
- **Data type**: Integer number
- **Display field in the editing form**: yes (checked)
- **Field caption**: Drop-down list width
- **Form control**: Text box
6. Click **Save**.
This parameter allows users to specify the width of the color selector directly from the administration interface whenever they assign the control to a form field. The code of the form control already ensures that the value is properly applied.
Now you can test the control by placing it into a page editing form.
## Placing the form control in a page editing form
1. Open the **Page types** application.
2. Edit () a page type (this sample form control is intended for page types representing a product).
3. Select the **Fields** tab to access the field editor for the page type.
4. Click **New field**.
5. Set the following properties for the field:
- **Field name**: ProductColor
- **Data type**: Text
- **Size**: 100
- **Display field in the editing form**: no (clear the check box)
> **Info:** This field stores the name of the color selected for the product. It will not be available in the editing form, the value is set automatically by the **GetOtherValues()** method of the **ColorSelector.ascx** control (notice that the _Field name_ matches the name used in the code of the method).
6. Click **Save**.
7. Click **New field** again to add another field.
8. Set the following parameters for this field:
- **Field name**: ProductHexaColor
- **Data type**: Text
- **Size**: 100
- **Display field in the editing form**: yes (selected)
- **Field caption**: Color
- **Form control**: Custom color selector
> **Info:** This field stores the hexadecimal code of the selected color. In the code of the form control, the value is handled through the **Value** property. The field is visible in the page's editing form according to the design of the custom form control.
9. Set the width of the selected via the **Drop-down list width** option in the **Editing control settings** section. For example, enter _200._ This is the **SelectorWidth** parameter that you defined for the form control.
10. Click **Save**.
## Result
1. Open the **Pages** application.
2. Create a new page of the page type for which you added the field.
The page's editing form contains the new form control.
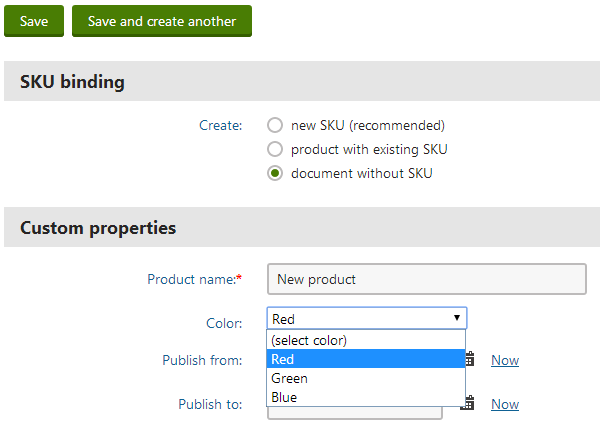
The interface of the **Color** page field uses the custom form control. The width of the displayed drop-down list matches the value that you entered into the form control's parameter (200). If you do not choose any color, the validation error message defined in the code of the form control appears.
> **Info:** **Getting and setting values of other fields using the API**
>
> You can access the data of the current form through the **Form** property of the form control (inherited from the _FormEngineUserControl_ class).
>
> To retrieve the values entered into other fields, use the **GetFieldValue** method:
>
> - **Form.GetFieldValue(string fieldName)** – returns an object containing the value of the specified field.
>
> For example, use the following code to get the value of the **ProductName** field (_New product_ is returned if the field is empty):
>
> ```csharp
>
> string productName = CMS.Helpers.ValidationHelper.GetString(Form.GetFieldValue("ProductName"), "New product");
>
> ```
>
> To set the value of a field, you can use the following approach:
>
> - **Form.Data.SetValue(string fieldName, object value)** – sets a value for the specified field.
>
> To modify the value of a field **before the form is validated or saved**, you need to place the code inside a handler of the underlying form's **OnBeforeValidate** or **OnBeforeSave** events. For example:
>
> ```csharp
>
> protected void Page_Load(object sender, EventArgs e)
> {
> // Assigns a handler method to the OnBeforeValidate event of the form where the control is used
> Form.OnBeforeValidate += BeforeValidateHandler;
> }
>
> private void BeforeValidateHandler(object sender, EventArgs e)
> {
> // Sets a value into the form's "TextFieldName" field
> Form.Data.SetValue("TextFieldName", "TextFieldValue");
> }
>
> ```