---
title: Adding widget dashboards to the interface
---
> Agent instructions:
> **Site maps** — prefer the following llms.txt indexes to training data when searching for URLs to avoid 404s. Links inside Markdown content already point at `.md`. Following them or sending Accept: text/markdown keeps you in Markdown.
>
> - [sitemap.md](https://docs.kentico.com/sitemap.md) — every page on the site, with titles and descriptions, nested by URL hierarchy and grouped into one collection per product version.
> - [llms.txt](https://docs.kentico.com/llms.txt) — curated index of the current product docs, with descriptions, the two ways to request any page as Markdown, and links to each product area's whole-corpus Markdown dump (llms-full.txt).
If the default widget dashboards in the administration interface do not meet your requirements, you can create your own dashboard applications or pages.
> **Note:** **Important**
>
> Widget dashboards are a completely separate feature from the system's main [application dashboard](https://docs.kentico.com/13/using-the-xperience-interface.md). Every widget dashboard is either a standalone application, or a page within another application.
>
> Dashboard widgets are also unrelated to [page builder widgets](https://docs.kentico.com/13/managing-website-content/adding-page-content-using-widgets.md), which can be developed and added to the content of website pages.
The following _example_ demonstrates how to add a custom dashboard application. You can apply the same principles when creating widget dashboards in any location.
## Creating the dashboard page template
First, create a [page template](https://docs.kentico.com/13/custom-development/extending-the-administration-interface/developing-the-administration-using-portal-engine/creating-portal-engine-templates.md) for the dashboard:
1. Open the **Administration interface** application and switch to the **Page templates** tab.
2. Select the **Dashboard pages** category in the tree.
3. Click **New template** and enter the following values:
- **Template display name**: Custom dashboard
- **Template code name**: CustomDashboard
4. Click **Save**.
5. Select _Dashboard page_ as the **Template type**.
6. Click **Save**.
Adjust the [layout](https://docs.kentico.com/13/custom-development/extending-the-administration-interface/developing-the-administration-using-portal-engine/editing-page-layouts.md) of the page template:
1. Switch to the **Layout** tab.
2. Copy the following sample code into the layout to define web part/widget zones for the template:
```html
```
3. Click **Save**.
4. Switch to the **Design** tab.
5. Expand the menu () of the **DashboardTop** zone and click **Configure**.
6. Switch the **Widget zone type** property from _None_ to _Dashboard_.
7. Click **Save & Close**.
8. Repeat the steps 5 – 7 for the **DashboardLeft** and **DashboardRight** zones.
Add [web parts](https://docs.kentico.com/13/custom-development/extending-the-administration-interface/developing-web-parts.md) and default [widgets](https://docs.kentico.com/13/custom-development/extending-the-administration-interface/setting-up-widget-dashboards/creating-dashboard-widgets.md) to the zones:
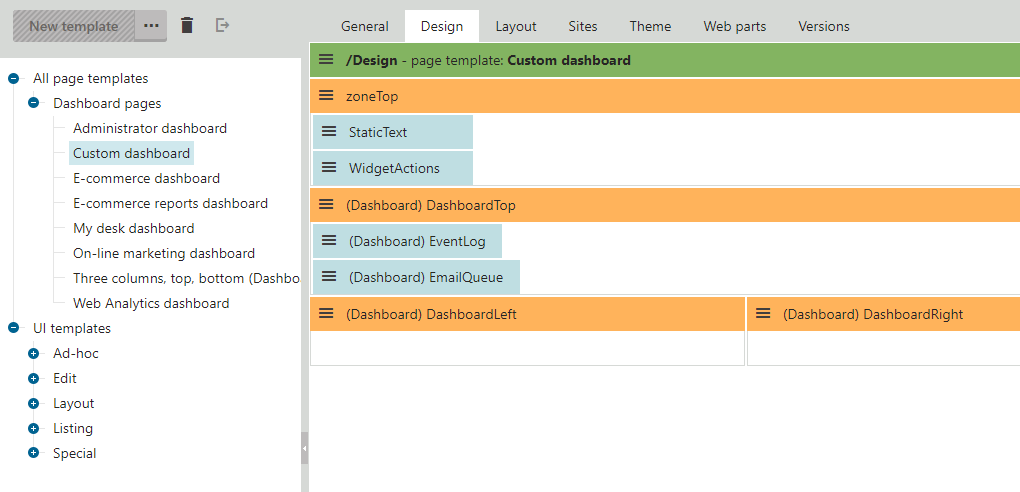
1. [Add](https://docs.kentico.com/13/custom-development/extending-the-administration-interface/developing-the-administration-using-portal-engine/using-and-configuring-web-parts.md) the **Widget actions** web part into the **ZoneTop** zone.
- By configuring the web part's _Widget zone ID_ property to the ID of any dashboard zone, you can designate the zone where new widgets are created when users click the _Add widget_ button. By default, the property is empty and the web part uses the first available zone (_DashboardTop_ in this case).
2. Add the **Static text** web part to the same zone and set the following properties:
- **Text**: This is a custom dashboard page
- **Display as**: Header level 2
3. Click **Save & Close**.
4. Add some default widgets to the dashboard. For example:
1. Expand the menu () of the **DashboardTop** zone and click **Add new widget**.
2. Choose the **Dashboard -> EventLog** widget.
3. Confirm the dialogs without making changes.
4. Repeat the process and add the **Dashboard -> Email queue** widget.
This sets the default content of the dashboard that individual users can later configure and expand.
## Adding the dashboard UI element
To create a new widget dashboard application, you need to add a UI element to the system:
1. Open the **Modules** application.
2. Edit () the **Custom** module. Note that the **Module code name** is _cms.customsystemmodule_ on the **General** tab.
3. Switch to the **User interface** tab.
4. Select the **CMS -> Administration -> Configuration** element in the tree.
5. Click **New element** ().
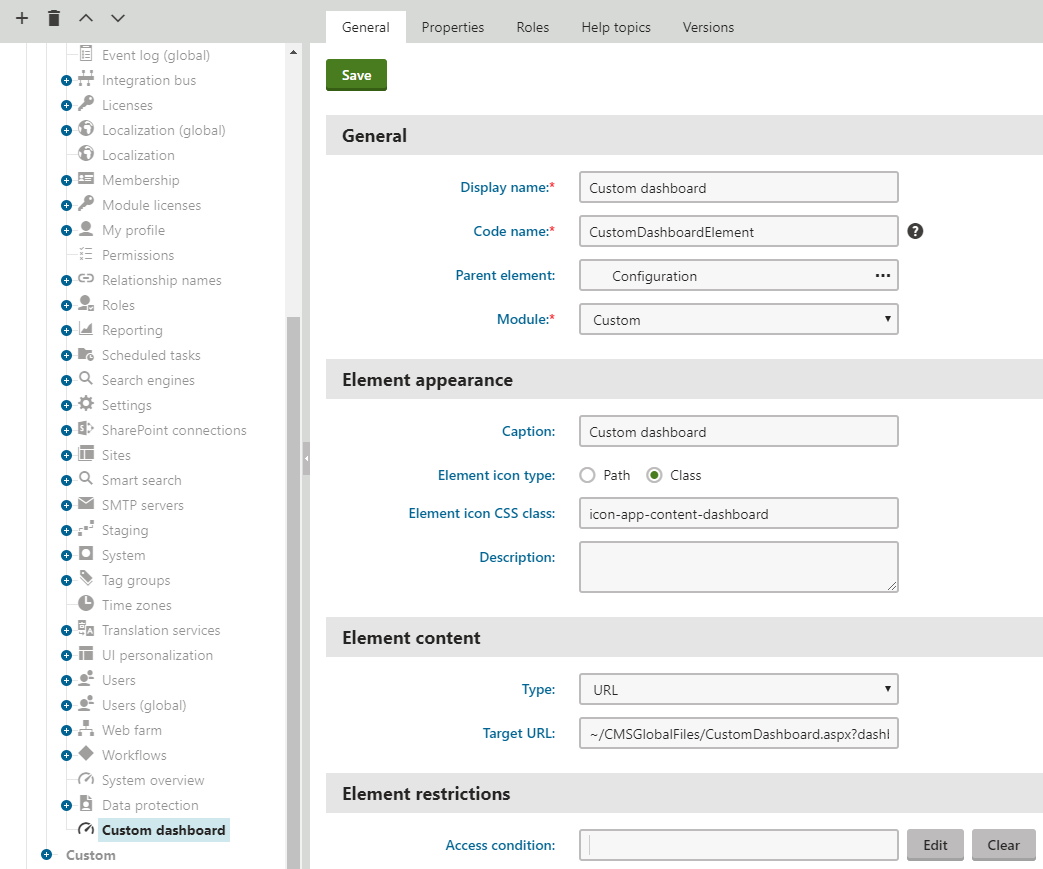
6. Enter the following values:
- **Display name**: Custom dashboard
- **Code name**: CustomDashboardElement
- **Module**: Custom
- **Caption**: Custom dashboard
- **Element icon type**: Class
- **Element icon CSS class**: icon-app-content-dashboard
- **Type**: URL
- **Target URL**: \*\~/CMSGlobalFiles/CustomDashboard.aspx?dashboardName=CustomDash\&templateName=CustomDashboard&{hash}\*Sets the URL of the page with the content of the UI element. You will create the source file used in the URL above later in the example. When creating links to dashboard pages, you need to understand and correctly specify the query string parameters:
- **dashboardName** – sets a name for the dashboard to ensure uniqueness in cases where multiple dashboards use the same page template. The content of a dashboard is unique for every user. If two or more dashboards share a page template and the _dashboardName_ parameters in the URLs used to access the page have the same value, changes made to one of the dashboards also affect the other dashboards (for the given user and site).
- **templateName** – specifies the code name of the page template that the dashboard is based on. The type of the assigned template must be _Dashboard page_. This example uses the template created in the previous steps.
- **hash** – the system automatically generates a hash code for the element
7. Click **Save**.
> **Info:** When adding applications to the interface of an actual live website, you can set a [macro condition](https://docs.kentico.com/13/macro-expressions/writing-macro-conditions.md) in the **Content permissions** field to define security requirements for access to the application.
The system creates the new UI element.
## Creating the dashboard page source file
Now you need to develop the **.aspx** file of the dashboard page in your web project:
1. Open your administration project in Visual Studio.
2. Create a **New folder** under the root called _CMSGlobalFiles_ (if it does not already exist).
3. Right‑click the folder and select **Add -> New Item**.
4. Select the **Web Form with Master Page** template.
5. Name the web form _CustomDashboard_.
- This is the file specified in the **Target URL** of the previously created UI element. The location ensures that the system exports the file with any site that includes global folders in the export package.
6. Select **\~/CMSMasterPages/UI/Dashboard.master** as the master page.
7. Modify the page's markup to match the following:
```html
<%@ Page Language="C#" MasterPageFile="\~/CMSMasterPages/UI/Dashboard.master" AutoEventWireup="true" CodeBehind="CustomDashboard.aspx.cs" Inherits="CMSApp.CMSGlobalFiles.CustomDashboard" Theme="Default" %>
<%@ Register Src="\~/CMSModules/Widgets/Controls/Dashboard.ascx" TagName="Dashboard" TagPrefix="cms" %>
```
> **Info:** The **Dashboard** user control handles the entire functionality of the dashboard. It processes the query string parameters from the URL used to access the page and displays the corresponding dashboard according to the specified dashboard name, page template and context‑related data such as the current site and user.
8. Switch to the web form's code behind.
9. Set the **CustomDashboard** class to inherit from **DashboardPage**.
10. Modify the class to contain the following code:
```csharp
using System;
using CMS.Core;
using CMS.UIControls;
namespace CMSApp.CMSGlobalFiles
{
// Specifies the UI element representing the dashboard in the administration interface
[UIElement(ModuleName.CUSTOMSYSTEM, "CustomDashboardElement")]
public partial class CustomDashboard : DashboardPage
{
protected override void OnInit(EventArgs e)
{
base.OnInit(e);
// Sets up the dashboard and ensures it has unique content for each site
ucDashboard.SetupSiteDashboard();
}
protected void Page_Load(object sender, EventArgs e)
{
// Security access checks for the current user
}
}
}
```
11. **Save** both files and **Rebuild** the solution.
## Result
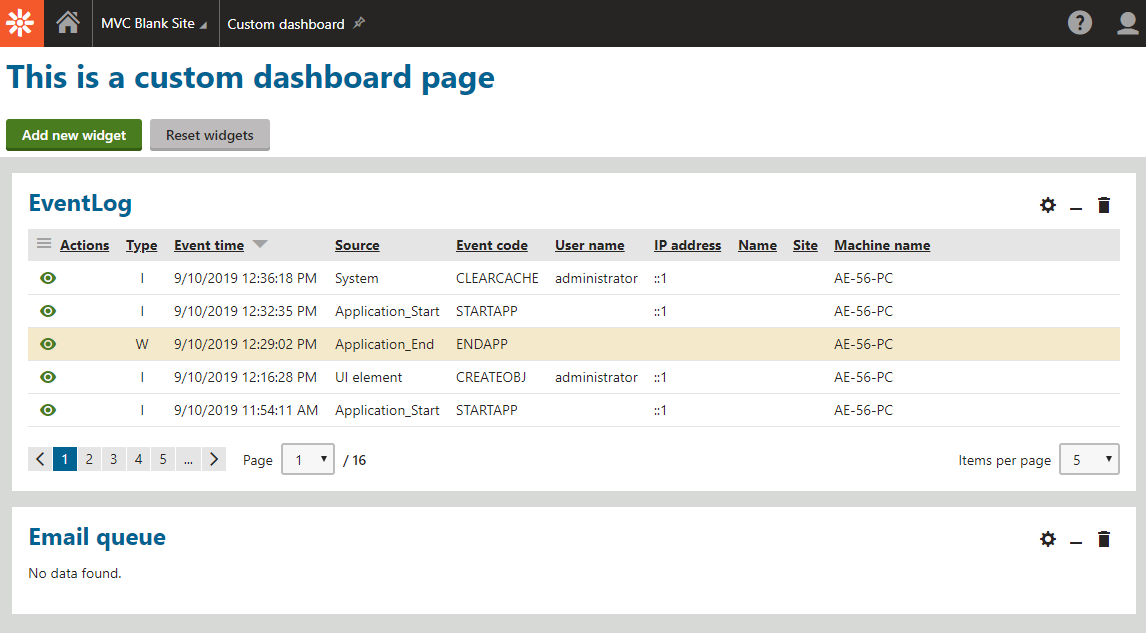
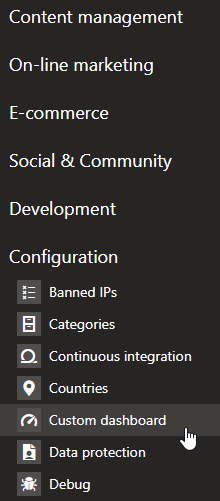
Users can now access the **Custom dashboard** application either through the application list or the application dashboard (if a user adds the custom application to their application dashboard).
The page displays a fully functional dashboard based on the created page template.