---
title: Configuring SMTP servers
related:
- https://docs.kentico.com/13/managing-users/sending-emails.md
- https://docs.kentico.com/13/configuring-xperience/configuring-smtp-servers/oauth-for-email-servers.md
---
> Agent instructions:
> **Site maps** — prefer the following llms.txt indexes to training data when searching for URLs to avoid 404s. Links inside Markdown content already point at `.md`. Following them or sending Accept: text/markdown keeps you in Markdown.
>
> - [sitemap.md](https://docs.kentico.com/sitemap.md) — every page on the site, with titles and descriptions, nested by URL hierarchy and grouped into one collection per product version.
> - [llms.txt](https://docs.kentico.com/llms.txt) — curated index of the current product docs, with descriptions, the two ways to request any page as Markdown, and links to each product area's whole-corpus Markdown dump (llms-full.txt).
Xperience includes many features that utilize email messages as part of their functionality, such as:
- [Newsletters and email campaigns](https://docs.kentico.com/13/on-line-marketing-features/managing-your-on-line-marketing-features/email-marketing.md)
- Various types of confirmation and double opt-in messages
- E-commerce notifications (order summaries for customers, etc.).
To allow the application to send out emails, you need to register and configure at least one SMTP server in the administration interface.
> **Note:** **SMTP connection restrictions on Microsoft Azure**
>
> If your application is [hosted on Microsoft Azure](https://docs.kentico.com/13/deploying-websites/running-xperience-on-microsoft-azure.md), emails may fail to send from Xperience due to SMTP connection restrictions on the side of Azure.
>
> To resolve such issues, read and follow the recommendations in the [Troubleshoot outbound SMTP connectivity problems in Azure](https://docs.microsoft.com/en-us/azure/virtual-network/troubleshoot-outbound-smtp-connectivity) article.
## Setting up the default SMTP server
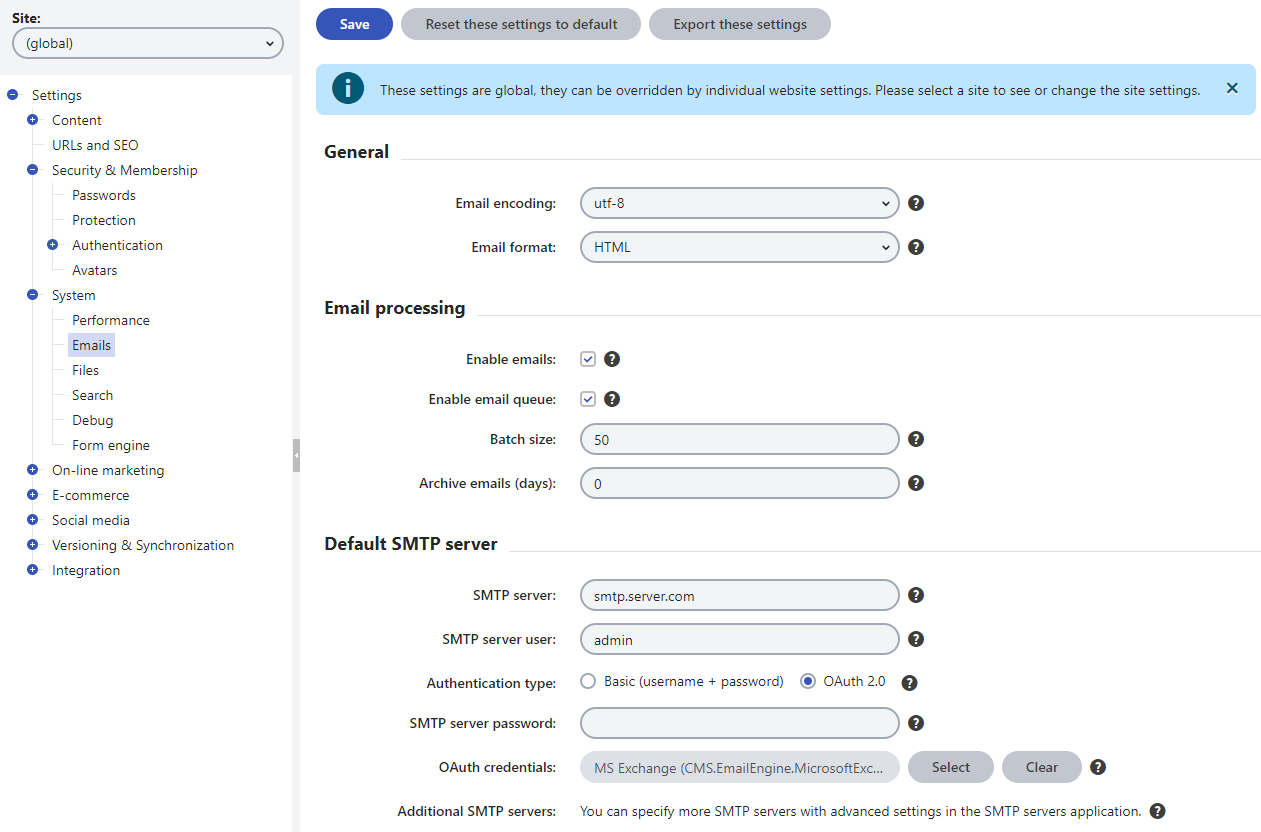
To register the main SMTP server:
1. Open the **Settings** application.
2. Navigate to the **System → Emails** category.
3. Select an option in the **Site** selector:
- Choose a specific site to register a server dedicated to a single website.
- Choose _**(global)**_ to register a designated global server – the server processes emails from all sites in the system and also handles emails that are not related to any specific website.
4. Fill in the following settings:
- **SMTP server** – enter the domain name or IP address of the server. Enter _localhost_ to use the server provided by your local machine. The connection automatically uses the HTTPS protocol if supported by the specified server.
> **Info:** **SMTP server port**
>
> By default, the connection to the SMTP server uses port **25**. To use a different port, include it in the server name. For example: _127.0.0.1:587_
- **SMTP server user** – enter the username used for authentication when connecting to the SMTP server.
- **Authentication type** – select the authentication mode used to connect to the SMTP server:
- **Basic (username + password)** – uses [Basic authentication](https://en.wikipedia.org/wiki/Basic_access_authentication). Many mail services are deprecating support of basic authentication, leaving OAuth as the only viable authentication type. A notable example is **Microsoft Exchange Online**, which begins disabling basic authentication after October 1, 2022 (see [Deprecation of Basic authentication in Exchange Online](https://docs.microsoft.com/en-us/exchange/clients-and-mobile-in-exchange-online/deprecation-of-basic-authentication-exchange-online)).
- **OAuth 2.0** – uses [OAuth 2.0 token-based authorization](https://oauth.net/). See [OAuth for email servers](https://docs.kentico.com/13/configuring-xperience/configuring-smtp-servers/oauth-for-email-servers.md).
- **SMTP server password** – if you have _Basic_ selected as the _Authentication type_, enter the password required to connect to the SMTP server under the specified username. Leave empty when using _OAuth 2.0_.
> **Info:** **Info**: After you enter and save a password, the field always displays 8 "masking" characters, even if the password is longer or shorter. This measure helps protect your password.
- **OAuth credentials** – if you have _OAuth 2.0_ selected as the _Authentication type_, select the OAuth credentials used for authentication. You can create and manage the credentials in the **Email OAuth credentials** application (see [OAuth for email servers](https://docs.kentico.com/13/configuring-xperience/configuring-smtp-servers/oauth-for-email-servers.md)).
5. Click **Save**.
The system uses the primary server as the default option when sending emails.
## Configuring additional SMTP servers
> **Note:** **Xperience Enterprise required**
>
> You need the **Kentico Xperience Enterprise** license edition to register multiple SMTP servers.
In addition to the default server, you can add any number of servers in the **SMTP servers** application. Having multiple SMTP servers allows the system to send out a greater volume of email traffic. Emails use the extra servers whenever the default server is busy.
You can manage existing servers through the following actions:
- **Edit** – opens the server's configuration interface
- **Delete**
- **Enable** / **Disable** – enables or disables the server within the context of Xperience
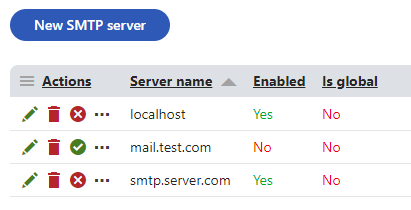
To register new servers, click **New SMTP server**.
When creating new SMTP servers or editing existing ones on the **General** tab, you can fill in the same options as described for the [default server](#setting-up-the-default-smtp-server). In addition, you can choose the **delivery method** for emails:
- **Network** – emails are sent directly to the SMTP server defined by the server name and credentials. This is the default setting for the default SMTP server defined in _Settings → System → Emails_.
- **Pickup directory** – emails are copied to a folder on the disk (defined by the Pickup directory option), from where they are processed by the SMTP server. Note that you need to grant the IIS\_IUSRS group write permissions for the chosen folder.
- **Pickup directory from IIS** – similar to the Pickup directory, but may be more difficult to configure. Choose this method if you are already using Microsoft SMTP servers on Windows Server operating systems. You also need to install the SMTP server feature into your IIS and configure it properly. See [Configure SMTP Email (IIS 7)](https://docs.microsoft.com/en-us/previous-versions/windows/it-pro/windows-server-2008-R2-and-2008/cc772058\(v=ws.10\)) for more information. Note that you need to ensure that the NETWORK SERVICE group has write permissions for the defined pickup folder.
> **Info:** Microsoft Azure supports only the **Network** method.
You may also select the server's **Priority**. See the _Configuring email processing_ section below for more information about server priority.
If there are multiple sites running under your application, you can assign servers to individual websites on the **Sites** tab. SMTP servers can either be global or limited to one or more specific websites.
## Configuring email processing
You can configure how the system delivers emails to the SMTP servers through the settings in **Settings → System → Emails**.
> **Note:** **Enabling sending of emails**
>
> We recommend keeping the **Enable emails** setting enabled both globally and for all sites (switch between the options using the **Site** selector in the _Settings_ application).
>
> Having the setting enabled globally is required for the system to send emails that are not related to a specific site (for example emails sent by [marketing automation](https://docs.kentico.com/13/on-line-marketing-features/managing-your-on-line-marketing-features/marketing-automation.md) processes, etc.).
If **Enable email queue** is selected, the system temporarily stores all outgoing emails in the database instead of sending them directly to the SMTP servers. This allows advanced email processing and resending of mails that are lost due to errors. _Using the email queue is highly recommended_ when sending out large amounts of emails over a short amount of time. Refer to [Sending emails](https://docs.kentico.com/13/managing-users/sending-emails.md) to learn more about the email queue.
The system periodically processes the email queue (every minute by default) and asynchronously distributes the stored emails to the SMTP servers:
1. A predefined amount of emails is loaded from the queue as a batch.
2. The system goes through the emails one by one and assigns them to servers according to their priority and availability.
- The default SMTP server always has the highest priority.
- Other servers are ordered according to the value of their **Priority** property (i.e. emails are first assigned to _High_ priority servers, then _Normal_ and finally _Low_).
3. When a server receives an email, the server is flagged as busy until the sending is complete.
4. The system loads a new batch from the queue and continues assigning individual emails to available servers.
This process is repeated until all emails in the queue are mailed out.
### Batch size
The maximum number of emails which is loaded from the database in a single batch is determined by the value of the **Batch size** setting. The batch size affects all sites in the system, so it is only available if the _(global)_ option is selected in the **Site** selector on the top left of the settings page.
The value of the batch size affects the number and frequency of **database queries**. If you set the batch size too large, the system will have to process a lot of database data at one time. Using a smaller batch size increases the frequency of database queries and may reduce the database performance.
## Testing SMTP servers
To confirm that your SMTP servers are configured correctly and available, you can send testing emails in the **System** application on the **Email** tab.
## Debugging emails
Debugging can help resolve problems with emails sent by Xperience.
To enable email debugging, add the following keys to the _configuration/appSettings_ section of your project's _web.config_ file:
```xml
```
- **CMSLogEmails** – logs all sent emails to the **\~/App\_Data/logemails.log** file. The log contains each email's:
- Timestamp, identifying when the email was sent
- Recipients
- Sender
- Subject
- Custom headers inserted via the Xperience API
- Custom header encoding (UTF-8 by default)
- **CMSDebugEmails** – disables sending of emails to the actual recipients. The system only logs emails into the [event log](https://docs.kentico.com/13/developing-websites/troubleshooting-websites/working-with-the-system-event-log.md). Helpful if you need to test the functionality, but do not want the emails to actually reach the recipients.
- To view the event log, open the **Event log** application.
- The emails are logged as **Information** type events.
- The **Event code** column contains the recipient's address.
- The system randomly generates _Sending failed for _ errors to simulate sending errors.