---
title: Configuring multi-factor authentication
related:
- https://docs.kentico.com/13/configuring-xperience/managing-sites/configuring-settings-for-sites/settings-security-membership/settings-authentication.md
- https://docs.kentico.com/13/custom-development/handling-global-events/handling-custom-multi-factor-authentication.md
---
> Agent instructions:
> **Site maps** — prefer the following llms.txt indexes to training data when searching for URLs to avoid 404s. Links inside Markdown content already point at `.md`. Following them or sending Accept: text/markdown keeps you in Markdown.
>
> - [sitemap.md](https://docs.kentico.com/sitemap.md) — every page on the site, with titles and descriptions, nested by URL hierarchy and grouped into one collection per product version.
> - [llms.txt](https://docs.kentico.com/llms.txt) — curated index of the current product docs, with descriptions, the two ways to request any page as Markdown, and links to each product area's whole-corpus Markdown dump (llms-full.txt).
Multi-factor authentication adds an additional layer of security to the sign-in process. In addition to the basic password, users need to verify their identity using one or more additional security components.
The multi-factor authentication feature described on this page is supported only for the **administration application**. For the live site, you can implement your own multi-factor authentication functionality (for example, see the [Two-factor authentication with ASP.NET Identity](https://docs.microsoft.com/en-us/aspnet/identity/overview/features-api/two-factor-authentication-using-sms-and-email-with-aspnet-identity) article).
By default, the administration interface provides support for a combination of standard forms authentication with a username and password, and a **passcode** generated by an authenticator application using the [Time-based One-time Password Algorithm](https://en.wikipedia.org/wiki/Time-based_One-time_Password_Algorithm) (TOTP), for example [Google Authenticator](https://support.google.com/accounts/answer/1066447?hl=en).
> **Info:** The authenticator application must be compatible with [RFC 6238](https://tools.ietf.org/html/rfc6238).
The default multi-factor authentication process consists of the following steps:
1. A user wants to sign in and enters their username and password.
2. The system verifies the credentials, displays a secret key and requests a passcode.
3. The user enters the secret key into their TOTP authenticator application.
4. The application generates a temporary passcode.
5. The user types the passcode into the Xperience authentication form.
6. The system signs in the user.
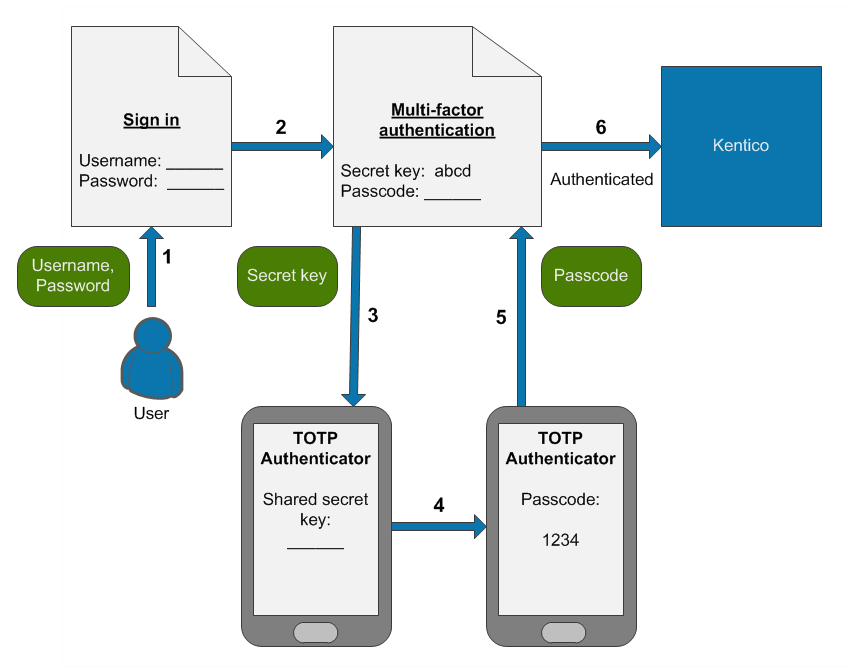
The system only displays the secret key on the first sign-in after multi-factor authentication is enabled. The next time the user signs in, the steps related to the secret key are no longer required, and the user only generates a new passcode in their authenticator application.
> **Note:** **Passcode expiration**
>
> By default, the system accepts passcodes generated **5 minutes** before or after the time of the authentication attempt. For example, if a user's authenticator application and your website server have exactly synchronized time settings, users have 5 minutes to enter the passcode.
## Security and limitations
The multi-factor authentication is:
- Available only for the default forms authentication method.
- Not compatible with the [Autocomplete](https://docs.kentico.com/13/securing-websites/designing-secure-websites/securing-and-protecting-the-system/autocomplete-deactivation.md) functionality.
For security reasons, we strongly recommend limiting the [maximum number of invalid sign-in attempts](https://docs.kentico.com/13/securing-websites/designing-secure-websites/securing-user-accounts-and-passwords/invalid-sign-in-attempts.md) to a small value, for example 5. Incorrectly submitted passcodes count as invalid sign-in attempts, so potential attackers cannot guess a valid passcode in the specified number of attempts.
If the [screen locking](https://docs.kentico.com/13/securing-websites/designing-secure-websites/securing-and-protecting-the-system/screen-locking.md) feature is enabled, entering of the passcode is also required when unlocking the screen.
## Enabling multi-factor authentication
> **Info:** **Notes**
>
> - The multi-factor authentication settings have a global effect. They cannot be configured differently for individual sites.
> - Keep the **Display secret key** setting enabled unless you have a [custom implementation](https://docs.kentico.com/13/custom-development/handling-global-events/handling-custom-multi-factor-authentication.md) of multi-factor authentication. With the default functionality, users need to enter the secret key into their authenticator application during their first sign-in to generate valid passcodes.
>
> See also: [Settings - Authentication](https://docs.kentico.com/13/configuring-xperience/managing-sites/configuring-settings-for-sites/settings-security-membership/settings-authentication.md)
### Enabling multi-factor authentication for selected users
1. Open the **Settings** application.
2. Select the **Security & Membership -> Authentication** category.
3. Select the **Enable multi-factor authentication** check box.
4. Click **Save**.
5. Open the **Users** application.
6. Edit the users for which you want to enable multi-factor authentication and enable the **Multi-factor authentication is required** option.
The given users will need to use multi-factor authentication when signing in to the Xperience administration interface.
You can also set up user account editing forms to allow users to choose whether to enable multi-factor authentication for their accounts. See [Allowing users to enable or disable multi-factor authentication](#allowing-users-to-enable-or-disable-multi-factor-authentication).
### Enabling multi-factor authentication for all users in the system
> **Warning:** **Keeping administrator access**
>
> After you enable multi-factor authentication globally, make sure that you do not lose administrator access. During the next sign-in under your administrator account, **note down the multi-factor secret key** for your account.
>
> The system only displays the secret key during the first sign-in. If you do not save the secret key or immediately set up your authenticator, you will lose access to the administration interface.
To enforce multi-factor authentication for all users in the system:
1. Open the **Settings** application.
2. Select the **Security & Membership -> Authentication** category.
3. Select the following check boxes:
- **Enable multi-factor authentication**
- **Multi-factor authentication is required globally**
4. Click **Save**.
All users now need to use multi-factor authentication when signing in to the administration interface. The **Multi-factor authentication is required** option of individual user accounts has no effect with this configuration.
> **Note:** **Recovering administrator access**
>
> If you enable multi-factor authentication globally and lose access to your administrator account (for example if you lose the secret key without setting up your authenticator), you can restore access by adding the **CMSAdminEmergencyReset** key to the _appSettings_ section of your project's web.config. For example:
>
> ```xml
>
>
>
> ```
>
> - _admin_ – the user name of the new account.
> - _password_ – the password for the new account – you should change it to your own value.
> - The third parameter is optional and indicates whether you want to create a new user with the Global administrator [privilege level](https://docs.kentico.com/13/managing-users/user-management.md).
> - The system automatically deletes the key after you gain access to the administration interface.
## Resetting the secret key for users
For multi-factor authentication to work, users need to enter a shared secret key into their authenticator application. The system displays this secret key to each user **once** during their first sign-in (after multi-factor authentication is enabled).
If a user loses the secret key before initializing their authenticator application, they will not be able to sign in. A new secret key is also required if a user wants to switch to a different authenticator application.
In these situations, administrators can reset the multi-factor secret of individual users:
1. Open the **Users** application.
2. Edit the given user account.
3. On the **General** tab, click the **Reset** button next to the **Reset multi-factor secret** field.
On the user's next sign-in attempt, the system displays a new secret key, which the user can enter into their authenticator application.
## Allowing users to enable or disable multi-factor authentication
If you have multi-factor authentication enabled [only for selected users](#enabling-multi-factor-authentication-for-selected-users), you can allow users to choose whether to enable multi-factor authentication for their account via the **My profile** application. To achieve this, make the **UserMFRequired** field visible in the corresponding [alternative form](https://docs.kentico.com/13/custom-development/extending-the-administration-interface/creating-alternative-forms.md).
To configure the visibility of the _UserMFRequired_ field in user [alternative forms](https://docs.kentico.com/13/custom-development/extending-the-administration-interface/creating-alternative-forms.md):
1. Open the **Modules** application.
2. Edit the **Membership** module.
3. Select the **Classes** tab and edit the **User** class.
4. On the **Alternative forms** tab, edit the **Edit profile (MyDesk)** form.
5. On the **Fields** tab, select the **UserMFRequired** field.
6. Enable the **Display field in the editing form** option.
7. Configure any required **Field appearance** settings.
8. Click **Save**.
Users can now enable or disable multi-factor authentication for their account in the **My profile** application on the **Details** tab.
## Customizing multi-factor authentication
> **Info:** If you wish to use a completely different authentication factor or passcode delivery method, you can implement your own solution (for example custom codes sent via email, SMS, etc.).
>
> See: [Handling custom multi-factor authentication](https://docs.kentico.com/13/custom-development/handling-global-events/handling-custom-multi-factor-authentication.md)
Developers can customize the parameters of the multi-factor authentication functionality by implementing a [custom helper class](https://docs.kentico.com/13/custom-development/customizing-providers.md) that inherits from the **CMS.Membership.MFAuthenticationHelper** class.
The following example demonstrates how to register a custom helper that changes the length and validity interval of multi-factor authentication passcodes.
1. Open your administration application's solution in Visual Studio.
2. [Add a custom assembly](https://docs.kentico.com/13/custom-development/adding-custom-assemblies.md) (_Class Library_ project) with class discovery enabled to the solution, or re-use an existing assembly.
3. Reference the project from the administration web project _(CMSApp_\*)\*.
4. Add a new class under the project, inheriting from the **MFAuthenticationHelper** class.
```csharp title="Example"
using System;
using CMS;
using CMS.Membership;
// Registers the custom MFAuthenticationHelper
[assembly: RegisterCustomHelper(typeof(CustomMFAuthenticationHelper))]
public class CustomMFAuthenticationHelper : MFAuthenticationHelper
{
///
/// The time interval for which the system considers multi-factor passcodes to be valid.
/// Calculated as a time interval before or after the time of the authentication attempt.
/// The default value is 5 minutes.
///
protected override TimeSpan ClockDriftTolerance
{
get
{
// Sets the passcode validity to 2 minutes before or after the time of the authentication
return TimeSpan.FromMinutes(2);
}
}
///
/// The length of the multi-factor passcode. The default value is 6.
/// Important: For the authentication to work, the value must match the number of characters used
/// by the authenticator applications that generate passcodes for your users.
///
protected override int PasscodeLength
{
get
{
// Sets the passcode length to 10 characters
return 10;
}
}
}
```
5. Save all changes and **Rebuild** the solution.
The custom helper in the example overrides the **ClockDriftTolerance** and **PasscodeLength** properties of the default _MFAuthenticationHelper_. When users attempt to sign-in with multi-factor authentication enabled, the system applies the customizations – passcodes must be 10 characters long and the validity tolerance is reduced to 2 minutes.