---
title: Connecting Xperience to social media
related:
- https://docs.kentico.com/13/integrating-3rd-party-systems/integrating-social-media/adding-social-media-accounts.md
- https://docs.kentico.com/13/integrating-3rd-party-systems/integrating-social-media/posting-to-social-media.md
---
> Agent instructions:
> **Site maps** — prefer the following llms.txt indexes to training data when searching for URLs to avoid 404s. Links inside Markdown content already point at `.md`. Following them or sending Accept: text/markdown keeps you in Markdown.
>
> - [sitemap.md](https://docs.kentico.com/sitemap.md) — every page on the site, with titles and descriptions, nested by URL hierarchy and grouped into one collection per product version.
> - [llms.txt](https://docs.kentico.com/llms.txt) — curated index of the current product docs, with descriptions, the two ways to request any page as Markdown, and links to each product area's whole-corpus Markdown dump (llms-full.txt).
Xperience supports connecting to **Facebook**, **Twitter**, and **LinkedIn**. Such connections allow you to:
- [add and view posts and content updates on the social media](https://docs.kentico.com/13/integrating-3rd-party-systems/integrating-social-media/posting-to-social-media.md)
- monitor your [Facebook page insights](https://docs.kentico.com/13/integrating-3rd-party-systems/integrating-social-media/viewing-facebook-insights.md), [Twitter channel analytics,](https://docs.kentico.com/13/integrating-3rd-party-systems/integrating-social-media/viewing-twitter-analytics.md) and [LinkedIn company pages metrics and trends](https://docs.kentico.com/13/integrating-3rd-party-systems/integrating-social-media/viewing-linkedin-statistics.md)
You connect to a social media by means of an **app** that you create on the social media, and then register the app within the system, as described on this page.
## Creating Apps
Apps on social media serve as an interface for connecting other applications, such as Xperience, to the particular social media.
- [Facebook](#creating-a-facebook-app)
- [Twitter](#creating-a-twitter-app)
- [LinkedIn](#creating-a-linkedin-app)
### Creating a Facebook App
**Prerequisite**: To connect with a Facebook app, you need to have [HTTPS](https://docs.kentico.com/13/securing-websites/deploying-websites-to-a-secure-environment/configuring-ssl.md) set up for your administration site.
1. Log in to your Facebook account at .
2. Go to and click **Create App**.
3. Enter the **Display Name** of your new app and your **Contact Email**.
4. Click **Create App ID**.
You have created a Facebook App. Now you need to further configure it to work properly.
#### Configuring the Facebook App
To configure the Facebook App you have just created:
1. Switch to the **Settings -> Basic** tab.
2. Specify the **Privacy Policy URL**.
3. Upload an image as the **App Icon**.
4. Click **Add Platform**and select _Website_.
5. Enter your **Site URL**.
6. Click **Save Changes**.
> **Note:** **Securing the Facebook integration**
>
> To ensure that the connection between Xperience and your Facebook app is secure, we strongly recommend the following additional configuration:
>
> 1. Open the **Settings -> Advanced** tab.
> 2. Scroll down to the **Security** section and switch the **Require App Secret** option to _Yes_.
> 3. Click **Save Changes**.Xperience automatically provides the required proof when communicating with your Facebook app.
7. Click the plus icon (+) next to the **Products** menu.
8. **Set up** the **Facebook Login** product.
9. Open the **Settings** tab of the Facebook Login product.
10. Make sure the **Web OAuth Login** setting is enabled.
11. Enter the following values into the **Valid OAuth redirect URIs** field:
- _**:443**/CMSModules/SocialMarketing/Pages/FacebookPageAccessTokenDialog.aspx_
- _**:443**/CMSModules/SocialMarketing/Pages/FacebookPageAccessTokenDialog.aspx?redirected=1_
> **Info:** The redirect URI values must be absolute, including the protocol, domain and virtual directory. Also, you need to explicitly include the **443** port in the value. For example:\
> _https://mydomain.com:443/CMSModules/SocialMarketing/Pages/FacebookPageAccessTokenDialog.aspx_
>
> If your website's administration interface is available on multiple domains, add all of the possible options.
12. Click **Save Changes**.
Next, you need to make your application publicly available (to allow usage by users outside of the **Roles** listed for you app) and obtain the required permissions:
1. Switch to **App Review** > **Permissions and Features**.
2. Request the following permissions for your app.
- **pages\_manage\_posts** – required to retrieve Page Access Tokens and [post content](https://docs.kentico.com/13/integrating-3rd-party-systems/integrating-social-media/posting-to-social-media.md) from Xperience to Facebook pages.
- **read\_insights** and **pages\_read\_user\_content** – required to retrieve [Facebook Insights statistics](https://docs.kentico.com/13/integrating-3rd-party-systems/integrating-social-media/viewing-facebook-insights.md) about published posts and the related pages.
Facebook requires a screencast to show reviewers how you use the requested permissions. To create a screencast, follow the instructions provided by Facebook on [how to create a screencast](https://developers.facebook.com/docs/facebook-login/review/examples#screencast).
Your Facebook app should now be ready. On the **Settings -> Basic** tab, you can find the data required to [register the Facebook app into Xperience](#registering-a-facebook-app-in-xperience).
### Creating a Twitter App
1. Go to and log in.
2. Click **Create an app**.
3. Fill in the required details and click **Create your Twitter application**.
- Required fields are marked with a star symbol.
4. Switch to **Permissions**, select **Read and Write** and click **Update settings**.
5. Switch to **API keys** and under**Your access token**, click **Create my access token**.
You now have the required data that you can use to [register the Twitter app into Xperience](#registering-a-twitter-app-in-xperience).
### Creating a LinkedIn App
> **Note:** **Prerequisite**: To integrate with LinkedIn, you need to set up [HTTPS](https://docs.kentico.com/13/securing-websites/deploying-websites-to-a-secure-environment/configuring-ssl.md) for your website. Your server (IIS) must support the **TLS 1.2** protocol.
1. Sign in to your LinkedIn account at or create a new account.
2. Visit .
3. Click **Create app** on the _My apps_ page.
4. Fill in at least the required fields and accept the LinkedIn legal terms.
5. Click **Create app**. LinkedIn redirects you to a page showing the details of your application.
6. Switch to the **Auth** tab and edit the **Redirect URLs** (under _OAuth 2.0 settings_).
7. Click **Add redirect URL** and enter the following value:\
**/CMSModules/SocialMarketing/Pages/LinkedInCompanyAccessTokenDialog.aspx**
> **Info:** The redirect URL value must be absolute, including the protocol, domain and virtual directory. For example:\
> _https://mydomain.com/CMSModules/SocialMarketing/Pages/LinkedInCompanyAccessTokenDialog.aspx_
>
> If your website's administration interface is available on multiple domains, add all of the possible options.
8. Click **Update**.
The _Auth_ tab contains the _Application credentials_, which you need to [register the LinkedIn app into Xperience](#registering-a-linkedin-app-in-xperience).
Your LinkedIn app additionally requires the following permissions:
- **rw\_organization\_admin**
- **r\_organization\_social**
- **w\_organization\_social**
To obtain the permissions, you need to apply and be approved as a LinkedIn Partner ([LinkedIn Marketing Developer Program](https://business.linkedin.com/marketing-solutions/marketing-partners/become-a-partner/marketing-developer-program)). You can apply on your app's **Products** tab by clicking **Add more products** and selecting **Marketing Developer Platform**.
## Registering Apps into Xperience
To be able to use social media features through apps, you must register the apps in the system. Depending on what social media features you want to use, you register your apps in different places:
- For **posting** to social media from within the Xperience administration interface, register the app in the system in the **Facebook**, **Twitter**, or **LinkedIn** application.
### Registering a Facebook app in Xperience
1. Open the **Facebook** application in Xperience and switch to the **Apps** tab.
2. Click **New app**.
3. Type a **Display name** you want to use for this app.
4. Enter your Facebook app's credentials – **Facebook App ID** and **Facebook App Secret**.
- You can find the credentials at , on your application's **Settings -> Basic** tab.

5. Click **Save**.
The system saves the app's credentials and the app appears in the list on the **Apps** page.
To finish the integration setup, [create a page](https://docs.kentico.com/13/integrating-3rd-party-systems/integrating-social-media/adding-social-media-accounts.md) in **Facebook -> Pages**.
### Registering a Twitter app in Xperience
1. Open the **Twitter** application in Xperience and switch to the **Apps** tab.
2. Click **New app**.
3. Type a **Display name** you want to use for this app.
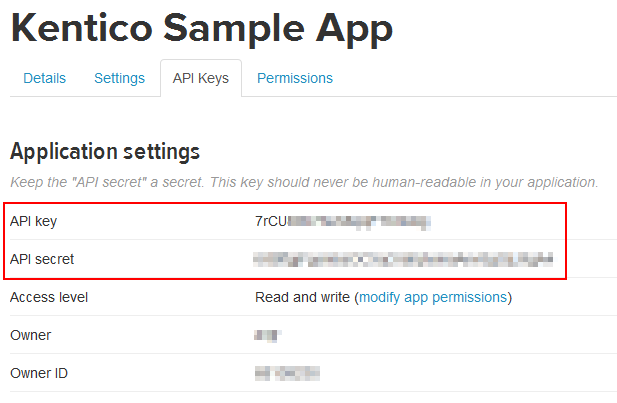
4. Enter your Twitter app's credentials – **API key**, **API secret**.
- You can get these on your API Keys page on Twitter:
5. Click **Save**.
The system saves the app's credentials to the database and the app appears in the list on the **Apps** page.
To finish the integration setup, [create a channel](https://docs.kentico.com/13/integrating-3rd-party-systems/integrating-social-media/adding-social-media-accounts.md) in **Twitter -> Channels**.
### Registering a LinkedIn app in Xperience
1. Open the **LinkedIn** application in Xperience and switch to the **Apps** tab.
2. Click **New app**.
3. Type a **Display name** you want to use for this app.
4. Enter your LinkedIn app's API keys – **Client ID** and **Client secret**.
- You can find the values when viewing your app on the _Auth_ tab at .
5. Click **Save**.
The system saves the app's credentials to the database and the app appears in the list on the **Apps** page.
To finish the integration setup, [create a company profile](https://docs.kentico.com/13/integrating-3rd-party-systems/integrating-social-media/adding-social-media-accounts.md) in **LinkedIn -> Company profiles**.
## Required permissions for registering Apps
To register apps in Xperience, an administrator must grant you permissions for the **Social media** module. You need either **Modify** or **Modify applications**.