---
title: Applying workflows to pages
related:
- https://docs.kentico.com/13/multilingual-websites/setting-up-multilingual-websites/defining-culture-dependent-workflow-scopes.md
---
> Agent instructions:
> **Site maps** — prefer the following llms.txt indexes to training data when searching for URLs to avoid 404s. Links inside Markdown content already point at `.md`. Following them or sending Accept: text/markdown keeps you in Markdown.
>
> - [sitemap.md](https://docs.kentico.com/sitemap.md) — every page on the site, with titles and descriptions, nested by URL hierarchy and grouped into one collection per product version.
> - [llms.txt](https://docs.kentico.com/llms.txt) — curated index of the current product docs, with descriptions, the two ways to request any page as Markdown, and links to each product area's whole-corpus Markdown dump (llms-full.txt).
There are two ways in which you can apply a workflow on pages on your site:
- [Directly applying a workflow on a page](#applying-workflows-on-pages-in-the-pages-application) – use this option if you want to apply a workflow on a page, or a page and its children, directly from the **Pages** application. Applying a workflow directly also creates a [workflow scope](#defining-workflow-scopes).
- [Creating a workflow scope](#defining-workflow-scopes) – use this option if you want to have more control when applying a workflow on the pages on your site. You can exclude pages from a workflow and control to which page types and cultures the scope applies. You can also create special conditions for each scope.
## Applying workflows on pages in the Pages application
This functionality is useful when you want to apply a workflow on a page, or a page and its children, directly from the **Pages** application. For example, when you create a page outside of an existing workflow scope.
> **Tip:** Users need to have the [Manage workflow permission](https://docs.kentico.com/13/managing-users/configuring-permissions.md) assigned in the content module to be able to use this functionality.
1. In the **Pages** application, navigate to the page that you want to apply a workflow on.
2. Click **Apply workflow**. A dialog box opens.
3. Select the workflow that you want to apply on the page.
4. Choose from the following options:
1. _To this page only_
2. _To this page and its children_
5. Click **Save & Close**.
> **Note:** Applying a workflow on a page directly also creates a [workflow scope](#creating-a-workflow-scope) that can be edited later.
## Defining workflow scopes
A workflow scope defines the conditions based on which a workflow will be applied to pages. When creating a workflow scope, you have to specify a page's path and whether you want to include child pages under this path. Then you can narrow down the set of covered pages by specifying some of the following parameters:
- page type
- culture
- macro condition
The system offers two types of scopes – **allowed** and **excluded**. This way you can apply a workflow on a large section of a site and then exclude sections, which you don't want the workflow to be applied on.
### Workflow priority
If a page matches scopes of multiple workflows, the workflow with the most specific parameters is applied on the page. Scopes are applied with the following priorities, from highest to lowest:
1. Scope with specified **page type and culture**
2. Scope with specified **page type**
3. Scope with specified **culture**
4. Scope **without** specified page type and culture.
5. Scope with the longest **path**.
6. Scope that covers only the specified **page without children**.
7. Scope that has its type set to **Excluded**.
8. Scope with specified **macro condition**.
#### Workflow priority examples
The following table presents the most common scenarios, where scopes from two different workflows (**Scope 1** and **Scope 2** columns in the table) conflict with each other. The **Result** column explains which scope takes priority.
| Scope 1 setup | Scope 2 setup | Result |
| -------------------------------- | ------------------------------------------------------------------- | --------------------------------------------------------------------------------------------------------------------------------------------------------------------------- |
| **This scope covers:** /News | **This scope covers:** /News
**Page type:** Press releases | Press releases under the News page will use Scope 2, the News page itself and its other children will use Scope 1. |
| **This scope covers:** /Products | **This scope covers:** /Products/Smartphones | All pages under the Products page will use Scope 1, except for the Smartphones page and its child pages, which will use Scope 2. |
| **This scope covers:** /Products | **This scope covers:** /Products/Smartphones
Only specified page | All pages under the Products page will use Scope 1, except for the Smartphones page, which will use Scope 2. However, children under the Smartphones page will use Scope 1. |
### Creating a workflow scope
Before creating a workflow scope, you need to [create a workflow](https://docs.kentico.com/13/configuring-xperience/configuring-the-environment-for-content-editors/configuring-workflows/creating-workflows.md) first.
1. In the **Workflows** application, edit an existing workflow.
2. Select the **Scope** tab.
3. Choose a site you want the scope to be effective on using the **Site** drop-down list.
4. Click **New workflow scope**.
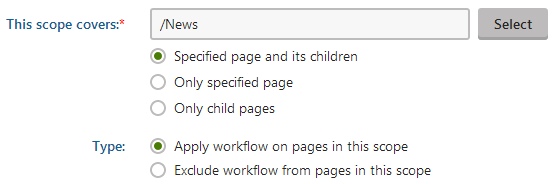
5. Define the part of the content tree that you want to be covered by the scope. Click **Select** next to the **This scope covers** property.
6. In the dialog that opens, choose the page you want covered by the scope.
7. Specify whether you want to cover the page and its child pages, only the page or only its children.
8. Select if you want the scope to be allowed or excluded. Keep the following behavior in mind when working with exclusions:
> **Note:** **Working with exclusions**
>
> _Exclude workflow from pages in this option_ applies only to the workflow under which it has been specified and does not override scopes in different workflows.
>
> For example, under _Workflow 1_, you have _"/Products" and its children_ allowed and _"/Products/Smartphones"_ excluded. Under _Workflow 2,_ however, you have _"/Products" and its children_ allowed and no exclusion specified. The exclusion specified under _Workflow 1_ will have no effect on the scope of _Workflow 2_.
9. Click **Save**.
> **Tip:** **Tip**
>
> If you want the scope to cover the whole site, or you want to specify only the parameters in the Advanced section, enter "**/**" (i.e. the path of the root page) in thefield next to the **This scope covers** property. Make sure that the scope covers the specified page including its children.
#### Advanced options
You can use these options to further refine the workflow scope. Keep in mind that the steps within the **Advanced** sections are optional.
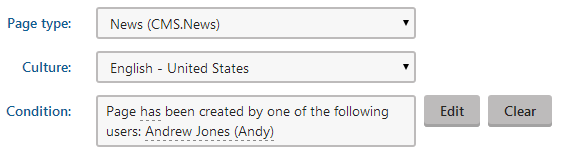
1. Choose a page type. The workflow will be applied only on pages of this type.
1. Make sure the desired page type is assigned to the site you have selected.
2. If you had to assign the page type to the site, click **Save** to refresh the page and load the newly assigned page type.
3. Select the page type from the **Page type** drop-down list.
2. Specify a culture. The workflow will be applied only on pages in this culture.
1. Make sure the culture is assigned to the site you have selected.
2. If you had to assign the culture to the site, click **Save** to refresh the page and load the newly assigned culture.
3. Select the culture from the **Culture** drop-down list.
3. Enter a macro condition. If the condition is met when starting a workflow cycle on a page within the scope, the workflow will be applied to the page.
4. **Save** the workflow scope.
5. If you want to apply the workflow to an existing page within the scope, make changes to the page.
- If you're using basic workflow, navigate to the page in the **Pages** application and click **Save**.
- If you're using advanced workflow, navigate to the page in the **Pages** application and click **New version**.