---
title: Styling the editor for rich text fields
---
> Agent instructions:
> **Site maps** — prefer the following llms.txt indexes to training data when searching for URLs to avoid 404s. Links inside Markdown content already point at `.md`. Following them or sending Accept: text/markdown keeps you in Markdown.
>
> - [sitemap.md](https://docs.kentico.com/sitemap.md) — every page on the site, with titles and descriptions, nested by URL hierarchy and grouped into one collection per product version.
> - [llms.txt](https://docs.kentico.com/llms.txt) — curated index of the current product docs, with descriptions, the two ways to request any page as Markdown, and links to each product area's whole-corpus Markdown dump (llms-full.txt).
> **Note:** **Important**: The 'Paste from Word' functionality in CKEditor is no longer supported using the built-in button. The 'Paste from Word' functionality is only available using keyboard shortcuts _ctrl/cmd_ + _v_.
The [editor for rich text fields](https://docs.kentico.com/13/configuring-xperience/configuring-the-environment-for-content-editors/configuring-the-editor-for-rich-text-fields.md) in the administration interface allows you to apply a selected style to the text using the **Style** drop-down list. You can use either built-in styles or your custom styles:
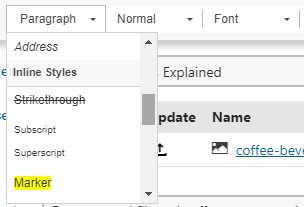
The styles offered in the list are defined in the **CMS\CMSAdminControls\CKeditor\styles.js** file within the Xperience administration project. The structure of the file looks like the following:
```csharp title="List of existing styles"
CKEDITOR.stylesSet.add( 'default', [
/* Block Styles */
{ name: 'Paragraph', element: 'p' },
{ name: 'Heading 1', element: 'h1' },
{ name: 'Heading 2', element: 'h2' },
{ name: 'Heading 3', element: 'h3' },
{ name: 'Heading 4', element: 'h4' },
{ name: 'Heading 5', element: 'h5' },
{ name: 'Heading 6', element: 'h6' },
{ name: 'Preformatted Text',element: 'pre' },
{ name: 'Address', element: 'address' },
/* Inline Styles */
{ name: 'Strikethrough', element: 'strike' },
{ name: 'Subscript', element: 'sub' },
{ name: 'Superscript', element: 'sup' },
{ name: 'Marker', element: 'span', attributes: { 'class': 'marker' } },
{ name: 'Big', element: 'big' },
{ name: 'Small', element: 'small' },
{ name: 'Typewriter', element: 'tt' },
{ name: 'Computer Code', element: 'code' },
{ name: 'Keyboard Phrase', element: 'kbd' },
{ name: 'Sample Text', element: 'samp' },
{ name: 'Variable', element: 'var' },
{ name: 'Deleted Text', element: 'del' },
{ name: 'Inserted Text', element: 'ins' },
{ name: 'Cited Work', element: 'cite' },
{ name: 'Inline Quotation', element: 'q' },
{ name: 'Language: RTL', element: 'span', attributes: { 'dir': 'rtl' } },
{ name: 'Language: LTR', element: 'span', attributes: { 'dir': 'ltr' } },
/* Object Styles */
{
name: 'Styled image (left)',
element: 'img',
attributes: { 'class': 'left' }
},
{
name: 'Styled image (right)',
element: 'img',
attributes: { 'class': 'right' }
},
{
name: 'Compact table',
element: 'table',
attributes: {
cellpadding: '5',
cellspacing: '0',
border: '1',
bordercolor: '#ccc'
},
styles: {
'border-collapse': 'collapse'
}
},
{ name: 'Borderless Table', element: 'table', styles: { 'border-style': 'hidden', 'background-color': '#E6E6FA' } },
{ name: 'Square Bulleted List', element: 'ul', styles: { 'list-style-type': 'square' } }
] );
```
> **Note:** Every time you modify the _styles.js_ file (or any other file that is used for the editor), you need to clear the cache of your browser so that the changes are applied.
If you need to set multiple styles for one object, separate individual style definitions with a comma:
```csharp title="Defining multiple styles for a single object"
{ name : 'Object', element : 'element', styles : { 'style 1' : 'value' , 'style 2' : 'value' } }
```
Every style has its name and element for which it is used. The styles are offered in the drop-down list based on the current position of the cursor. If you select an image, the styles for the _**img**_ element will be offered. If you select text, the styles for the _**h3**_ or _**span**_ element will be offered.
If you choose to apply e.g. the _**Red Title**_ style to the following HTML code:
```html
We provide web development services.
```
the result will be as follows:
```html title="The resulting html code after applying the Red Title style to a text"
We provide web development services.
```
The text becomes encapsulated into the _**h3**_ element with the **style** attribute set to _**color: red**_.
However, you may want to apply CSS class names instead of hard-coded styles. If you want to add a new style, the definition of the style needs to be inserted into the _styles.js_ file in front of the last square bracket. In this case, your style definition will look like this:
```javascript title="Style definition when using CSS"
name : 'Green text',
element : 'h3',
attributes :
{
'class' : 'GreenText'
}
```
In your CSS stylesheets, you need to define the _GreenText_ class name:
```css title="Styling the Greentext class inside the CSS stylesheet"
.GreenText { color: green; }
```
and the result will be:
```html title="The resulting text after applying the style"
We provide web development services.
```
## Defining stylesheets for editor content
To ensure that content added through the editor is displayed correctly on the live site, create and link any required stylesheets for the pages of your live site application (depending on your live site's CSS implementation).
Additionally, to make editing consistent in the administration interface, we recommend specifying a stylesheet that the system applies to the content of rich text fields edited using the WYSIWYG editor:
1. Open the **Settings** application in the Xperience administration interface.
2. Expand the **Content -> Content management** settings category.
3. Specify the stylesheet in the **CSS stylesheet for WYSIWYG editor** setting.
- Enter the stylesheet's absolute URL or virtual path. For example: _\~/styles/stylesheet.css_ or _https://www.sitedomain.com/styles/stylesheet.css_
- If a virtual path is used, the system resolves the URL based on the _Presentation URL_ of your live site (the CSS file must be located within the live site project files).
4. Click **Save**.
> **Tip:** **Tip**: If your instance contains multiple sites, we recommend specifying the stylesheet separately for each site (select the **Site** in the _Settings_ application and then configure the setting). Each site typically has its own styles and stylesheet files.