
Using X.509 authentication
You can choose between two types of staging service authentication – Username and password authentication, and X.509. If you want to use X.509 authentication, you need to install your own certificates or use the provided sample certificates.
X.509 authentication is slower and more difficult to configure, but also more secure.
Using the sample certificates
Kentico contains sample client and server private certificates. To install the sample certificates, perform the following tasks on the source and target servers.
Installing the server certificate
To install the server certificate:
- In Windows, type mmc in the Start menu search box press Enter.
- In the console window, choose File -> Add/Remove Snap-in.
- Select Certificates and click Add.
- Choose Computer account and click Next.
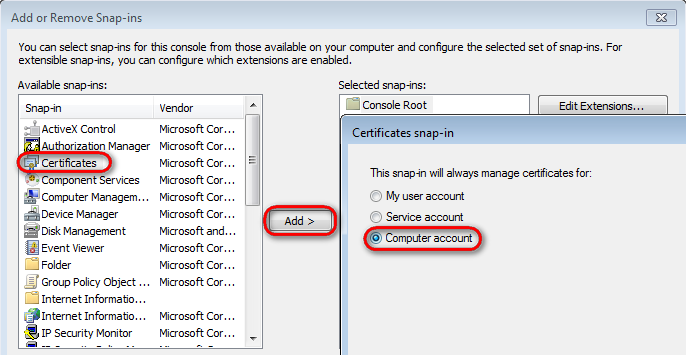
- Choose Local computer (the computer this console is running on) and click Finish.
- Close the Add or Remove Snap-ins window by clicking OK.
- Unfold Certificates (Local Computer) under the console root, right-click Personal and choose All Tasks -> Import.
- Import the Server private.pfx file located in C:\Program Files\Kentico\<version>\SampleCertificates.
- Enter the following password for the sample certificate: wse2qs.
- Leave the other settings and finish the Certificate Import Wizard.
Granting the Read permissions for the Server certificate
Grant the Read permission to the certificate file for the ASP.NET account.
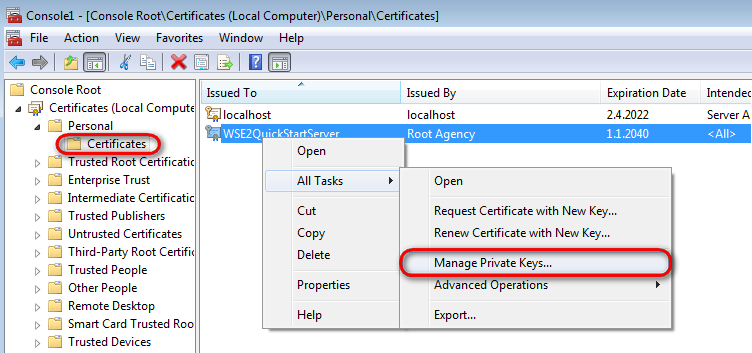
- Right-click the imported WSE2QuickStartServer certificate and choose All tasks -> Manage private keys.
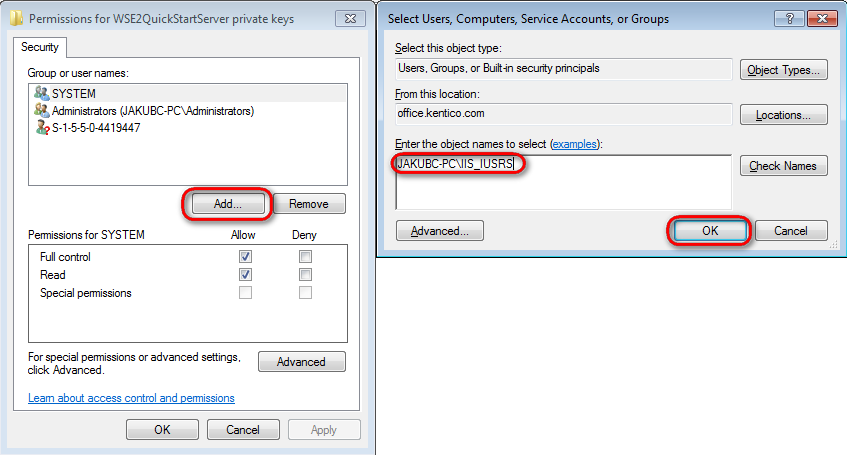
- Click Add…,fill in the name of the account.
- Click OK.
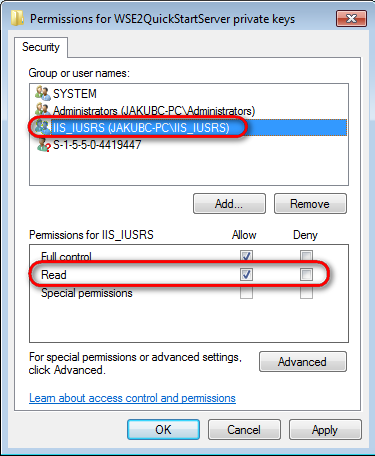
- Make sure the account’s permission is set to Read - Allow and click OK.
Installing the client certificate
To install the client certificate:
- In Windows, type mmc in the Start menu search box press Enter.
- In the console window, choose File -> Add/Remove Snap-in.
- Choose Certificates and click Add.
- Choose My user account and click Finish.
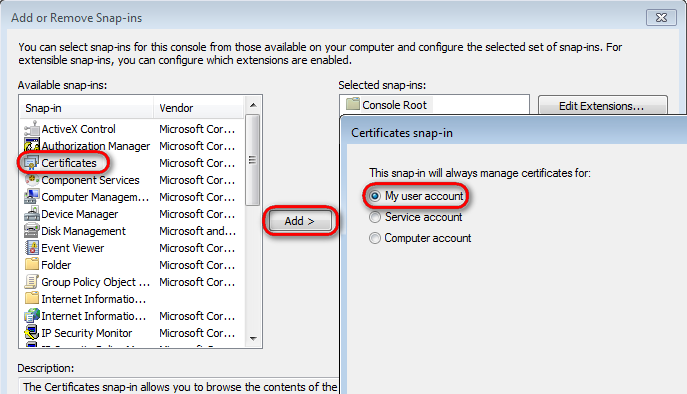
- Close the Add or Remove Snap-ins window by clicking OK.
- Expand Certificates - Current User under the console root, right-click Personal and choose All Tasks -> Import.
- Import the Client private.pfx file located in C:\Program Files\Kentico\<version>\SampleCertificates.
- Enter the following password for the sample certificate: wse2qs.
- Leave the other settings and finish the Certificate Import Wizard.
Granting the Read permissions for the Client certificate
You need to grant the Read permissions for the certificate file to the ASP.NET account. We recommend that you install the WSE 3.0 tool:
- Download the WSE 3.0 installation file.
- Run the downloaded file.
- In the Setup Type choose the Administrator type of installation.
- Install the utility.
When the utility is installed, you can use it to grant the Read permissions to the certificate file:
- Run the Certificates tool from Start -> Microsoft WSE 3.0.
- Choose Current User in the Certificate Location field.
- Choose Personal in the Store Name field.
- Click Open Certificate.

- Choose the WSE2QuickStartClient certificate and click OK.
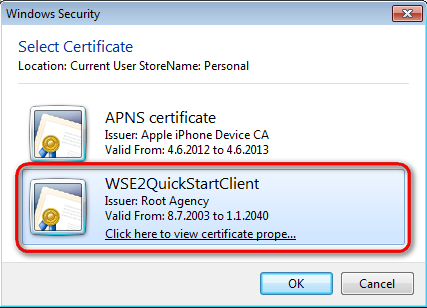
- Click View Private Key File Properties…
- Switch to the Security tab and click Edit….
- Click Add…,fill in the name of the account and click OK.
- Make sure the account’s permission is set to Read - Allow and click OK.
Sample certificates
Using the sample certificates is not secure and also very slow. We highly recommended using your own certificates issued by a certification authority.
Using your own certificates
If you are using your own certificates (highly recommended), you need to obtain Client key ID and Server key ID values for your certificates.
To get the IDs, we recommend that you install and use the WSE 3.0 tool:
- Download the WSE 3.0 installation file.
- Run the downloaded file.
- In the Setup Type choose the Administrator type of installation.
- Install the utility.
When the utility is installed, you can use it to obtain the values for your certificates:
- Run the Certificates tool from Start -> Microsoft WSE 3.0.
- Select the Certificate Location and Store Name for your certificate.
- Click Open certificate and select either the client or server certificate.
- In the Key identifiers group you can now see the certificate key. Use the Windows key identifier (Base64 Encoded).
Configuring staging for the use of certificates
Now that you have installed and configured the certificates, adjust the staging settings in Kentico to use the certificates for authentication.
Target server
On the target server, change the staging service authentication type:
- Open the Settings application.
- Select the Versioning & Synchronization -> Staging category.
- Set the Staging service authentication setting to X.509.
- Fill in the Client key ID and Server key ID.
- Click Save.
Source server
On the source server, adjust the settings of the target servers:
- Open the Staging application.
- Select the Servers tab.
- Edit () the target servers.
- Change the Server authentication to X509 and copy the Client and Server key ID’s from the target server.
- Save the configuration.
The staging service now uses certificates during authentication.