
Defining web farm servers
To use web farm synchronization, you need to enter the internal URLs of all your servers into the system. Perform at least the following steps:
- Add web farm servers.
- Enable web farm functionality.
- Add license keys for your web farm servers.
Adding web farm servers
To add a server to the web farm:
Open the Web farm application.
Click New server.
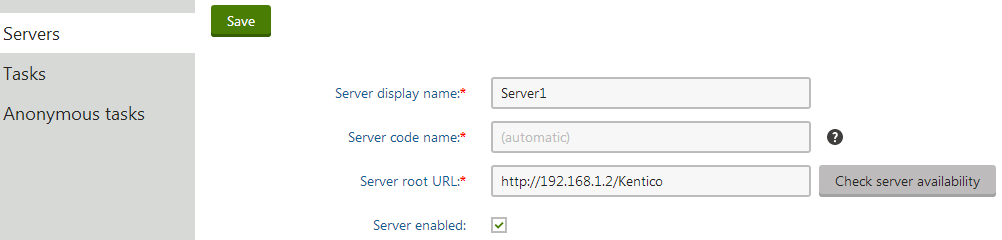
Fill in the following fields:
- Server display name - a descriptive name for the server displayed in the administration interface.
- Server root URL - the URL of the root of the website on the server, such as http://192.168.1.2/Kentico. You can check the availability of the server by clicking Check server availability.
- Server enabled - allows you to manually enable or disable web farm synchronization for the server.
Click Save to register the server.
Repeat the process for every server in your web farm.
You also need to update the web.config file on each server and add the CMSWebFarmServerName key into the appSettings section:
<add key="CMSWebFarmServerName" value="servername"/>
Where servername is the code name that the system created for the server (or the code name that you manually entered). Every server must contain only one such key with its own name.
Enabling web farm functionality
After you define your web farm servers, you need to enable web farm synchronization in the settings:
- Open the Settings application.
- Expand the Versioning & Synchronization -> Web farm category.
- Check the Enable web farm setting.
- Click Save.
You can perform additional low-level settings for web farm synchronization by adding the keys listed in Web.config file settings into the /configuration/appSettings section of your web.config file.
Adding web farm license keys
Enter an appropriate license key for the internal URLs of all your web farm servers.
For example, if you use the web farm for domain name example.com and access the servers internally through URLs like:
- http://192.168.1.2
- http://192.168.1.3
Enter separate license keys for example.com, 192.168.1.2 and 192.168.1.3 in the Licenses application. You only need to add the licenses on one server and restart the other instances using the System application (click Restart application).
Adding licenses for domains with a different number of allowed web farm servers
When you enable web farm functionality on a Kentico instance, we recommend that you use only those website domains, for which you have licenses with the same number of web farm servers allowed. If you have a website which can be run on multiple servers, adding another website with fewer allowed web farm servers can cause “License web farm server count exceeded.” errors.
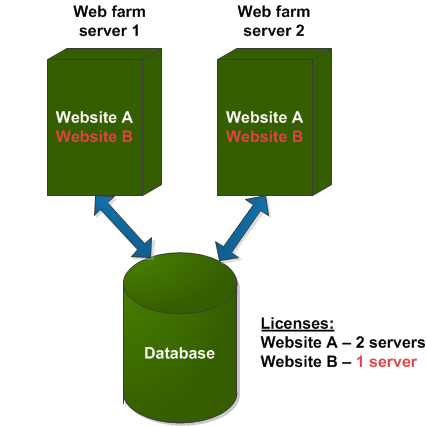
These are the possible solutions for this problem:
- Obtain additional licenses for your websites so that they can be run on the same number of web farm servers.
- Use completely separate infrastructures (different servers and databases) for each website.
Configuring servers for synchronizing macros
The system uses signatures to ensure the security of macro expressions. Macro signatures contain the user name of the macro’s author and a hash of the given expression.
The hash function used to create the signatures appends a salt to the input. To ensure that macro expressions work correctly in a web farm environment, you need to configure all servers to use the same hash salt:
Set the CMSHashStringSalt key in the appSettings section of the web.config file to the same value on all web farm servers. For example:
<add key="CMSHashStringSalt" value="e68b9ad6-a461-4707-8e3e-ece73f03dd02" />
The best option is to set the hash salt value before you start creating content for your website. Changing the salt causes all current hash values to become invalid. To fix existing macro expressions in the system after changing the hash salt, you need to re-sign the macros. See Working with macro signatures for more information.
Setting the server synchronization interval
By default, web farm servers are updated with changes made on other servers once per request. Synchronizing this frequently may be impractical for high‑traffic websites. To change the synchronization interval, set the value of the CMSWebFarmUpdateWithinRequest web.config key to false:
<add key="CMSWebFarmUpdateWithinRequest" value="false"/>
and use the Synchronize web farm changes scheduled task instead, which has a configurable execution interval:
- Open the Scheduled tasks application.
- Select (global) in the Site selector at the top of the page.
- Edit () the Synchronize web farm changes task.
- Set an appropriate task interval.
- Select the Task enabled check box.
- Click Save.
You also need to create the task for each server in the web farm. To create the tasks quickly:
Note: All web farm servers that you wish to use need to be registered in the system before performing the following steps.
- Return to the list of scheduled tasks.
- Click New task.
- Fill in the same properties as those of the Synchronize web farm changes task (the Task name must be different)
- Check Create tasks for all web farm servers below the Server name property.
- Click Save.
Your web farm now synchronizes according to the interval of the scheduled tasks.
Monitoring web farm synchronization tasks
If synchronization doesn’t work as expected, you can check the Tasks tab of the Web farm application’s interface. The tab provides information about all synchronization tasks that are currently active (waiting to be processed).
Click Run tasks to manually execute tasks, regardless of how the synchronization interval is currently configured.
You can remove all listed tasks by clicking Clear task list, or individual tasks via the Delete () action. Clearing the list is not necessary if the web farm is working correctly — the system automatically removes successfully processed tasks.
A similar user interface can be found on the Anonymous tasks tab. This tab displays a list of currently active (waiting to be processed) anonymous synchronization tasks. These tasks are logged by external applications (e.g. Windows services) to ensure that changes made by the external application are reflected in the web application cache. Tasks are logged as anonymous only if the application is NOT configured to run in a web farm. If it is configured to run in a web farm, these tasks are logged as standard synchronization tasks on the Tasks tab.
See also: Debugging web farms
Creating web farm servers automatically
An alternative way of defining web farm servers is letting the system create the servers automatically on application start.
Prerequisite: You need to have web farm synchronization enabled on all the servers.
- Open the Settings application.
- Select the Versioning & Synchronization -> Web farm category.
- Enable the Generate servers dynamically setting.
- Click Save.
Alternatively, you can add the following key to the appSettings section of your web.config file:
<add key="CMSWebFarmGenerateServers" value="true"/>
All servers with enabled web farm support add themselves into the list of servers when the application starts. If a server doesn’t have a server name defined in the web.config, it uses its machine name.