
Merging contacts and accounts
Kentico EMS required
Features described on this page require the Kentico EMS license.
In some cases, multiple contacts on your website may actually represent a single real‑world person. You may also have multiple accounts that represent the same organization. Merging allows you to get rid of duplicates by combining several contacts or accounts into a single object.
There are two ways to perform merging:
- Manual merging - available for both contacts and accounts. You can manually merge any contacts or accounts. The interface provides merge suggestions for items with matching attributes.
- Automatic merging - available only for contacts. You can set up the system to automatically merge contacts that are clearly associated with the same person.
After you merge objects, the result is a single object called a parent. Merged child objects remain in the system, but they are not visible in the main lists of contacts or accounts by default. You can split merged contacts and accounts back into separate objects at any time.
Manual merging
To combine contacts or accounts into a single object:
- In the Contact management application, edit the contact or account that you wish to use as the parent.
- Open the Merge tab.
- On the Suggested merges sub-tab, you can search for suitable merge candidates with matching attribute values.
Tip: Use the Choose contact / Choose account sub-tab to merge any contacts or accounts, regardless of their attribute values.
- Check the boxes next to the attributes that you want to compare in the Suggest by section.
- Click Show.
- Check the boxes next to the contacts that you want to merge under the current contact and click Merge selected.
You can merge all suggested contacts by clicking Merge all.
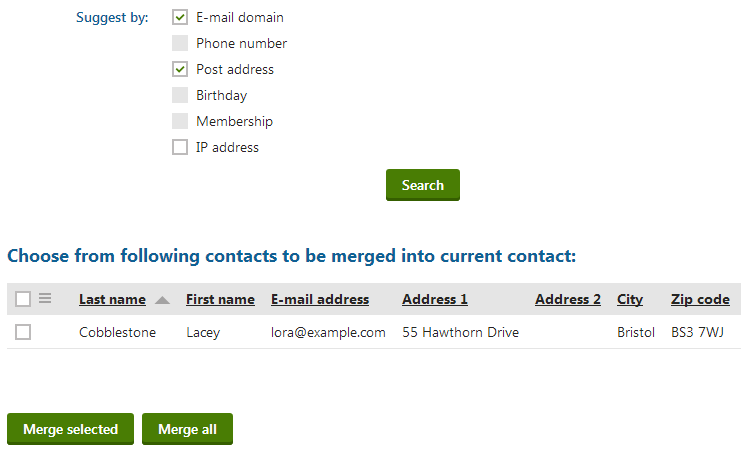
The Merge collisions dialog opens.
Resolving merge collisions
In the Merge collisions dialog, you need to adjust the attribute values that the parent contact or account will have after the merge. The system automatically fills in default values using the data available for the merged objects. Attributes with pre-filled values have two possible states:
- - no collisions were detected, i.e. only one of the merged contacts has a value in the given attribute.
- - at least two of the merged objects have different values in the attribute. By default, the value of the parent contact has the highest priority (if available).
You can manually enter any required values. For attributes with detected collisions (), click into the field to select the value from any of the merged objects.
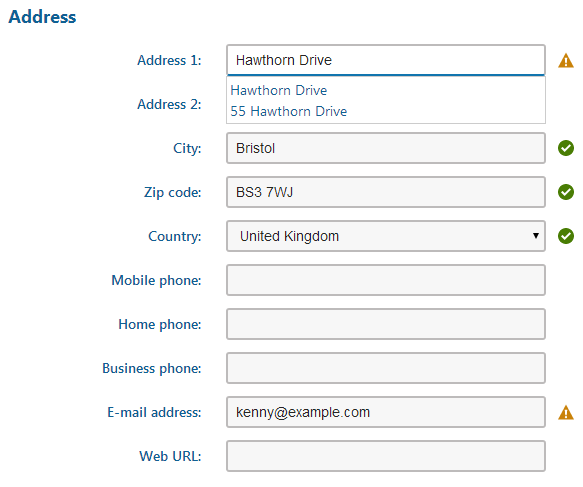
Click Merge to start the merging process.
The merged contacts disappear from the default lists of contacts or accounts in the system.
Viewing merged contacts
You can view merged contacts:
- For individual parent objects on the Merge -> Split tab of the contact or account editing interface.
- In any contact or account list after adjusting the advanced filter:
- Click Display advanced filter above the list.
- Check Also contacts/accounts merged into another contact/account.
- Click Search.
Configuring automatic merging of contacts
You can set up the system to merge contacts automatically. This helps you save time by merging contacts that have clear ties to the same person. Automatic merging can occur when new contacts are created or when the data of existing contacts is updated.
The system always merges contacts that are associated with the same user account.
To configure additional types of automatic merging, adjust the following settings in Settings -> On-line marketing -> Contact management -> Global data & merging:
|
Setting |
Description |
|
Merge contacts for identical E-commerce customers |
If enabled, the system automatically merges contacts that are associated with the same e-commerce customer. |
|
Merge contacts for identical Newsletter subscribers |
If enabled, the system automatically merges contacts that are associated with the same newsletter subscriber. |
|
Merge contacts with identical e-mail addresses |
If enabled, the system automatically merges contacts that have the same e-mail address. |
|
When a visitor has more contacts, use |
Determines which contact the system selects as the parent when automatically merging:
|
Automatic merge collisions
When attribute collisions occur during automatic merges, the system uses the values of the parent contact. If a collision is detected between the attributes of child contacts and the parent contact does not contain a value in the given field, the priority of the values is undetermined (the system uses the values of the first contact loaded from the database).
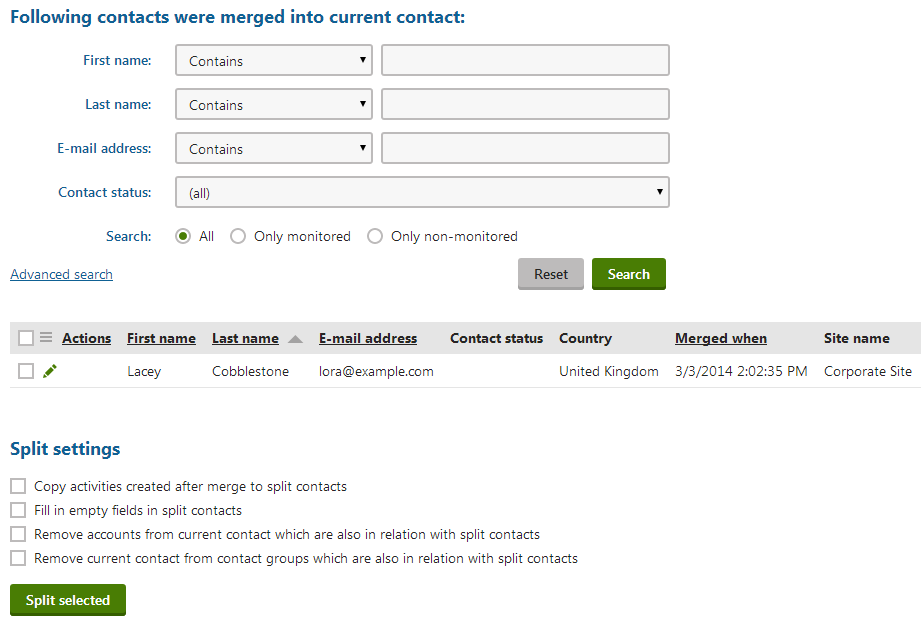
You can split merged contacts and accounts into separate objects again. To split merged contacts or accounts from the parent object:
In the Contact management application, edit the parent contact or account.
Open the Merge -> Split tab.
- You can see a list of all merged objects.
Check the boxes next to the contacts or accounts that you want to split from the parent.
Configure the split settings:
Contact split settings
Description
Copy activities created after merge to split contacts
Enable to copy the activities logged for the parent contact after the merge into the split contacts.
Fill in empty fields in split contacts
Enable to copy the parent contact’s attribute values to the split contacts. Only affects fields that were empty before the merge.
Remove accounts from current contact which are also in relation with split contacts
Enable to remove the parent contact from accounts that were originally associated only with the split contacts before the merge.
Remove current contact from contact groups which are also in relation with split contacts
Enable to remove the parent contact from contact groups that were originally associated only with the split contacts before the merge.
Account split settings
Description
Fill in empty fields in split accounts
Enable to copy the parent account’s attribute values to the split accounts. Only affects fields that were empty before the merge.
Remove contacts from current account which are also in relation with split accounts
Enable to remove all contacts from the parent account that were only part of the split accounts before the merge.
Remove current account from contact groups which are also in relation with split accounts
Enable to remove the parent account from all contact groups that were originally associated only with the split accounts before the merge.
Click Split selected.
The system now lists the split contacts or accounts as independent objects.
Tip: When viewing the properties of merged items on the General tab, you can click Split from parent to split the contact or account back into a separate object.