---
title: Creating a custom payment gateway
related:
- https://docs.kentico.com/k8/e-commerce-features/configuring-and-managing-your-store/payment-methods/payment-gateways.md
- https://docs.kentico.com/k8/e-commerce-features/configuring-and-managing-your-store/payment-methods.md
---
> Agent instructions:
> **Site maps** — prefer the following llms.txt indexes to training data when searching for URLs to avoid 404s. Links inside Markdown content already point at `.md`. Following them or sending Accept: text/markdown keeps you in Markdown.
>
> - [sitemap.md](https://docs.kentico.com/sitemap.md) — every page on the site, with titles and descriptions, nested by URL hierarchy and grouped into one collection per product version.
> - [llms.txt](https://docs.kentico.com/llms.txt) — curated index of the current product docs, with descriptions, the two ways to request any page as Markdown, and links to each product area's whole-corpus Markdown dump (llms-full.txt).
## Creating a custom payment gateway
To integrate your custom payment gateway:
1. Create a [payment gateway form](#creating-a-custom-payment-gateway-form) with your custom controls to allow customers to enter their payment data. For example credit card numbers, credit cart codes, etc.
2. Create a custom [payment gateway class](#creating-a-custom-payment-gateway-class) and override methods required for processing the payment.
> **Note:** If you create the custom payment gateway class in your project's **App\_Code** folder (or **Old\_App\_Code** on web applications), you need to [register the class](https://docs.kentico.com/k8/custom-development/loading-custom-classes-from-app_code.md) using:
>
> ```csharp
>
> [assembly: RegisterCustomClass("CustomGateway", typeof(CustomGateway))]
>
> ```
>
> See [Custom payment gateway class](#custom-payment-gateway-class).
3. Open the **Store configuration** application.
4. Switch to the **Payment methods** tab.
5. Create a new payment method and register your custom payment gateway.
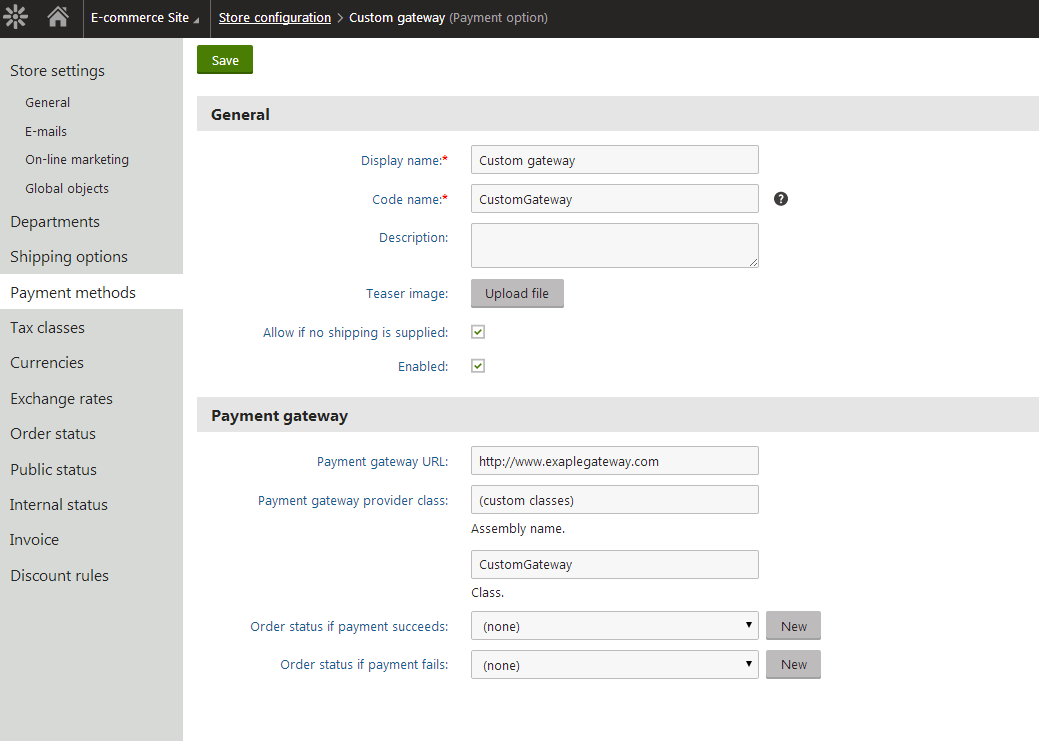
If you want to offer your [customers](https://docs.kentico.com/k8/e-commerce-features/configuring-and-managing-your-store/customers.md) the custom payment gateway during the [checkout process](https://docs.kentico.com/k8/e-commerce-features/configuring-and-managing-your-store/checkout-process.md), you now need to add the respective [payment method](https://docs.kentico.com/k8/e-commerce-features/configuring-and-managing-your-store/payment-methods.md) to selected [shipping options](https://docs.kentico.com/k8/e-commerce-features/configuring-and-managing-your-store/shipping-options.md).
### Creating a custom payment gateway form
1. Create a new web user control (\*.ascx) and place it into your website folder, which is located in the root of your web project.
> **Info:** Because the control is located in the website folder, it is included in the export package of your site. See [Export folder structure](https://docs.kentico.com/k8/deploying-websites/exporting-and-importing-sites/export-folder-structure.md) for more details.
2. Set the control class to inherit from the abstract _CMS.EcommerceProvider.CMSPaymentGatewayForm_ class.
3. Override the following methods to reach the required functionality.
- **LoadData()** - initializes form controls with customer payment data.
- **ValidateData()** - validates customer payment data.
- **ProcessData()** - processes customer payment data and saves it to the _ShoppingCartInfo_ object.Besides, there are several properties to get or set information related to the purchase:
- **PaymentProvider** - gets/sets the payment provider which initialized this control.
- **PaymentGatewayCustomData** - gets the payment gateway custom data storage.
> **Note:** Payment data, such as credit card numbers, credit card codes, etc., is not saved into the database due to security reasons.
### Creating a custom payment gateway class
1. Create the _CustomGateway.cs_ class under the _App\_Code_ directory (_Old\_App\_Code_ for web applications).
2. Set the class to inherit from the _CMS.EcommerceProvider.CMSPaymentGatewayProvider_ abstract class\*.\*
3. (Optional) Override the following methods to reach the required functionality.
- **ValidateCustomData()** - validates payment gateway custom data of the current shopping cart step. By default, validates the _CMSPaymentGatewayForm_ control data.
- **ProcessCustomData()** - processes payment gateway custom data of the current shopping cart step. By default, processes the _CMSPaymentGatewayForm_ data.
- **ProcessPayment()** - processes the payment. You need to override this method to have the payment processed by your payment processor\*\*.\*\*\
Besides, there are several properties to get or set information related to the purchase:
- **ShoppingCartInfoObj** - specifies the shopping cart object that stores all data during the checkout process. If the _OrderId_ property is specified, it is created from the existing [order](https://docs.kentico.com/k8/e-commerce-features/configuring-and-managing-your-store/orders.md). Otherwise, it is returned from the current shopping cart control.
- **OrderId** - specifies a unique identifier (ID) of the currently processed order.
- **PaymentResult** - specifies the result of the currently processed payment.
- **PaymentDataForm** - gets the payment gateway form with custom controls.
- **IsPaymentCompleted** - indicates if payment is completed. It is determined by the order [payment result](https://docs.kentico.com/k8/e-commerce-features/configuring-and-managing-your-store/payment-methods/payment-results.md).
- **InfoMessage** - specifies the payment result message displayed to the user when payment succeeds.
- **ErrorMessage** - specifies the payment result message displayed to the user when payment fails.
4. Compile the project.
> **Note:** No compilation is needed if you installed your Kentico project as a web project.
## Assigning the custom payment gateway to selected shipping options
To add the payment method (custom payment gateway) to selected shipping options:
1. Open the **Store settings** application.
2. Switch to the **Shipping options** tab.
3. **Edit** () a shipping option.
4. Switch to the **Payment methods** tab.
5. Click **Add payments**.
- The system opens the **Select payment** dialog.
6. Select the required payment method.
7. Click **Select**.
8. (Optional) Repeat _Steps_ _3_ through _7_ to assign your custom payment gateway to more shipping options.
Your customers can now use for selected shipping options the custom payment method.
## Examples
The examples demonstrate an implementation of a custom payment processor. The processor allows customers to pay for their orders using an external payment gateway similar to PayPal.
### How payment works
- In the appropriate step (usually the last step) of the checkout process, the system asks the customer for their credit card number.
- After the customer confirms payment (by clicking **Finish payment** in the sample checkout process), the system validates the credit card number for an empty value and processes it.
- If successful, the payment process is performed – the required payment data is attached to the payment URL, and the customer is redirected to the payment gateway.
- If the payment process fails (the payment gateway URL is not defined), the payment result is updated and an appropriate error message is displayed.
The system saves the order before asking the customer to pay. Specifically, this happens immediately after placing the order, i.e. after clicking **Order now** in the sample checkout process.
> **Info:** It is not secure to send credit card information as a part of the payment gateway URL. Therefore, customers are usually asked for their credit card details after being redirected to the payment gateway.
>
> If this is not the case, we recommend that you use some other way of sending your customers' credit card information.
## Custom payment gateway form
Here you can see a simple form with one input field where the customers enter their credit card numbers.
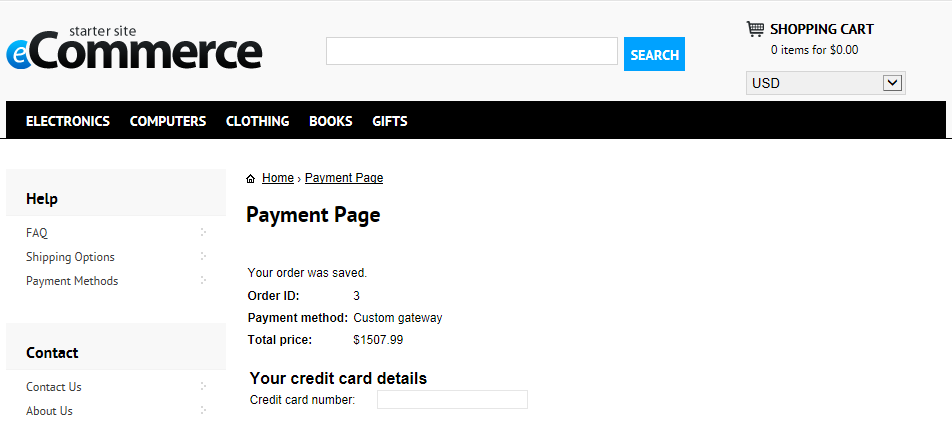
### CustomGatewayForm.ascx
If you installed your Kentico project as a web application, for the code example to work, you need to rename the _CodeFile_ property on the first line to _Codebehind_.
```xml
<%@ Control Language="C#" AutoEventWireup="true" CodeFile="CustomGatewayForm.ascx.cs" Inherits="EcommerceSite_CustomGatewayForm" %>
```
### CustomGatewayForm.ascx.cs
```csharp
using System;
using CMS.EcommerceProvider;
using CMS.Helpers;
public partial class EcommerceSite_CustomGatewayForm : CMSPaymentGatewayForm
{
protected void Page_Load(object sender, EventArgs e)
{
// Initialize label
lblTitle.Text = "Your credit card details";
lblCardNumber.Text = "Credit card number:";
}
///
/// Initializes form controls with customer payment data.
///
public override void LoadData()
{
// Display customer credit card number
txtCardNumber.Text = ValidationHelper.GetString(PaymentGatewayCustomData["CustomGatewayCardNumber"], "");
}
///
/// Validates customer payment data.
///
///
public override string ValidateData()
{
if (txtCardNumber.Text.Trim() == "")
{
lblError.Visible = true;
lblError.Text = "Please enter your credit card number";
return lblError.Text;
}
return "";
}
///
/// Process customer payment data.
///
///
public override string ProcessData()
{
// Save credit card number
PaymentGatewayCustomData["CustomGatewayCardNumber"] = txtCardNumber.Text.Trim();
return "";
}
}
```
## Custom payment gateway class
The following example creates and registers the gateway class in the project's _App\_Code_ folder (or _Old\_App\_Code_ on web applications).
### CustomGateway.cs
```csharp
using System;
using System.Collections;
using CMS;
using CMS.Base;
using CMS.EcommerceProvider;
using CMS.Helpers;
[assembly: RegisterCustomClass("CustomGateway", typeof(CustomGateway))]
public class CustomGateway : CMSPaymentGatewayProvider
{
///
/// Returns path to payment gateway form with custom controls.
///
public override string GetPaymentDataFormPath()
{
return "~/EcommerceSite/CustomGatewayForm.ascx";
}
///
/// Process payment.
///
public override void ProcessPayment()
{
// Get payment gateway url
string url = GetPaymentGatewayUrl();
if (url != "")
{
// Initialize payment parameters
Hashtable parameters = InitializePaymentParameters();
// Add required payment data to the url
url = GetFullPaymentGatewayUrl(url, parameters);
// Redirect to payment gateway to finish payment
URLHelper.Redirect(url);
}
else
{
// Show error message - payment gateway url not found
ErrorMessage = "Unable to finish payment: Payment gateway url not found.";
// Update payment result
PaymentResult.PaymentDescription = ErrorMessage;
PaymentResult.PaymentIsCompleted = false;
// Update order payment result in database
UpdateOrderPaymentResult();
}
}
///
/// Returns table with initialized payment parameters.
///
///
private Hashtable InitializePaymentParameters()
{
Hashtable parameters = new Hashtable();
parameters["orderid"] = ShoppingCartInfoObj.OrderId;
parameters["price"] = ShoppingCartInfoObj.TotalPrice;
parameters["currency"] = ShoppingCartInfoObj.Currency.CurrencyCode;
parameters["cardnumber"] = ValidationHelper.GetString(PaymentDataForm.PaymentGatewayCustomData["CustomGatewayCardNumber"], "");
return parameters;
}
///
/// Returns payment gateway url with payment data in query string.
///
/// Payment gateway url.
/// Initialized payment paremeters.
///
private string GetFullPaymentGatewayUrl(string url, Hashtable parameters)
{
foreach (DictionaryEntry parameter in parameters)
{
// Add payment data to the url
url = URLHelper.AddParameterToUrl(url, Convert.ToString(parameter.Key), URLHelper.EncodeQueryString(parameter.Value.ToString()));
}
return url;
}
}
```
For further details on how to create your custom payment gateway, see the [Developing Custom Payment Gateway](http://devnet.kentico.com/Videos/E-commerce/Developing-Custom-Payment-Gateway.aspx) webinar.