
Using Kentico API and Controls externally
This page describes how to configure external ASP.NET applications so that they support the Kentico API and Controls. Using Kentico functionality externally allows you to create scenarios such as:
- Separate applications integrated with your main Kentico website
- Custom websites or applications that use Kentico as a content repository
Start Visual Studio and open your external application’s project.
Connecting to the Kentico database
To be able to access the Kentico database, you need to specify the appropriate connection string in your application’s web config file.
Add the connection string into the configuration/connectionStrings section using an <add> element named CMSConnectionString.
 <configuration>
  <connectionStrings>

    ...

    <add name="CMSConnectionString" connectionString="Persist Security Info=False;database=Kentico;server=myserver;user id=username;password=mypassword;Current Language=English;Connection Timeout=120;" />

  </connectionStrings>
Note: It is recommended to copy the exact connection string from the web.config file of the Kentico web project.
Adding references to Kentico API libraries
Before you can use Kentico functionality in your application, you need to add references to the libraries containing the required code:
- Right-click your application’s web project root in the Solution Explorer and select Add Reference.
- On the Browse tab, click Browse and navigate to the Lib folder of the Kentico project.
- Select all dll files in the folder and click Add.
Initializing the Kentico application
You need to initialize Kentico before making calls to its API from an external project.
Edit your application’s Global.asax file (create the file if necessary).
Execute the CMSApplication.Init method in the Application_BeginRequest method:
CMS.DataEngine.CMSApplication.Init();
Enabling ASCX transformations in external applications
Adding the CMSTransformation class:
The CMSTransformation partial class allows you to write your own methods for use in ASCX transformations. The system checks the CMSTransformation class for method definitions when loading transformations — an error may occur if the class is not present in your project.
If you plan to use ASCX transformations, add the class to your external project:
Create a new class file in your project named CMSTransformation.cs.
- In web site projects, add the file into the App_Code folder.
- In web application projects, you can create the class in any location.
Add the following code into the class:
 namespace CMS.Controls
 {
     /// <summary>
     /// Base class for transformation methods
     /// </summary>
     public partial class CMSTransformation : CMSAbstractTransformation
     {
     }
 }
If you wish to use E-commerce or Message board transformation methods, copy the default content of the CMSTransformation partial class from the Kentico project:
- ~/App_Code/CMSModules/Ecommerce/CMSTransformation.cs
- ~/App_Code/CMSModules/MessageBoards/CMSTransformation.cs
Execute the following code in the Application_BeginRequest method in your application’s Global.asax file (create the file if necessary).
 void Application_BeginRequest(object sender, EventArgs e)
 {
     ...

     if (CMS.DataEngine.CMSApplication.Init())
     {
         // Sets CMSTransformation as the base class for transformation methods
         CMS.PortalEngine.TransformationInfoProvider.TransformationBaseClass = "CMS.Controls.CMSTransformation";
     }
 }
You can now use all default methods in ASCX transformations and define custom methods inside the CMSTransformation partial class.
Running without the Virtual path provider:
Kentico uses a virtual path provider to retrieve the code of ASCX transformations. If you cannot use the virtual path provider in your environment (e.g. when using precompiled applications or a custom trust level), you need to:
- Save your virtual objects in Kentico to the local disk using the System -> Virtual objects interface.
- Copy the ~/CMSVirtualFiles folder from the Kentico project the to the root of your own project.
See also: Deployment mode for virtual objects
Example - Displaying content from Kentico
Once you have completed the configuration described in the sections above, you can use the Kentico API and Controls in your application. A typical example is loading and displaying data from the Kentico database.
Using the Kentico API
The Kentico API allows you to perform any action available in the standard administration interface. You can also use the API to load or modify records in the database.
The following example shows how to retrieve document content from the Kentico database and display it using a standard ASP.NET Repeater control.
Create a new page (web form) in your external web project using Visual Studio.
Add the standard ASP.NET Repeater control onto the page.
Insert the following item template markup into the <asp:Repeater> control element:
 <asp:Repeater ID="Repeater1" runat="server">

     <ItemTemplate>
         <strong>
         <%# Eval("NewsTitle") %>
         </strong>
         (<%# ((DateTime) Eval("NewsReleaseDate")).ToString("d") %>)
         <br />
         <i><%# Eval("NewsSummary") %></i>
         <br />
     </ItemTemplate>

 </asp:Repeater>
Switch to the page’s code behind and add the following using statements to the beginning of the code:
 using System.Data;
 using CMS.DocumentEngine;
Add the following code into the page’s Page_Load method:
 protected void Page_Load(object sender, EventArgs e)
 {
     // Creates a data set containing all released news documents from the Corporate Site
     TreeProvider tp = new TreeProvider();
     DataSet ds = tp.SelectNodes("CorporateSite", "/news/%", "en-us", true, "cms.news", null, " NewsReleaseDate DESC ", -1, true);

     // Binds the news data to the Repeater control
     Repeater1.DataSource = ds;
     Repeater1.DataBind();
 }
Note
When performing other types of document operations (editing, deleting etc.), you need to initialize the tree provider within the context of a specific user:
 using CMS.Membership;

 ...

 // Gets an Info object representing the administrator user
 UserInfo user = UserInfoProvider.GetUserInfo("administrator");

 // Creates a tree provider instance using administrator context
 TreeProvider tp = new TreeProvider(user);
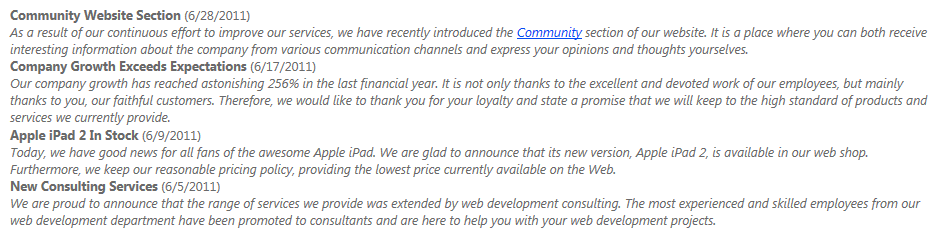
If you run the website and open the new page, the Repeater control displays a list of news article summaries.
Using Kentico controls
This example demonstrates how to display Kentico documents via the built-in CMSRepeater control.
Note: For quick access to Kentico controls, add the controls to your Visual Studio Toolbox.
Create a new page (web form) in your application’s project using Visual Studio.
Add the CMSRepeater control onto the page.
- You can either drag the control from the toolbox or manually register the CMS.Controls assembly on the page and then use the Visual Studio IntelliSense.
Set the following properties for the CMSRepeater control:
- ClassNames: cms.news
- SiteName: CorporateSite (or any other site code name)
- TransformationName: cms.news.preview
- SelectedItemTransformationName: cms.news.default
<%@ Register Assembly="CMS.Controls" Namespace="CMS.Controls" TagPrefix="cms" %>

...

<cms:CMSRepeater ID="CMSRepeater1" runat="server" Path="/%" ClassNames="cms.news" SiteName="CorporateSite" TransformationName="cms.news.preview" SelectedItemTransformationName="cms.news.default" />
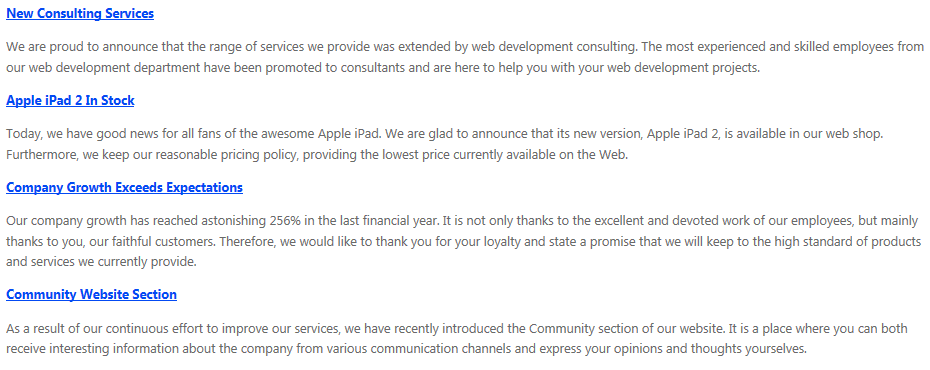
If you run your project and navigate to the new page, you can see the list of news documents.
Handling document links in external applications:
The default URLs of Kentico documents are based on the structure of the content tree and the settings of individual documents. These URLs will not work correctly outside of the Kentico application. For example, the links in the news item headings in the example above lead to pages that most likely do not exist in your custom web project.
The following steps extend the previous example so that the news detail links work in external applications. The CMSRepeater control renders the links using the cms.news.preview transformation, which you can modify.
Log in to the Kentico administration interface and open the Document types application.
Edit () the News document type.
Select the Transformations tab and edit the Preview transformation.
Change the transformation code that defines the link URL from:
<a href="<%# GetDocumentUrl() %>">to:
<a href="?aliasPath=<%# Eval("NodeAliasPath") %>">Click Save.
The original GetDocumentUrl() transformation method generates document URLs in the default Kentico format. The modified link URL leads to the same page containing the listing control, but with an aliasPath parameter in the query string of the URL. The parameter contains the alias path of the corresponding news document.
Kentico listing controls automatically process the aliasPath URL parameter and insert its value into the Path property. In this case, the link URLs ensure that the CMSRepeater control only loads one specific news document. When the source data only contains one document, the control uses the transformation specified by the SelectedItemTransformationName property (cms.news.default in this case) to display the details of the given document.
Note: Controls cache transformations, so you need to restart your application to apply the changes.
Implementing custom document selection for listing controls:
You can alternatively use your own custom logic to dynamically set the path of listing controls according to the URL or other variables.
For example, the following steps demonstrate how to ensure document selection based on a custom URL parameter:
Edit the cms.news.preview transformation again and change the name of the URL parameter in the link code to customParameter.
<a href="?customParameter=<%# Eval("NodeAliasPath") %>">Open the markup of the page in Visual Studio and set the DataBindByDefault property of the CMSRepeater control to false.
In the page’s code behind, add the following code into the Page_Load method:
 protected void Page_Load(object sender, EventArgs e)
 {
     // Checks whether the URL contains the 'customParameter' query string parameter
     if (Request.QueryString["customParameter"] != null)
     {
        // Limits the path of the CMSRepeater to the document specified by the URL parameter
        CMSRepeater1.Path = Request.QueryString["customParameter"];
     }
     else
     {
         // Loads documents from the entire website if the URL doesn't contain the 'customParameter' parameter
         CMSRepeater1.Path = "/%";
     }

     // Loads and binds the data of the CMSRepeater control (with regard to the dynamically set Path)
     CMSRepeater1.ReloadData(true);
 }
Setting control properties dynamically
By default, Kentico listing controls load content during the Init stage of the control life cycle. If you need to programmatically assign control properties that affect the content, use one of the following approaches:
Set the DelayedLoading property to true in the control’s markup.
- This moves the automatic data binding to the control’s Load event.
Assign the required properties during the page’s Load event (in the Page_Load handler) or sooner.OR
Set the DataBindByDefault property to false in the control’s markup.
- This completely disables automatic data binding for the control.
Assign the required properties at any appropriate point in the page life cycle.
Explicitly call the control’s ReloadData(true) method.The control then loads the content based on the dynamically assigned properties.
The page now uses the customParameter query string parameter to select specific news documents. The custom parameter works the same way as the default aliasPath parameter.