
Displaying image galleries
You can display images on a page using one of the image gallery web parts. The image gallery web parts display images saved in the content tree as documents (CMS.File document type). Kentico comes with three web parts and four page templates suitable for creating image galleries.
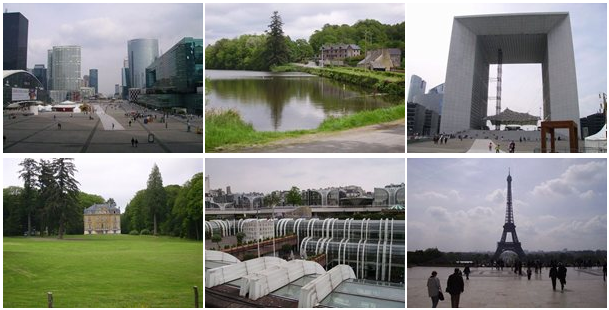
Image galleries aren’t the only way to display images on your web pages. You can achieve similar functionality by using the Media application. The Media application provides an alternative way of creating a gallery and is suitable for large numbers of stored images, or for making audio, video and other file types accessible from your pages. Another option consists of attaching an image to a document using the Attachment image galleryweb part.
Images used in galleries are imported the same way as any other files, i.e. you can import files or even the whole folder structure from the disk to the Kentico content repository.
Creating an image gallery
- In the Pages application, upload the images to the content tree. You can import multiple images at once. This doesn’t have to be the first step, but having some images already in place can help you with the next steps.
- Place one of the available web parts on an existing page. The web available web parts that you can use for creating image galleries are:
- Lightbox gallery web part - displays a set of expandable picture thumbnails.
- Image gallery web part - displays a set of expandable picture thumbnails.—OR—
- Create an image gallery page using one of the templates:
- Lightbox gallery template - uses the Lightbox gallery web part displays set of expandable picture thumbnails.
- Image gallery template - uses the Image gallery web part to display a set of expandable picture thumbnails.
- Configure how images are displayed by configuring the web part’s transformations.
Image gallery web parts transformation examples
Transformations define how images are displayed in all the Image gallery web parts. You can view and alter transformations in the Transformations section of a web part’s property configuration dialog. For each transformation property, you can Select a predefined transformation from a list, Edit the current transformation or create a New one by means of the respective buttons.
Here are some examples of how you can alter the appearance of the Image gallery web part. This is the default thumbnail transformation code of the Image gallery web part:
<a href="?imagepath=<%# System.Web.HttpUtility.UrlEncode(DataBinder.Eval(Container, "DataItem.NodeAliasPath").ToString()) %>">
<%#IfEmpty(Eval("FileAttachment"), "no image", "<img alt='" + Eval("FileName") + "' src='" + GetFileUrl("FileAttachment") + "?maxsidesize=300' border='0' />")%>
</a>
And this is how the gallery created with this transformation looks like:
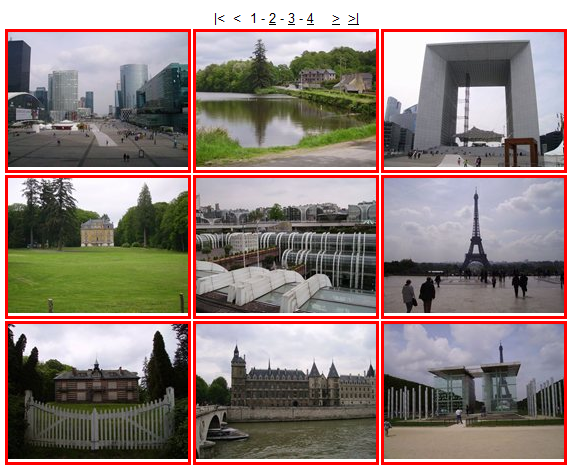
You can add a border by adding encapsulating the transformation in a div element (with style property or via a class).
<div style="border: solid 3px Red">
<a href="?imagepath=<%# System.Web.HttpUtility.UrlEncode(DataBinder.Eval(Container, "DataItem.NodeAliasPath").ToString()) %>">
<%#IfEmpty(Eval("FileAttachment"), "no image", "<img alt='" + Eval("FileName") + "' src='" + GetFileUrl("FileAttachment") + "?maxsidesize=300' border='0' />")%>
</a>
</div>
This is how the result looks like:
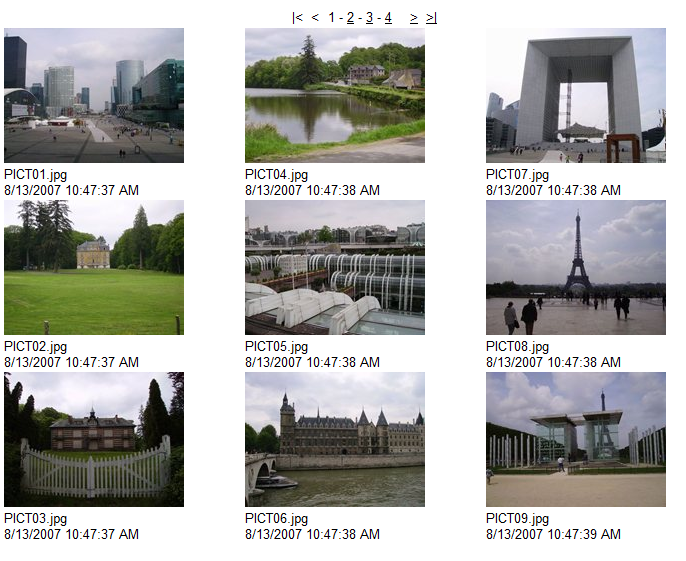
This example shows how you can display the file name and the date and time of creation for each thumbnail in the gallery:
<a href="?imagepath=<%# System.Web.HttpUtility.UrlEncode(DataBinder.Eval(Container, "DataItem.NodeAliasPath").ToString()) %>">
<%#IfEmpty(Eval("FileAttachment"), "no image", "<img alt='" + Eval("FileName") + "' src='" + GetFileUrl("FileAttachment") + "?maxsidesize=300' border='0' />")%>
</a>

<%# Eval("DocumentName") %> <br/>
<%# GetDateTime("DocumentCreatedWhen") %>
Transformations for the Lightbox gallery web part
When writing a custom transformation for the Lightbox gallery web part, it is necessary to use the ‘rel’ and ‘rev’ parameters. The value of the ‘rel’ attribute needs to be in the lightbox[group] format, where group specifies the name of a group of pictures to be displayed by the web part.
The ‘title’ parameter is used to determine the description of the image displayed in the lightbox.
<a href="<%# GetDocumentUrl() %>" rel="lightbox[group]" rev="<%# Eval("NodeAliasPath") %>" title="<%# Eval("FileDescription", true) %>">
<img src="<%# GetFileUrl("FileAttachment") %>?maxsidesize=150" alt="<%# Eval("FileName", true) %>" />
</a>