
Managing widget dashboard content
Important: Widget dashboards are a completely separate feature from the system’s main application dashboard. Every widget dashboard is either a standalone application, or a page within another application.
Using widgets on dashboards
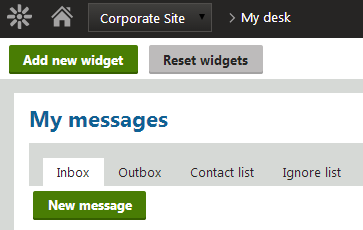
If you have access to a widget dashboard application or page, you can personalize the content by manipulating widgets in the available zones:
- Click Add new widget to add new widget instances
- Click Reset widgets to return all zones and their widget content to the default state
Individual widgets are enclosed in containers with a header and a set of action buttons. To manage the widgets on the dashboard, use the appropriate actions.
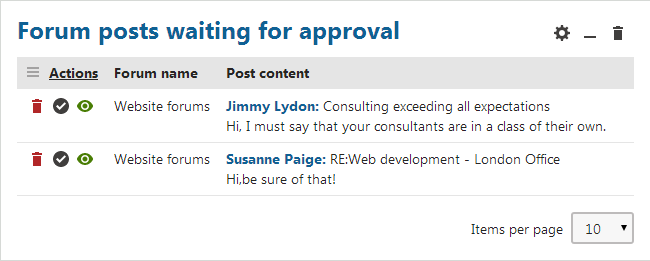
- Configure widget () - allows you to edit the widget’s properties. Every widget has its own set of properties. The Widget title property is present for all types of widgets — the property sets the text displayed in the header of the widget on the dashboard page.
- Minimize widget () - hides the content of the widget so that only the header is visible. Click Maximize widget () to restore the full content of the widget.
- Remove widget () - deletes the widget from the dashboard.
Use drag-and-drop to change the location of widgets. To pick up a widget, hover over its header, hold down the mouse button and drag the widget to the desired position. This works both for modifying the order of widgets within a zone and moving widgets to a different zone.
Setting the layout and default content of widget dashboards
The overall design and initial content of a dashboard is determined by its page template. You can manage dashboard templates in the Page templates application. The templates of the default dashboards are in the Dashboard pages category.
Note: Dashboard templates must have the Template type property set to Dashboard page on the General tab.
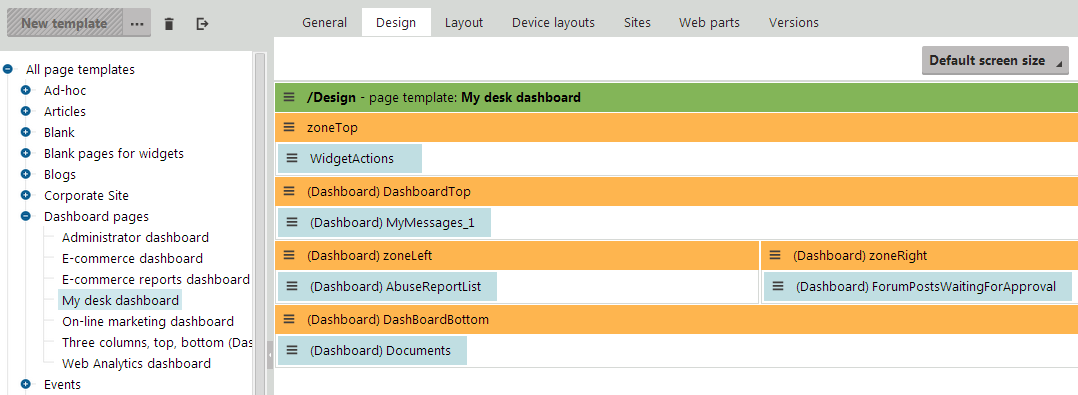
Set up the actual content of the template on the Design tab:
You can define two types of zones on dashboard templates:
- Web part zones - the content can only be managed here on the Design tab of the page template. The added web parts function as fixed content on the dashboard page itself. The Widget zone type property of these zones must be set to None.
- Dashboard widget zones - widgets added here on the Design tab serve as the default content of the zone. Individual users can change and configure the widget content of the zone for their own personalized version of the dashboard. The Widget zone type property of these zones must be set to Dashboard.
To alter the placement, size and amount of zones on the template, edit the code of the page layout on the Layout tab.
Add the Widget actions web part into the fixed content of every dashboard template. The web part allows users to:
- Add new widgets
- Reset the zones of the dashboard to their default widget content
You need to configure the properties of the Widget actions web part according to the following:
- Widget zone type: Dashboard
- Widget zone ID: Specify the dashboard zone to which the web part adds new widgets (enter the ID of the desired zone). Once created, users can drag widgets to other zone as required.
On the Sites tab, you can assign the template to individual websites. The site bindings do NOT determine where you can create dashboards based on the template. They only ensure that the system exports/imports the template along with the assigned sites.
To learn how to assign a page template to a specific dashboard page, see Adding widget dashboards to the interface.
Allowing widgets on dashboards
To make a widget usable as a dashboard component:
- Open the Widgets application.
- Select the widget in the catalog tree.
- Open the Security tab.
- Select This widget can be used in dashboard zones in the Allowed for column.
Note: The user type security settings of the widget apply on dashboards. Select whether the widget is usable by all Authenticated users, Global administrators only or members of Authorized roles.
If a widget is also allowed for other types of zones, for example user zones on the live site, you can make properties available only when configuring widget instances on dashboards:
- Open the Properties tab.
- Check Display field only on dashboards for individual properties.
- Click Save to confirm the change for each property.