---
title: Creating grouped page attachments
related:
- https://docs.kentico.com/k10/managing-website-content/working-with-files/page-attachments.md
- https://docs.kentico.com/k10/managing-website-content/working-with-files/page-attachments/attaching-file-groups-to-pages.md
- https://docs.kentico.com/k10/configuring-kentico/managing-files/storing-files.md
---
> Agent instructions:
> **Site maps** — prefer the following llms.txt indexes to training data when searching for URLs to avoid 404s. Links inside Markdown content already point at `.md`. Following them or sending Accept: text/markdown keeps you in Markdown.
>
> - [sitemap.md](https://docs.kentico.com/sitemap.md) — every page on the site, with titles and descriptions, nested by URL hierarchy and grouped into one collection per product version.
> - [llms.txt](https://docs.kentico.com/llms.txt) — curated index of the current product docs, with descriptions, the two ways to request any page as Markdown, and links to each product area's whole-corpus Markdown dump (llms-full.txt).
If you want files to be associated with a particular page, there are two types of page attachments:
- [unsorted attachments](https://docs.kentico.com/k10/managing-website-content/working-with-files/page-attachments.md) that you can set on a page, on the **Properties -> Attachments** tab, and
- **grouped attachments** by defining fields for a page type and then uploading files to the fields.
Grouped page attachments are a more complex way of attaching files to pages in situations when you want more groups of attachments. First, [create attachment fields](#creating-basic-attachment-fields) in the page type of the required page; then second, add a web part that will display the files on the page.
## Creating basic attachment fields
1. Open the **Page types** application.
2. [Create a new page type](https://docs.kentico.com/k10/developing-websites/defining-website-content-structure/page-types/creating-page-types.md), or **Edit** () an existing one.
3. If you are creating a new page type, stop at step 3 – **Fields**. If you are editing an existing page type, switch to the **Fields** tab.
4. Click **New field**.
5. Type a **Field name**.
6. In **Data type**, select _Attachments_.
- The system then automatically selects _Attachments control_ in **Form control**.
7. Type a **Field caption**. This is the label of the field.
8. Click **Save**.
9. (Optional) Repeat steps 4–8 to add more attachment fields.
10. If you are creating a new page type, finish the creating process.
The system saves the fields. The attachment fields are on pages using the specified page type. See [all options](#reference-editing-control-settings-category-in-editing-a-page-type-field) to learn all settings of attachment fields. Don't forget that you need to [add a web part to display the files](#displaying-attached-files-with-a-web-part).
## Displaying attached files with a web part
1. Open the **Pages** application.
2. If the page where the attachment will be displayed uses its own template, navigate to the page. Otherwise, navigate to the closest parent page with its own template.
3. Switch to the **Design** tab.
4. [Place](https://docs.kentico.com/k10/developing-websites/developing-websites-using-the-portal-engine/using-and-configuring-web-parts.md) a new **Page attachments** web part to a web part zone.
1. Unwrap the **Visibility** category and in the **Show for page types** field select the page types of the pages on which you want the web part to be visible.
2. In the **Content** category, specify the path to the page holding the attachments in the **Path** field.
3. In **Attachment group**, select the page type you created in the [previous steps](#creating-basic-attachment-fields). In the second field of **Attachment group**, select the name of the field with files you created in the [previous steps](#creating-basic-attachment-fields).
4. (Optional) In **Content before** or **Content after**, you can type an HTML code that is before or after the displayed attachments, for example:
```csharp
Attached documents
```
5. Click **Save & Close**.
The system saves the web part on the page. If a user uploads a file in the **For\*\*\*\*m** tab now, the page will display the file.
## Example
The example shows how to create a grouped page attachment on a page. The example uses the sample _Corporate site_.
First, we want to create two separate attachment fields on a page, and then second, we want to display attachments on the page.
### Creating attachment fields
We want to add documents and images separately to the _Open Day_ page that uses the _CMS.BookingEvent_ page type.
1. Open the **Page types** application.
2. **Edit** () the _CMS.BookingEvent_ page type.
3. Switch to the **Fields** tab.
4. Create two new fields:
1. Click **New field**.
2. Type _AttachedDocuments_ to **Field name**.
3. Select _Attachments_ in **Data type**.
4. Type _Attached documents_ to **Field caption**.
5. Click **Save**.
6. Click **New field**.
7. Type _AttachedImages_ to **Field name**.
8. Select _Attachments_ in **Data type**.
9. Type _Attached images_ to **Field caption**.
10. Click **Save**.
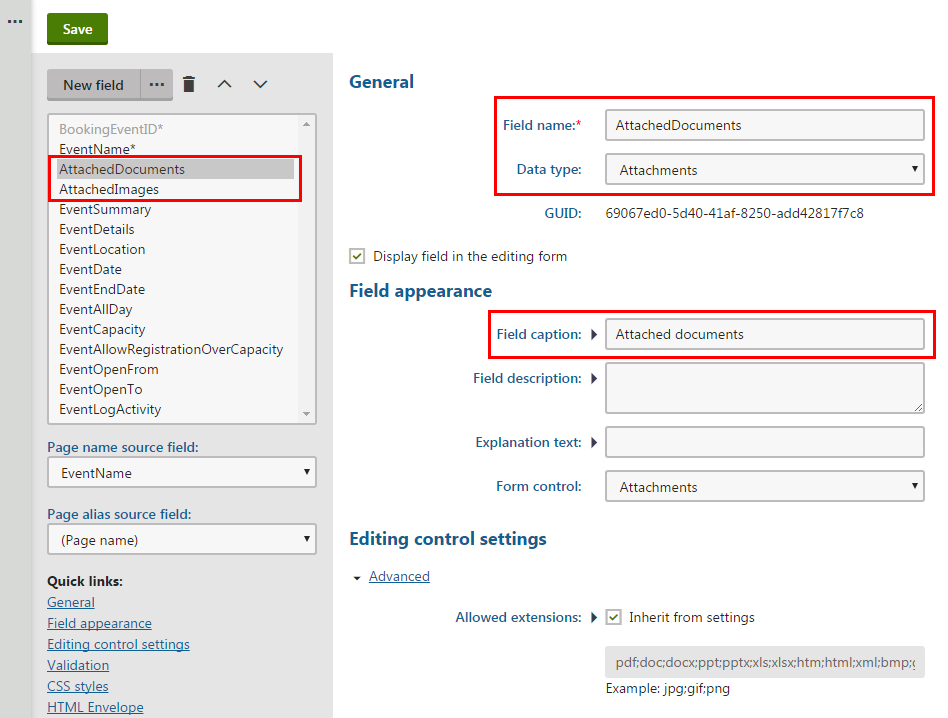
The system saves the fields. Then, you can check the _Open Day_ page to see the fields you just added.
1. Open the **Pages** application.
2. Navigate to **Community -> Events -> Open Day**.
3. Switch to the **Form** tab.
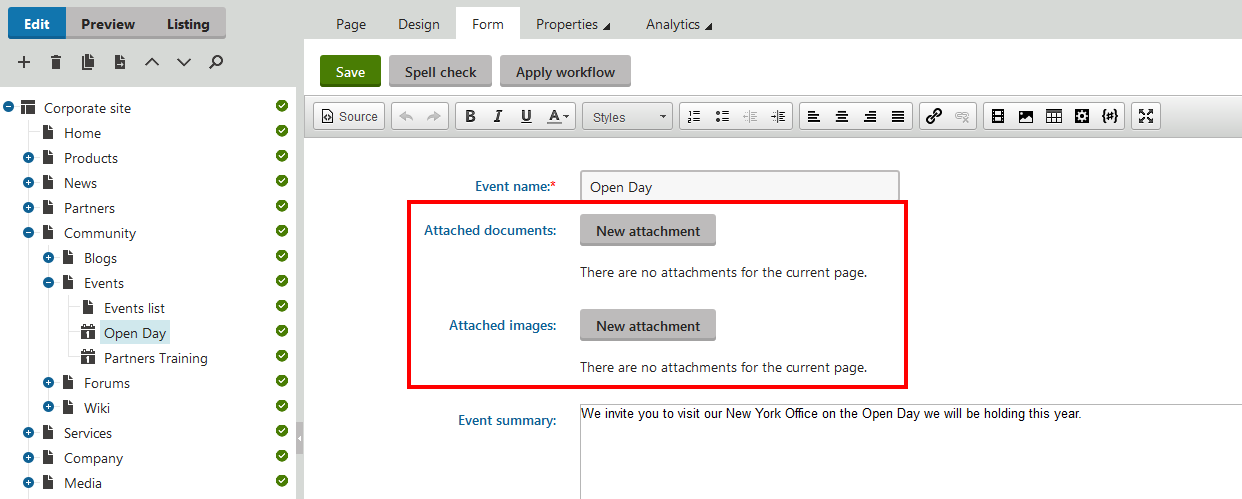
Now, you see the two fields that you just added to the page type.
### Displaying attachments on the page
We want the files to be displayed on the _Open Day_ page.
1. In **Pages** application, navigate to the _Events_ page, since _Events_ is the closest parent page with its own template.
2. Switch to the **Design** tab.
3. Display _Attached Documents_.
1. Right-click the orange web part zone header, and click **Add new web part**.
2. Select **Page attachments**, and click **Select** to add the web part and to open the **Web part properties** dialog.
3. Unwrap the **Visibility** category and in the **Show for page types** field select _Event (booking system) (CMS.BookingEvent)_.
4. In the **Content** category, specify the path to the page holding the attachments in the **Path** field.
5. In **Attachment group**, select again _Event (booking system) (CMS.BookingEvent)_. In the second field of **Attachment group**, select _Attached Documents_.
6. In **Content before**, type:
```csharp
Attached documents
```
7. Click **Save & Close**.
4. Display _Attached_ _Images_.
1. Right-click the orange web part zone header, and click **Add new web part**.
2. Select **Page attachments**, and click **Select** to add the web part and to open the **Web part properties** dialog.
3. Unwrap the **Visibility** category and in the **Show for page types** field select _Event (booking system) (CMS.BookingEvent)._
4. In the **Content** category, specify the path to the page holding the attachments in the **Path** field.
5. In **Attachment group**, select again _Event (booking system) (CMS.BookingEvent)_. In the second field of **Attachment group**, select _Attached Images_.
6. In **Content before**, type:
```csharp
Attached images
```
7. Click **Save & Close**.
The system saves the web part on the page. If someone uploads a file on the **For\*\*\*\*m** tab of the _Open Day_page, the page will display the files – attached documents and attached images.
## Reference – Editing control settings category in editing a Page type field
When you edit a specific page type in the **Page type** application, select a specific field on the **Fields** tab. If you select _Attachments_ in **Field name**, the system automatically selects _Attachments control_ in **Form control**, and the **Editing control settings** category appears. All options from the category is in the following reference.
> **Info:** Some of the options are displayed after you click **Advanced**.
| Name | Description |
| -------------------------------- | ------------------------------------------------------------------------------------------------------------------------------------------------------------------------------------------------------------------------------------------------------------------------------------------------------------------------------------------------------------------------------------------------------------ |
| Allow change order | If selected, the order of attachments can be changed. |
| Paging | If selected, paging is used for the list of attachments. |
| Page size | Define the page size options that are selectable in the attachments paging. Values must be separated by commas.
For example, _25,50,100,##ALL##_ where _##ALL##_ means an option for displaying all attachments on one page.
**Page size** is valid only when **Paging** is selected. |
| Default page size | Define the amount of attachments displayed per page by default.
**Default page size** is valid only when **Paging** is selected. |
| Allowed extensions | Define which file extensions are allowed to be uploaded as attachments.
Select **Inherit from** **settings** to use the values specified in **Settings -> System -> Files**. Clear **Inherit from settings** to set own file extentions separated by semicolons, e.g., _jpg;gif;png_. |
| Automatic image resize on upload | |
| Resize | Define whether the system resizes uploaded images or not. Select:
_(do not resize)_ – to leave images in their original resolution without resizing,
_(use site settings)_ – to resize images according to the site settings in **Settings -> System -> Files**, or
_(use custom settings)_ – to resize images according to the fields **Width (px)**, **Height (px)**, and **Max side size** (px). |
| Width (px) | Images will be resized so that width matches the entered value. The aspect ratio will not be kept.
**Width (px)** is enabled only when you select _(use custom settings)_ in **Resize**. |
| Height (px) | Images will be resized so that height matches the entered value. The aspect ratio will not be kept.
**Height (px)** is enabled only when you select _(use custom settings)_ in **Resize**. |
| Max side size (px) | If one of the sides of the image is larger than this value, the image will be resized so that the larger side matches the entered value. The aspect ratio is kept, and **Width (px)** and **Height (px)** are not applied.
**Max side size (px)** is enabled only when you select _(use custom settings)_ in **Resize**. |