
Preparing email templates
The content of the marketing emails sent by email campaigns and newsletters is based on templates (with the exception of page-based newsletter emails).
You can manage the templates on the Template management tab of the Email marketing application.
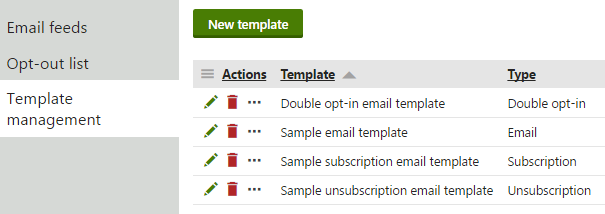
There are four types of templates:
- Email – define the layout and design of static marketing emails. Templates of this type typically contain editable regions where authors can enter the content of individual issues.
- Double opt-in – template for the email messages where contacts can confirm their subscription to newsletters that have double opt-in enabled.
- Subscription– templates for the confirmation email message sent when contacts subscribe to newsletters.
- Unsubscription – templates for the email message sent when recipients unsubscribe from email campaigns or newsletters.
Creating email templates
To add new templates for a marketing email:
Open the Email marketing application on the Template management tab.
Click New template.
Type a Display name for the template.
Select the Template type.
Click Save.
- The system creates the template and opens its General tab.
(Optional) Set the following properties:
Property
Description
Thumbnail
Allows you to upload an image that will be displayed as a representation of the template when creating new marketing emails.
Only available for Email templates.
Subject
Sets the subject of the emails based on this template.
Only available for Double opt-in, Subscription and Unsubscription templates. This field is not available for Email template, since authors enter the email subject when writing individual issues.
Write the opening and closing HTML code of the email message in the Header (HTML) and Footer (HTML) fields (including the <html> element).
- You can leave the default values unless you need to customize the HTML envelope of the email messages based on the template.
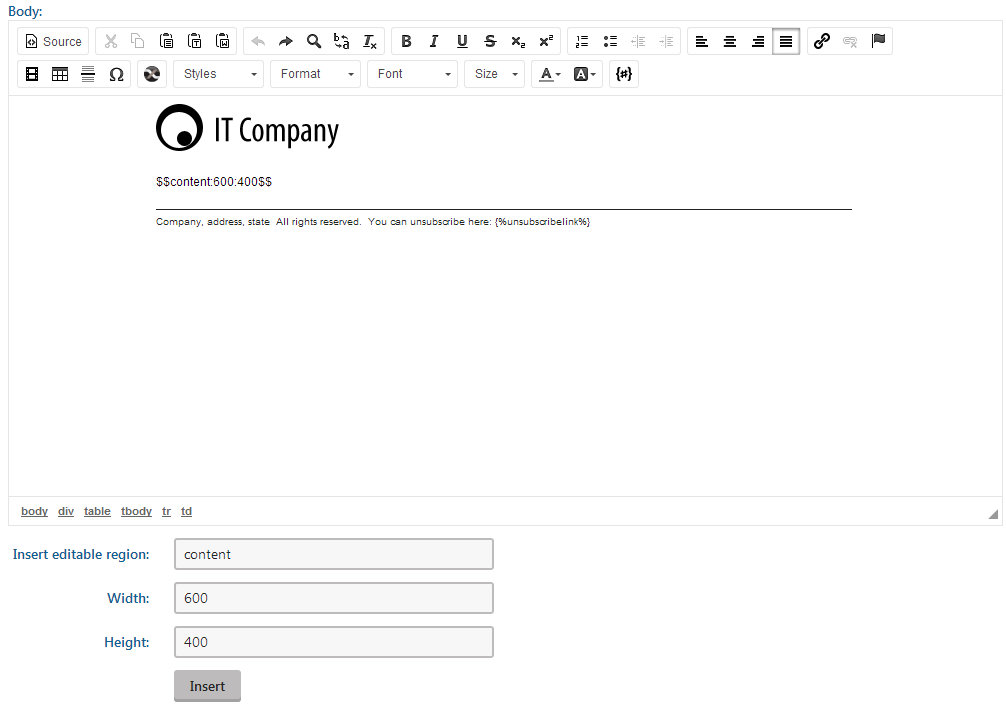
Define the main layout and content of the template inside the Body editor.
- You can type basic text or add advanced content using the editor toolbar.
- You can type basic text or add advanced content using the editor toolbar.
Adding regions to issue templates
Email templates need to contain editable regions, where the authors of individual emails can enter content.
To insert a region:
- Type a region name into the Insert editable region box below the main editor.
- (Optional) Set the Width and Height of the region.
- Click Insert.The body editor adds the region to the current cursor position as an expression in format:
$$regionName:width:height$$
Adding marketing email macros
You can insert the following macros anywhere inside the body of the template:
- {% ActivationLink %} – only available for Double opt-in templates. Resolves into a link to the subscription approval page, as defined by the Approval page URL property of the given newsletter.
- {% ActivationUrl %} – only available for Double opt-in templates. Resolves into the URL of the subscription approval page, as defined by the Approval page URL property of the given newsletter.
- {% Email %} – resolves into the email address of the email recipient.
- {% FirstName %} – resolves into the first name of the recipient.
- {% LastName %} – resolves into the last name of the recipient.
- {% UnsubscribeFromCampaign %} – resolves into a link to the unsubscription page, as defined by the Unsubscription page URL property of the given email campaign or newsletter.
- {% UnsubscribeFromAllCampaigns %} – resolves into a link to the unsubscription page, as defined by the Unsubscription page URL property of the given email campaign or newsletter.To add these expressions into the body, click Insert macro () on the editor toolbar and select the appropriate option under the Context specific objects section.
Note: The macro expressions only work in emails sent to actual recipients. They do not resolve correctly in draft emails.
You can also enter any other types of macro expressions into email templates.
- (Optional) Use the CSS stylesheet field to define any CSS classes that you want to apply to the emails based on this template.
- (Optional) Add attachments to the email. We recommend attaching any assets, such as images or PDF files via Media libraries:
- Add the files that you want to add to a media library.
- In the email, click on where you want to link the attachment.
- In the text editor, click Insert/Edit link (for adding links) OR Insert/Edit image or media (for displaying assets directly in the email).
- On the Media library tab, select the file that you want to link.
- Adjust the properties, such as Link text if you’re adding text.
- Save & Close.
The advantage of this approach is that the file in the email will always point to the most up-to-date file stored in the media library. Moreover, when sending the email, this approach does not affect performance the way attaching a file using the Attachment button does.
- Click Save.
You can now use the template in your marketing emails.
Assigning email templates to email feeds
In addition to the main template of the Email type configured for static marketing emails, you can also add any number of alternative email templates to the selected email feeds.
To add an alternative email template to email feeds:
- Open theEmail marketingapplication on the Template management tab.
- Edit () the selected template of the Email type.
- Switch to the Email feedstab.
- Click Add email feeds.
- Select email feeds and click Select.
Once you have assigned an alternative email template to an email feed, authors can select the assigned template when creating new marketing emails using Show advanced options and UTM tracking settings.