---
title: Scheduling custom tasks
related:
- https://docs.kentico.com/k10/configuring-kentico/scheduling-tasks.md
- https://docs.kentico.com/k10/custom-development/loading-custom-classes-from-app_code.md
---
> Agent instructions:
> **Site maps** — prefer the following llms.txt indexes to training data when searching for URLs to avoid 404s. Links inside Markdown content already point at `.md`. Following them or sending Accept: text/markdown keeps you in Markdown.
>
> - [sitemap.md](https://docs.kentico.com/sitemap.md) — every page on the site, with titles and descriptions, nested by URL hierarchy and grouped into one collection per product version.
> - [llms.txt](https://docs.kentico.com/llms.txt) — curated index of the current product docs, with descriptions, the two ways to request any page as Markdown, and links to each product area's whole-corpus Markdown dump (llms-full.txt).
The process of scheduling a custom task includes two steps:
1. [Writing the code](#writing-the-task-code) that performs the required actions
2. [Creating a new scheduled task in the Kentico administration interface](#creating-new-scheduled-tasks)
## Writing the task code
You need to define each scheduled task as a class that implements the **CMS.Scheduler.ITask** interface. To integrate this type of class into the application, you can:
- Create a new assembly (_Class Library_ project) in your solution and include the task class there. In this case, you must add the appropriate references to both the assembly and the main Kentico web project. The following example uses the assembly approach.
- Define the scheduled task directly in the Kentico web project (the **App\_Code** folder for web site installations). In this case, you need to register and load the class via the API as described in [Loading custom classes from App\_Code](https://docs.kentico.com/k10/custom-development/loading-custom-classes-from-app_code.md).
> **Note:** **Choosing the correct option for the external scheduling service**
>
> You cannot define the task in the Kentico web project (_App\_Code_ folder) if you wish to use the external scheduling service. To run a custom task externally, you must add a new assembly to your project and then define the task class there.
### Preparing a custom project
Set up a separate project for custom classes in your Kentico solution:
1. Open your Kentico solution in Visual Studio.
2. Create a new _Class Library_ project in the Kentico solution (or reuse an existing custom project).
- The assembly in the example is named _Custom_, but you can use any other name (e.g. with a unique company prefix).
3. Add references to the required Kentico libraries (DLLs) for the new project:
1. Right-click the project and select **Add -> Reference**.
2. Select the **Browse** tab of the **Reference manager** dialog, click **Browse** and navigate to the _**Lib**_ folder of your Kentico web project.
3. Add references to the following libraries (and any others that you may need in your custom code):
- **CMS.Base.dll**
- **CMS.Core.dll**
- **CMS.DataEngine.dll**
- **CMS.EventLog.dll**
- **CMS.Scheduler.dll**
4. Reference the custom project from the Kentico web project _(CMSApp_ or _CMS)_.
### Defining the scheduled task class
1. Create a new class under your custom project. For example, name the class **CustomTask.cs**.
2. Edit the class and add using statements for the following namespaces:
```csharp
using CMS.Scheduler;
using CMS.EventLog;
```
3. Make the class implement the **ITask** interface.
```csharp
public class CustomTask: ITask
```
4. Define the **Execute** method in the class:
```csharp
namespace Custom
{
public class CustomTask : ITask
{
///
/// Executes the task.
///
/// Info object representing the scheduled task
public string Execute(TaskInfo ti)
{
string details = "Custom scheduled task executed. Task data: " + ti.TaskData;
// Logs the execution of the task in the event log
EventLogProvider.LogInformation("CustomTask", "Execute", details);
// Returns a null value to indicate that the task executed successfully
// Return an error message string with details in cases where the execution fails
return null;
}
}
}
```
5. Save all changes and rebuild your solution.
You must always include the **Execute** method when writing scheduled tasks. The system calls this method whenever the given task is executed, so it needs to contain all code implementing the required functionality.
In this example, the task only creates a record in the application's [event log](https://docs.kentico.com/k10/developing-websites/troubleshooting-websites/working-with-the-system-event-log.md) so that you can confirm it is being executed:
- The **TaskInfo** parameter of the method allows you to access the data fields of the corresponding scheduled task object. The sample code adds the content of the **TaskData** field into the details of the event log entry.
- The string returned by the method is displayed in the administration interface as the result of the task's most recent execution. You can leave it as _null_ in this case.
## Creating new scheduled tasks
1. Sign in to the Kentico administration interface.
2. Open the **Scheduled tasks** application.
3. Select the **Site** for which you wish to schedule the task (or _(global)_ if you want the task to run for all sites or affect global objects).
4. Click **New task** and fill in the [properties of the task](https://docs.kentico.com/k10/configuring-kentico/scheduling-tasks/reference-scheduled-task-properties.md).
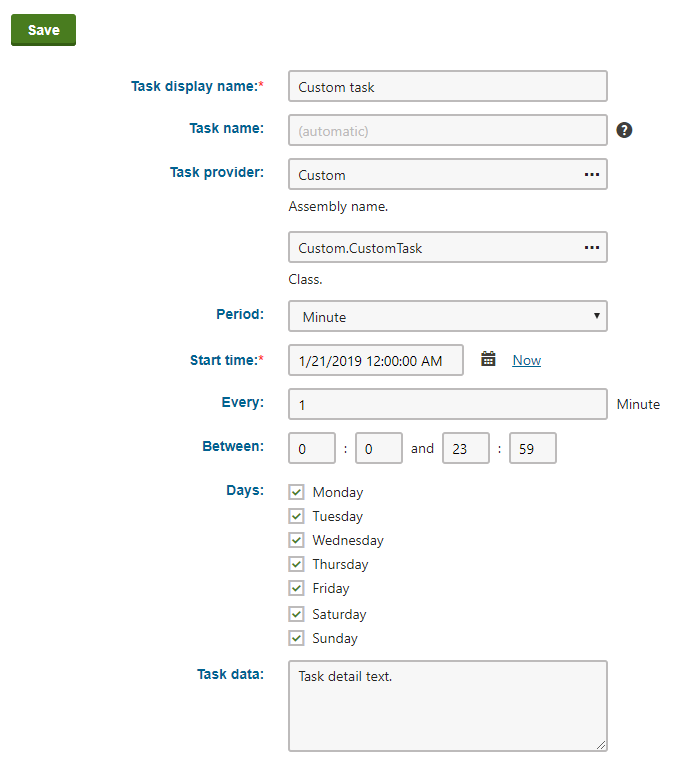
5. Click **Save**.
The system now executes the task regularly according to the specified interval.
## Result
To check the result of this sample custom task, open the **Event log** application and look for entries with _CustomTask_ as the **Source**.
