
Products
Products form the basis of the E-commerce solution. They represent the merchandise and services that your store offers.
Customers can purchase standard products, products with options, customizations such as size or color, or product variants – static configurations of product options sold as individual products. Correspondingly, the product inventory can be configured to track product stock by variants.
You can assign internal and public statuses to products to inform users about the current state of products. You can also specify product brands, manufacturers, suppliers and collections, or attach images and other types of files to provide more information to customers.
Kentico associates product objects (SKUs) with pages representing product types. This means that if you want to present a product on your website, you need to display a product type page that has a product object assigned.
License limitations on the number of products
Sites that run under the Kentico CMS Base License Edition have a maximum limit of 500 enabled products (SKUs).
The limit counts all active products and product variants, i.e. those that have the Allow for sale property enabled (on the General tab in the Products application). Product options are not included in the product count.
Global products count towards the limit of every site in the system. For example, if a site has 400 site-specific products and also uses 150 global products, the total number of products is 550.
The number of products is unlimited for Kentico CMS Ultimate and Kentico EMS license editions.
Managing products in the Products application
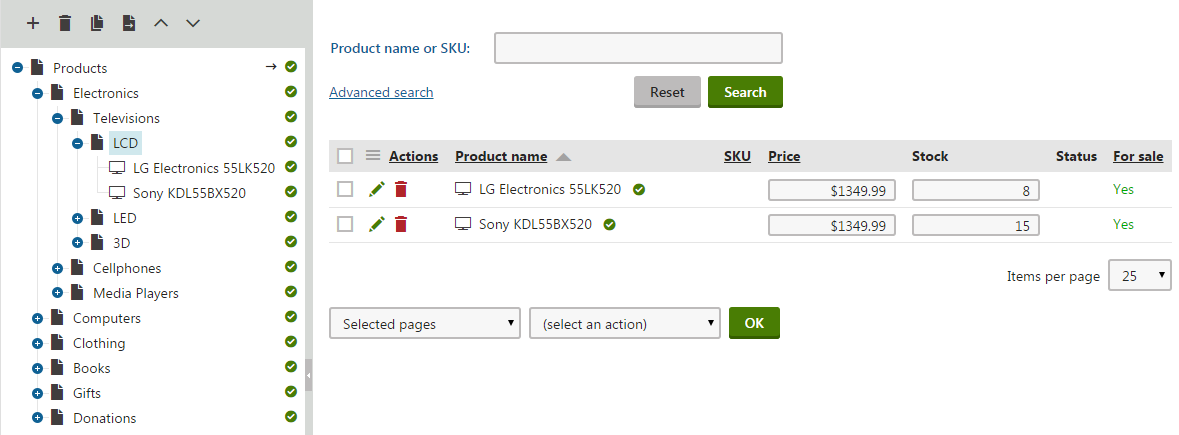
You can manage products in the Products application. This application contains the product section tree that shows sections of the website containing at least one product. You can also see a list of all products placed into the currently selected section.
The content of the Products application is determined by your on-line store settings and the configuration of the product filter.
Product sections tree
The sections tree, located on the left, shows sections of the website containing at least one product. Selecting a section lists all products contained in the section. Selecting a product displays its editing interface, allowing you to modify the product’s properties.
Deleting a section or product
Delete a section or a product by clicking Delete (). The system deletes the product page and the assigned SKU record, if no dependency exists (e.g., the product is not part of any orders). Otherwise, only the product page gets deleted and the SKU is disabled, remaining in the system.
Multilingual store
Running a multilingual store allows you to switch between multiple language versions of the currently selected section or product by clicking on the language selector at the bottom of the screen. You can also enable the language version comparison mode and edit section/product language versions side-by-side.
Stand-alone SKUs
If stand-alone SKUs are allowed on the current site, the Stand-alone SKUs node is displayed above the sections tree. This node allows you to view a list of all stand-alone SKUs existing on the current site.
Products list
You can Edit () and Delete () products listed in a selected section. Furthermore, you can filter the list of products by using either the simplified or advanced search.
Using the pair of drop‑down lists under the displayed product items, you can perform certain management tasks with multiple products at once ( Move , Copy , Link , Delete , Translate , Publish , Archive ). Select either Selected pages or All pages in the first drop-down list, the required action in the second one and click OK.
Managing products in the Pages application
An alternative way of working with products is via the Pages application. However, since the Pages application is intended for page management, it primarily facilitates the configuration of product pages associated with individual products.
You can edit frequently accessed product object (SKU) properties, such as the price, or description on a product page’s Form/Content tab. Other SKU-specific properties – volume discounts, options, variants, and pages – are available on the SKU tab.
Form tab
When editing a product (i.e., an SKU and the associated product page) on the Form/Content tab, the Remove SKU from this page action in the SKU binding section allows you to remove the bound SKU from the page. The system doesn’t support the action (and hides the section) for products that use a workflow.
If you are editing a product page with no SKU assigned, the Create new or assign existing SKU action allows you to assign an SKU to the page.
Reference
If you are editing a product in the Products application, the system offers the following tabs:
You may not be able to view some of the tabs (Workflow, Versions) based on your system configuration.
General tab
The General tab allows you to edit the basic properties of the product. The system supports several product representations: standard product , membership, e-product and bundle. Standard products typically represent product articles and services.
The following table lists all properties of the standard product. These properties are shared by the membership,e-product, and bundle product representations:
General |
|
|
Product name |
The name of the product that is displayed to your customers on the live site and to the users in the administration interface. |
|
SKU |
Allows you to specify an alphanumeric identifier, usually referred to as the product number, serial number or SKU number. You can use this identifier, for example, in your accounting records. |
|
Price |
The price of the product in the store’s main currency. Depending on the configuration of the site’s Prices include tax setting, enter the value with or without tax included. |
|
List price |
The recommended retail price (RRP) or manufacturer’s suggested retail price (MSRP) of the product. The list price is typically determined by factors such as supply, demand and manufacturing costs. The system always displays the list price value as entered (without calculating taxes, etc.). |
|
Department |
Adds a department for the product. You can add a new department directly, without the need to navigate to the dedicated Departments section:
The department is now available for all your products. |
|
Tax class |
Specifies which tax applies to the product. Automatic taxes You can specify default tax classes for departments. This means that the system automatically applies the selected tax class to all new products from the given department. If suitable, you can also specify a default department for each product type. Therefore, you can create products in your store sections without considering which tax is the one you need. |
|
Brand |
Allows you to specify the product’s brand. Brands can be defined in the dedicated Brands application (see Managing brands and manufacturers). Note: Brands are always related to a specific site, so they cannot be assigned to global products. |
|
Manufacturer |
Assigns the product manufacturer. You can add a new manufacturer directly, without the need to open the dedicated Manufacturers application:
Now you can use the manufacturer for any product that you offer in your on-line store. |
|
Supplier |
Specifies a supplier for the product. You can add a new supplier directly, without the need to open the dedicated Suppliers application:
Now you can use the supplier for any product that you offer in your on-line store. |
|
Collection |
Assign the product to a collection. Collections can be defined in the dedicated Collections application (see Managing product collections). Note: Collections are always related to a specific site, so they cannot be used for global products. |
|
Image |
Allows you to upload a file (usually an image) representing the product. After uploading the file, the system displays the name and size of the file and allows the user to perform the following actions:
|
|
Short description |
Here you can enter a short description of the product used for special product listings. |
|
Description |
A description of the product used for special product listings. |
|
Representing |
Allows you to specify a representation for the product. The system offers the standard product representation, i.e. Standard product, and specialized types derived from this general type, Membership, E-product, and Bundle. |
Custom properties |
|
|
This section allows you to edit:
If there are no custom properties defined for the product, this section is unavailable. |
|
Status |
|
|
In store from |
Indicates product availability. The default value is the current date (i.e. the date of adding the product to the system). You can type in the value and you can also change it automatically by using or clicking Now . |
|
Public status |
Product status displayed to your customers, for example, Featured. You can add a new public status directly, without the need to navigate to the dedicated Public status section:
Now you can use the public status for any product that you offer in your on-line store. |
|
Internal status |
Product status to used for internal business purposes, for example, New model. You can add a new internal status directly, without the need to navigate to the dedicated Internal status section:
Now you can use the internal status for any product that you offer in your on-line store. |
|
Allow for sale |
Indicates if your customers can add to the shopping cart and purchase the product. |
Shipping |
|
|
Needs shipping |
Indicates if the product requires shipping from your on-line store warehouse to an address specified by the customer. Memberships and E-products do not require shipping. |
|
Package weight |
Package weight in units set for your online store. |
|
Package height |
Package height in units of your choice. |
|
Package width |
Package width in units of your choice. |
|
Package depth |
Package depth in units of your choice. |
Inventory |
|
|
Track inventory |
Determines whether and how the system tracks product inventory:
If allowed (the Yes or By variants options), the system can offer the users inventory-related information such as the number of available product (product variant) items or quantity at which the product (product variant) needs to be reordered. You can also specify whether your customers can purchase the product (product variant) only if it is available in stock. |
|
Sell only if items available |
Indicates if your customers can purchase only quantity of the product (product variant) that is in stock (checked box). Available if the Track inventory property is enabled (the Yes or By variants options). |
|
Available items |
The number of product items available in stock. The Track inventory property must be enabled (the Yes option) to set this property. |
|
Reorder at |
The quantity at which the product should be reordered. Available only if the Track inventory property is enabled (the Yes option). The system informs you about products that you should reorder in the Inventory report (in Store reports -> Products -> Inventory). You can also configure the Products widget (in the Store overview application) to display this information. |
|
Min items in one order |
Here you can specify the minimum number of product items in one order. Product variants Product variants inherit the minimum and maximum numbers of items in one order from the product. If customers buy multiple variants of the same product, all variants need to be between the minimum and maximum quantity of each variant needs to be between the minimum and maximum allowed numbers of items. The quantity of variants is not counted together. |
|
Max items in one order |
Specifies the maximum number of product items in one order. Product variants Product variants inherit the minimum and maximum numbers of items in one order from the product. If customers buy multiple variants of the same product, all variants need to be between the minimum and maximum quantity of each variant needs to be between the minimum and maximum allowed numbers of items. The quantity of variants is not counted together. |
Analytics |
|
|
Note: The product conversion properties only apply to Portal Engine sites. To track product purchase conversions for A/B tests on MVC sites, configure the Purchase of a specific product conversion in the settings of individual A/B tests. See A/B testing pages for more information. These properties are also not available for global products. |
|
|
Conversion name |
Sets a custom conversion that is logged when a customer purchases the product.
|
|
Conversion value |
Here you can enter a numerical value to be recorded by the system for the specified custom conversion on purchasing the product. The values are cumulative, i.e. when a conversion hit is logged, the specified value is added to the total sum previously recorded for the given conversion. You may insert a macro expression into this field to dynamically retrieve a value from the current site context. For example: {%ShoppingCartItem.UnitPrice%} This sample macro allows the custom conversion to log the price of the given product as its value. The advantage of a macro is that it retrieves the price dynamically, including any potential discounts that apply for the customer. |
Attachments tab
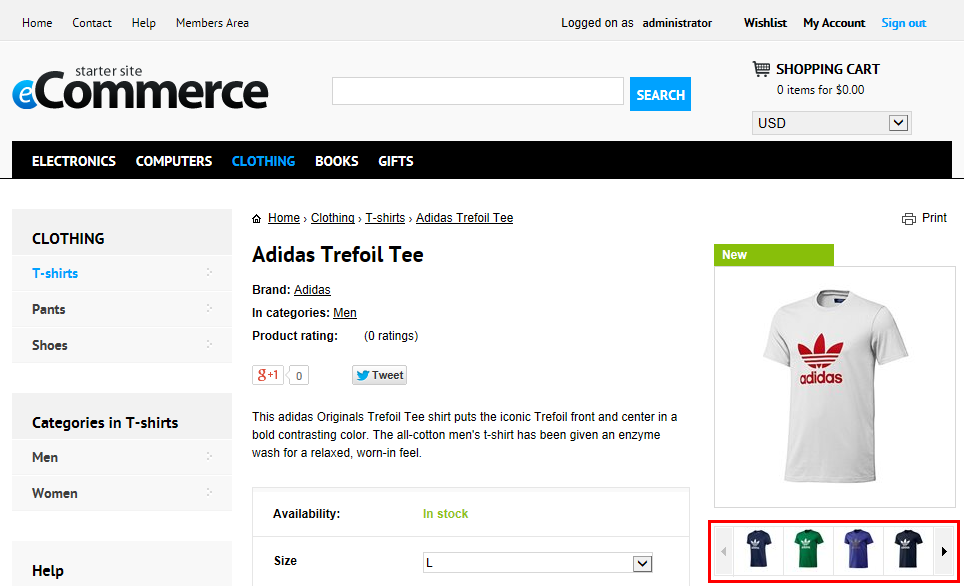
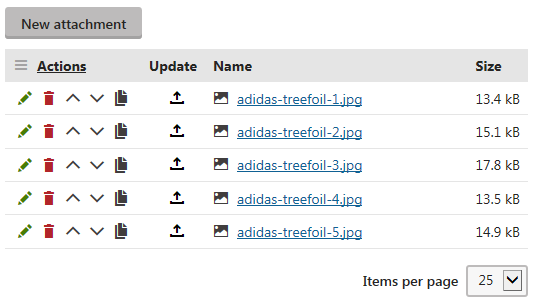
On the Attachments tab you can see a list of the currently selected product’s attachments. You can add images and any other allowed types of files, where required. For example, you can present your customers with featured images of a given product (i.e., create an image gallery), or provide them with various supplementary materials such as leaflets, e-guides, and so on.
To add a product attachment, click New attachment and open the required file. The system then displays the name and size of the file and allows the administrator to perform the following actions:
Edit () - if the attachment is an image, clicking the icon opens the image in the built-in Image editor. If the attachment is not an image, clicking the icon opens the file in the built-in Metadata editor.
Delete () - removes the attachment from the product.
Move up () and Move down () - re-orders the attachments. The order is stored in the AttachmentOrder property of each attachment.
The order of attachments is not versioned with the product’s (product page’s) workflow (if applied).
This means that if you change the order of attachments in one version of the product, the order is changed in all other versions, too.
Clone () - allows you to quickly create a copy of the selected item, including its configuration. You can then modify the copy as required.
Update () - allows you to replace the attachment with a different attachment.
Resting your mouse cursor over the name of an image attachment displays the image’s thumbnail. Clicking an attachment’s name opens it in the browser.
Metadata tab
On the Metadata tab you can edit metadata of the product, for example, page title, page tags. You can use this type of product data for Search engine optimization (SEO), or to mark your product pages with key words.
If you enable Inherit for a given property, the system uses settings from the product’s parent page. For example, if the Page keywords property of the Televisions -> LCD product section is set to LCD, each product in this section has LCD set as its keyword.
Page settings |
|
|
Page title |
Sets the title of the product page. When customers view the product, the system displays the title in the header of the browser (or tab). The property is important also for Search engine optimization (SEO). This is because many search engines use the property in their search result lists. The system adds the content of the field into the <title> element in the HEAD section of the page output. |
|
Page description |
Allows you to enter a brief description of the product and its purpose, which may be used for Search engine optimization (SEO). Besides, the system uses the property to augment the site’s search functionality. The system adds the content of the field as a description meta element into the HEAD section of the product page. |
|
Page keywords |
Allows you to add meta keywords to the product. The system may use this type of metadata if your customers search the site (e.g. the built-in Smart search application). You need to separate multiple keywords with commas. |
Tags |
|
|
Page tag group |
A tag group which the system will use for tagging the product. Please specify the actual tags using the Page tags property. |
|
Page tags |
Tags with which the system will tag the product. If you need to enter more than one tag, please ensure that the tags are separated with commas or blank spaces. A combination of the two separators in a single entry is valid as well. The following examples are all valid entries for adding three tags:
If you need to enter a tag consisting of more than one word, you should enclose it within quotation marks. You can enter multiple multi-word tags, which can also be separated with both blank spaces and commas:
You should use quotation marks also for tags containing special characters:
|
You can use macro expressions in the {%ColumnName%} format to insert values of the current product page’s properties into the Page title or other metadata properties.
You can set up a page title prefix, page description prefix, page keywords prefix and page title format for all pages (including product pages) available on the site. See Editing metadata of pages for more details.
Options tab
On the Options tab you can specify which option categories (Option categories tab) and product variants (Variants tab) apply to the current product. You can also manage the option categories and product variants.
To add option categories, click Add categories and select appropriate categories in the displayed selection dialog, or create new ones. See Working with product options for more details.
To add product variants, click Define available variants and select option categories and variants available for the product. See Working with product variants for more details.
Categories tab
Categories allow you to sort products into related groups. You can assign categories to the product on the Categories tab.
If categories are assigned to the product, the system displays their list. You can use the Remove selected and Add categories actions. If no categories are assigned to the product, only the latter action is available. You can remove all listed category items at once by clicking … next to Remove selected and then clicking Remove all.
Advanced tab
On the Advanced tab you can edit the following product properties:
- Volume discounts
- Related products
- Workflow
- Versions
- Pages
Volume discounts
On the Volume discounts tab you can see a list of volume discounts, which are applied when your customers purchase specified amounts of the product. The system automatically calculates and applies volume discounts during the checkout process when the customers add a given amount of product items to the shopping cart. You can create multiple volume discount levels, allowing you to apply different discounts for different amounts of purchased product items.
You can add a new volume discount by clicking New volume discount. You can also Edit () properties of existing volume discounts levels, and Delete () selected levels.
Related products
On the Related products tab you can build relationships between products. The relationship names need to be defined in the Relationship names application.
You can add relationships after clicking Add related page, and you can remove selected relationships from the system by clicking Delete (). See Working with page relationships for more details.
When building relationships between products that you offer in your on-line store, use only relationship names enabled for the current site.
Workflow
The Workflow tab is available only if a workflow is defined for the product.
Workflow is a sequence of steps that define the life cycle of the product. It allows you to set up a reviewing and approval process to ensure the quality of content. For example, you can specify roles that users play in the product’s life cycle. Similarly, you can specify points in the life cycle where the users have an influence on the product.
In the top section of the Workflow page you can see what workflow is currently applied to the product (e.g. Default workflow), and the current step of the workflow (e.g. Published). You can perform workflow actions (Publish, Reject, Archive, etc.) and toggle sending of notification emails (using the Send notification emails checkbox).
Product properties covered by workflow
Workflow covers the properties on the product’s General tab, as well as Product attachments and page settings (i.e., the Page title, Page description and Page keywords properties accessible on the Metadata tab).
However, the following properties are NOT subject to workflow and their modifications affect the live site immediately:
- The product image (i.e. the Image property shared by all product representations)
- The Track inventory and Available items properties used for inventory management
- E-product files (i.e. the Files property of the E-product representation)
- The product content of bundles (i.e. the Products property of the Bundle representation)
Important: If using workflow in a multilingual store, the product properties covered by workflow are NOT shared between different language versions of a single product. Any updates of the product Price (or other key properties) need to be made separately for each language version. Alternatively, your developers can set up some form of automatic synchronization mechanism.
Workflow steps
In the Workflow steps section, the system displays all steps of the workflow currently applied to the product. The current workflow step is highlighted.
Workflow history
The Workflow history section displays workflow step history of the product, i.e. a list of all workflow status changes that the users made throughout the product’s life cycle. For each status change, you can read its exact date and time, final workflow step, the user who took the action, and the type of action that was performed.
Versions
The Versions tab is available only if a workflow is defined for the product.
The system displays product history (the respective workflow version of the product) when the version is published, i.e. when a previous version of the product is replaced with the current version.
In the top section of the Versions page you can see what workflow is currently applied to the product (e.g. Default workflow), and the current step of the workflow (e.g. Published).
Page history
The Page history table displays product history (a list of workflow versions of the product). You can perform the following actions with the versions:
- View version () - allows you to see details of the product version. If you click the icon, the system redirects you to the Page version page.
- Roll back version () - allows you to roll back any changes made to the product since adding the product version.
- Delete () - allows you to remove the product version.
Clicking Clear history removes all versions except the latest one.
You can change the length of version history by configuring the Version history length property in Settings -> Content -> Content management.
Automatic version numbering
The system supports automatic version numbering:
- If you applied a workflow without content locking, the system uses automatic version numbering by default.
- If you applied a workflow with content locking, using automatic version numbering is optional. To enable the feature, go to Settings -> Content -> Content management and enable the Use automatic version numbering property.
Automatic version numbering works as shown in the following example:
- 0.1 - the first version of the product when it is created.
- 0.2 - the second modification of the product.
- 1.0 - the first published version of the product.
- 1.1 - the first modification of the published product.
- 2.0 - the second published version of the product.
Pages
On the Pages tab you can see a list of pages to which the currently edited SKU (product object) is assigned. Product pages allow you to present the products and services to your customers on the live site.
Click Edit page () to edit the given page or click Navigate to page () to view the page on the live site.
Preview tab
On the Preview tab you can preview the current version of the product before it is published (if you are using a workflow for the product). You can also preview the product’s content with caching disabled, which allows you to see the content even if the live site displays a cached version.
Examples:
- You are using a workflow, and the product’s Publish from property (if available) is set to a future date and time.
- The tab displays content that will be published after the specified date and time.
- You are using a workflow, and the product hasn’t got to the Published step yet.
- The tab displays content that you have created in the current workflow step.
- You are using a workflow, the product had already got to the Published workflow step, and its workflow cycle was restarted (i.e. the product was switched from the Published/Archived workflow step back to the Edit step and is going through the workflow cycle again).
- The tab displays content from the current workflow step.