---
title: Creating pages with editable areas in MVC
related:
- https://docs.kentico.com/k12sp/developing-websites/page-builder-development.md
---
> Agent instructions:
> **Site maps** — prefer the following llms.txt indexes to training data when searching for URLs to avoid 404s. Links inside Markdown content already point at `.md`. Following them or sending Accept: text/markdown keeps you in Markdown.
>
> - [sitemap.md](https://docs.kentico.com/sitemap.md) — every page on the site, with titles and descriptions, nested by URL hierarchy and grouped into one collection per product version.
> - [llms.txt](https://docs.kentico.com/llms.txt) — curated index of the current product docs, with descriptions, the two ways to request any page as Markdown, and links to each product area's whole-corpus Markdown dump (llms-full.txt).
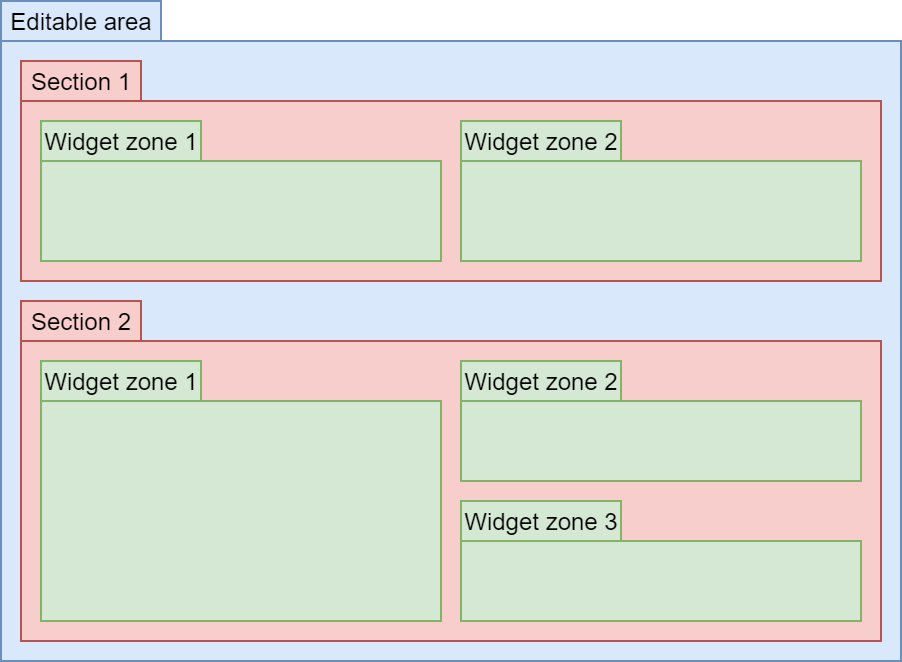
After you [register the page builder](https://docs.kentico.com/k12sp/developing-websites/page-builder-development.md) feature in your MVC project, you need to create pages with editable areas, where content editors can add content through widgets. Content editors can arrange widgets using predefined layouts to achieve their desired result without having to resort to coding. You can adjust the visual arrangement of widgets on a page through the following components:
- **Editable areas** – defined directly in the views of your site's pages. They are the top-level layout component and contain one or more sections.
- **Sections** – customizable components that specify the visual layout of widget zones. In the _Pages_ application, content editors can choose which sections to add within editable areas, and thus adjust the structure of the page. A section may contain multiple widget zones. See [Developing page builder sections](https://docs.kentico.com/k12sp/developing-websites/page-builder-development/developing-page-builder-sections.md).
- **Widget zones** – components that allow content editors to insert widgets. Widget zones are defined in the views of sections.
## Creating a page in Kentico
1. Open the Kentico administration interface.
2. In the **Page types** application, set up a [content-only page type](https://docs.kentico.com/k12sp/developing-websites/defining-website-content-structure/creating-and-configuring-page-types/creating-content-only-page-types.md).
3. Perform the following on the **General** tab of the given page type's editing interface:
1. Specify a [URL pattern](https://docs.kentico.com/k12sp/developing-websites/defining-website-content-structure/creating-and-configuring-page-types/configuring-page-types/specifying-the-url-pattern-for-content-only-pages.md) (e.g. _/Home_).
2. Enable the **Use Page tab** setting (the page builder will be available on the _Page_ tab in the _Pages_ application).
3. Click **Save**.
4. In the **Pages** application, create a page of the appropriate content-only page type in the content tree.
The live site URL of the page must match the route of the MVC page where the page builder is located. For example, if you use the _/Home_ [URL pattern](https://docs.kentico.com/k12sp/developing-websites/defining-website-content-structure/creating-and-configuring-page-types/configuring-page-types/specifying-the-url-pattern-for-content-only-pages.md), the page builder must be located on your MVC site's _example.com/Home_ page.
> **Tip:** **Viewing the live URL of content-only pages**
>
> You can view the live site URL of content-only pageson the **Properties** -> **General** tab in the **Live URL** field.
## Initializing the page builder in the controller
In your MVC project, initialize the page builder in the GET action of the controller that handles the page's URL (route). Use the **HttpContext.Kentico().PageBuilder().Initialize** method with the _DocumentID_ of the page as the parameter:
```csharp title="Example"
// Retrieves the page from the Kentico database
TreeNode page = DocumentHelper.GetDocuments()
.Path("/Home")
.OnCurrentSite()
.TopN(1)
.FirstOrDefault();
// Returns a 404 error when the retrieving is unsuccessful
if (page == null)
{
return HttpNotFound();
}
// Initializes the page builder with the DocumentID of the page
HttpContext.Kentico().PageBuilder().Initialize(page.DocumentID);
```
> **Note:** **Pages protected by authorization**
>
> If the GET action of the controller that handles a page's URL (route) is protected by an [Authorize](https://docs.microsoft.com/en-us/dotnet/api/system.web.mvc.authorizeattribute?view=aspnet-mvc-5.2) attribute, you may need to take additional steps to ensure that users can work with the page builder. With most configurations, any user can edit the page via the page builder, given the user has [permissions](https://docs.kentico.com/k12sp/managing-users/configuring-permissions.md) necessary to modify the page in the content tree.
>
> However, if the _Authorize_ attribute has the **Users** parameter specified, only the listed users have access to this page in the _Pages_ application. In these cases, you need to include your content editors in the _Users_ parameter to allow them to edit the content.
> **Info:** **Initialization when using page templates**
>
> It is not necessary to initialize the page builder for pages that use the [page templates functionality](https://docs.kentico.com/k12sp/developing-websites/page-builder-development/developing-page-templates-in-mvc.md). The _TemplateResult_ object that is returned in the controller of templated pages automatically initializes the page builder and thus you do not need to do it manually.
## Adding editable areas to views
Identify the locations on your website where you want editors to place widgets. Then define these locations by adding editable areas to the code of the corresponding views. The identifier of each editable area must be a string without white spaces that is unique within the context of the given page:
```xml title="Required namespaces"
@using Kentico.PageBuilder.Web.Mvc
@using Kentico.Web.Mvc
```
```xml
@Html.Kentico().EditableArea("area1")
```
You can optionally specify a default [section](https://docs.kentico.com/k12sp/developing-websites/page-builder-development/developing-page-builder-sections.md) for each area by setting the _identifier_ of the given section as a parameter of the **EditableArea** method. The default section is automatically added into new areas and in cases where an editor removes the last section from an area.
```xml
@Html.Kentico().EditableArea("areaWithSection", defaultSectionIdentifier: "LearningKit.Sections.Col5050")
```
If you do not specify the default section for an area, it uses the default section configured for the entire page builder (either the system's _Default_ section with a single widget zone, or a custom section assigned when enabling the page builder feature).
### Loading page builder scripts and styles
All pages with editable areas must contain scripts and CSS styles required by the page builder and its components. To add these resources to pages, call the following extension methods in your views:
- **PageBuilderScripts** – renders required script tags and script file links. Call before the closing _\
...
@Html.Kentico().PageBuilderScripts()
_ tag of the page code.
- **PageBuilderStyles** – renders links for the required stylesheet files. Call within the _\