
Membership management
The Membership application allows you to define special types of user membership for the website (or globally for all sites in the system).
Within the security model of Kentico, membership objects perform a function similar to roles. Users that belong to memberships are authorized to perform certain actions on the website, access secured content or similar. However, memberships do not directly allow individual permissions, but instead group together one or more existing roles. When a membership is assigned, it grants the given user the sum of all permissions defined for the contained roles.
Typically, a membership will be associated with a certain product, which can then be purchased by users through the website’s e‑commerce features. This will allow them to gain access to restricted sections of the website or other types of premium content for a specified amount of time. For additional information about how you can offer various types of website membership as products, see Managing E-commerce memberships.
Memberships versus roles
Memberships are mainly intended to be used in combination with e‑commerce for live site users and customers, or for other specific purposes where an additional security layer that groups together multiple roles is useful.
If you need to define authorization options for different types of users, such as content editors or administrators for specific applications, it is recommended to do so directly using standard roles.
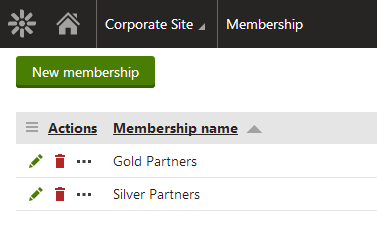
Managing memberships
You can manage memberships in the Membership application.
Memberships can either be assigned to a specific site or defined as global objects that are available for all sites. You can select the site context using the Site drop‑down list at the top of the page. Only the Global administrator can manage global objects.
You can specify the following properties when creating a new membership:
- Membership name – sets a name for the membership which is displayed in the administration interface.
- Membership code name – sets a name that serves as an identifier for the membership.
- Membership description – can be used to enter an optional text description for the membership.
There are four tabs available when editing a membership:
General
On this tab you can edit the same properties that were specified when the membership was created.
Roles
On this tab you can define which roles which the membership should contain. When the membership is assigned to a user, it will grant all permissions allowed by the specified roles until it expires.
To add roles, click the Add roles button and check the boxes next to the appropriate roles in the displayed selection dialog. Only roles that belong under the same site as the membership can be chosen (global memberships may only contain global roles).
If you need to add a role under multiple memberships, you can do this more quickly in the Roles application by editing the given role on its Memberships tab. There you may easily assign the role to any number of memberships using a single action.
Users
On this tab you can view which users are assigned to the currently edited membership. For as long as their membership is valid, the listed users will be authorized to perform any actions allowed for the roles that the membership contains, as defined on the Roles tab.
Typically users will be added automatically when they purchase the membership as a product, so it is not necessary to manually assign them one by one. The purpose of this tab is to allow administrators to monitor the membership and override its settings if necessary.
If you wish to add users, click the Add users button and check the boxes next to the appropriate users in the displayed selection dialog. Only users who are assigned to the same site as the membership can be chosen (global memberships may be assigned to all users in the system).
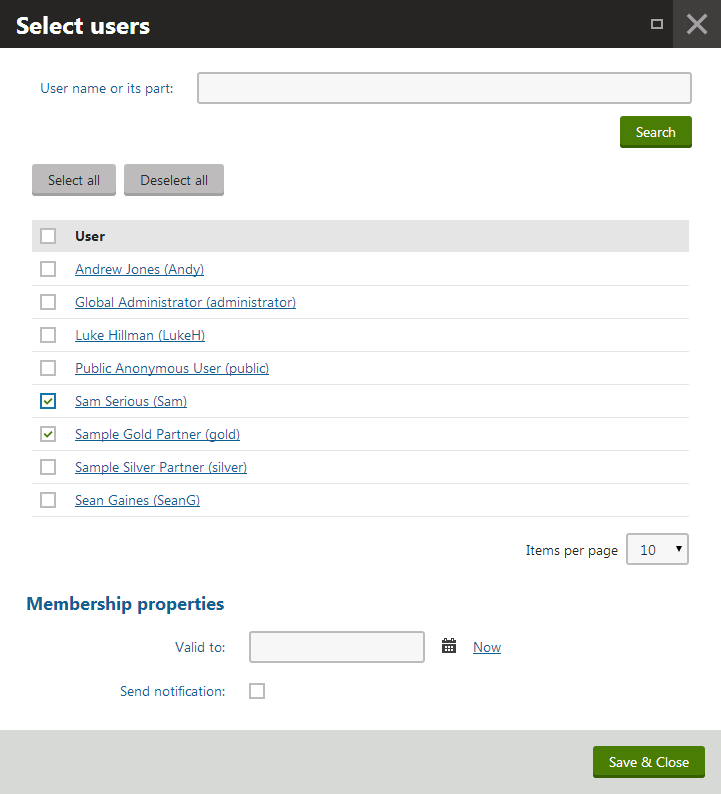
Using the Valid to field you can specify the exact date and time when the membership should expire for the given users. If this field is left empty, the users will be assigned to the membership for an unlimited time period. If you set an expiration date for the membership, you can also select the Send notification check box to enable email reminders that will be sent to the selected users before their membership ends. For more about notification emails, see Membership expiration reminders below.
Using the Change validity () action you can prolong or shorten the time interval for which the user should be assigned to the membership. This way you can set an expiration date or reactivate expired memberships for users.
Products
This tab displays a list of products with which the membership is associated, as well as additional details. When purchased, these products assign the membership to the customer along with the authorization options that it provides. Membership as a type of product is described in Managing E-commerce memberships.
Setting memberships for users
It is also possible to directly manage the memberships of individual users via the administration interface in the Users application.
When editing a user, switch to the Membership tab where you can add or remove memberships to/from the user. Note that global memberships can only be assigned by users with the Global administrator privilege level. Using this approach, you can set an expiration date for each of the memberships assigned to the user.
Displaying memberships on the live site
On Portal Engine sites, the My account web part from the Membership -> Logon & Registration category can be used to allow users to view a summary of their current memberships on the live site. If its Other tabs -> Display my membership property is enabled, the web part displays a list of all memberships assigned to the current user and their expiration dates. It may also be configured using its Memberships -> Memberships page URL property to generate a link to a page where users can buy new memberships for the website or renew existing ones.
For MVC sites, developers can implement content that displays user memberships via the MembershipInfoProvider API.
Membership expiration reminders
To help users keep track of their memberships and ensure that they know when it is necessary to renew a paid membership, the application includes an automatic notification feature.
There is a global scheduled task named Membership reminder that periodically checks memberships (once per day by default) and sends a notification email to users whose membership will expire within the amount of days specified by the Settings -> Security & Membership -> Send Membership reminder (days) field. You can configure this task and setting as needed.
The Membership reminder scheduled task is a global scheduled task and works by default only for global memberships. If you use site memberships, you need to clone the scheduled task to the specific site.
To clone the scheduled task to a specific site:
- Open the Scheduled tasks application.
- Next to the Membership reminder task, click Other actions () -> Clone.
- In the dialog, click Show advanced settings.
- In Clone to site, select the site.
- (Optional) Set the other fields as desired.
- Click Clone.
These reminders are only sent for memberships that were assigned with the Send notification flag enabled and for those that were purchased as a product with a limited duration. The content of the reminder emails is taken from the Membership - Expiration notification email template, which can be edited via the Email templates application.
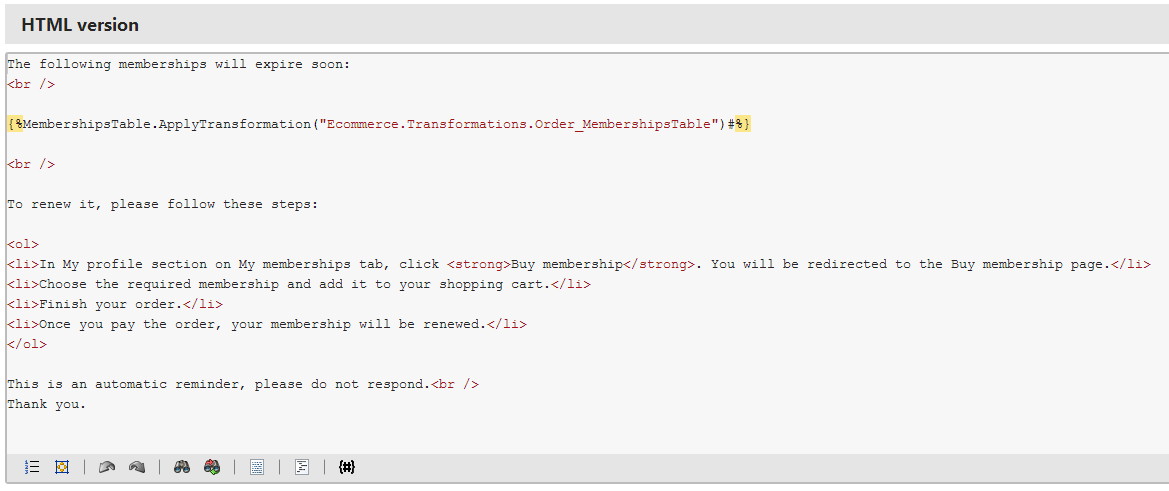
When editing this email template, you can use the {% MembershipsTable %} context macro to insert a list of all memberships that will soon expire for the given user. This list must be formatted via a Text/ XML type transformation, which you can specify through the ApplyTransformation method, for example:
{%MembershipsTable.ApplyTransformation(“Ecommerce.Transformations.Order_MembershipsTable”)%}
In addition to this special macro, you can also use all other standard macro expressions in the templates.