
Creating ASPX page templates
Use the following steps to create ASPX page templates:
Open your Kentico web project in Visual Studio.
Create a new web form (.aspx file).
(Optional) Select a master page.
Develop the content of the page template.
- Add any required HTML or controls into the template’s markup.
- You can execute custom code in the web form’s code behind.
Edit the web form’s code behind and make the class inherit from CMS.UIControls.TemplatePage.
Inheriting from TemplatePage allows you to use the web form as a page template in Kentico.
Sign in to the Kentico administration interface and open the Page templates application.
Create a New template.
Set the following values on the template’s General tab:
- Template type - ASPX page
- File name - enter the path of the aspx file that implements the template
Switch to the Sites tab and add all websites where you wish to use the template.
Users can now create pages based on the template.
Example - Building an ASPX template
The following example demonstrates how to create a new ASPX page template. The sample template allows users to add pages with two editable regions.
Creating the web form
- Open your web project in Visual Studio (using the WebSite.sln or WebApp.sln file).
- Right-click the CMSTemplates/CorporateSite folder in the Solution Explorer and select Add -> Add New Item.
- Create a new Web Form and enable Select master page.
- Or Web Form with Master Page if you are using a web application project.
- Name the file TwoColumnTemplate.aspx
- Click Add. The Select a Master Page dialog opens.
- Choose the CMSTemplates/CorporateSite folder and select the default Root.master file.
- Click OK.
Writing the ASPX code
Adding Kentico Controls to your Visual Studio Toolbox
Before you start developing ASPX page templates, it is recommended to add the Kentico Controls to your Visual Studio Toolbox. This allows you to drag‑and‑drop the controls onto the ASPX pages.
Open the Source view of the new web form.
Add the following code inside the <asp:Content> element:
Note: This example uses a table layout. If you prefer a CSS-based layout, replace the surrounding HTML code with <div> elements. You have full control over the content.
<table> <tr> <td style="width: 50%"> <cms:CMSEditableRegion ID="txtLeft" runat="server" DialogHeight="400" RegionType="HtmlEditor" RegionTitle="Left column" /> </td> <td style="width: 50%"> <cms:CMSEditableRegion ID="txtText" runat="server" DialogHeight="400" RegionType="HtmlEditor" RegionTitle="Right column" /> </td> </tr> </table>- The <asp:Content> control allows you to use standard ASP.NET master pages. When the system renders the page, it loads the content of the control into the assigned master page (as defined in the Root.master file).
- The CMSEditableRegion control defines an editable region that the page displays as an HTML editor in the Kentico administration interface on the Page tab of the Pages application. On the live site, the control renders the content entered into the editor.
Edit the web form’s code behind file (TwoColumnTemplate.aspx.cs).
Add a using statement for the CMS.UIControls namespace:
using CMS.UIControls;Modify the class declaration so that the web form inherits from TemplatePage:
public partial class CMSTemplates_CorporateSite_TwoColumnTemplate : TemplatePageSave the web form’s files.
Registering the web form as a page template
Now you need to register the web form as a page template in Kentico.
Sign in to the administration interface and open the Page templates application.
Select the Corporate Site/Examples category.
Click New template.
Type Two column template into the Template display name field.
Click Save.
Set the following values on the General tab:
- Template type: ASPX page
- File name: ~/CMSTemplates/CorporateSite/TwoColumnTemplate.aspx
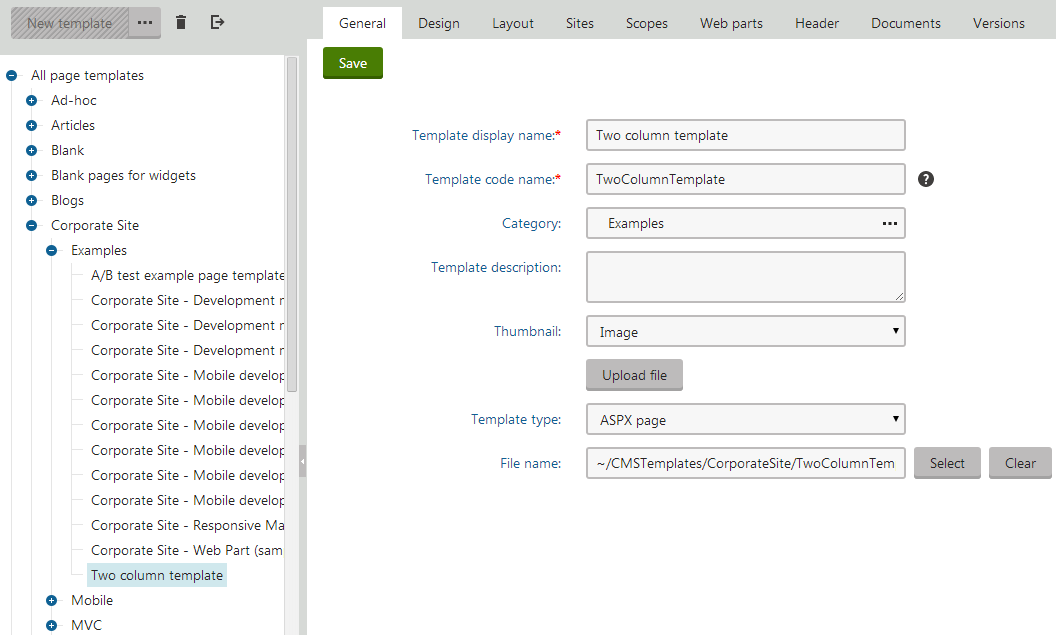
Click Save.
Switch to the Sites tab.
Click Add sites.
Choose the sites where you wish to use the page template and click Select.
Creating a page based on the template
Content editors can now use the page template to create pages.
- Open the Pages application.
- Select Corporate Site (the root of the content tree).
- Click New () above the tree.
- Choose the Page (menu item) page type.
- Type About Us as the Page name and choose the Use existing page template option.
- Select the Corporate Site/Examples category and the Two column template page template.
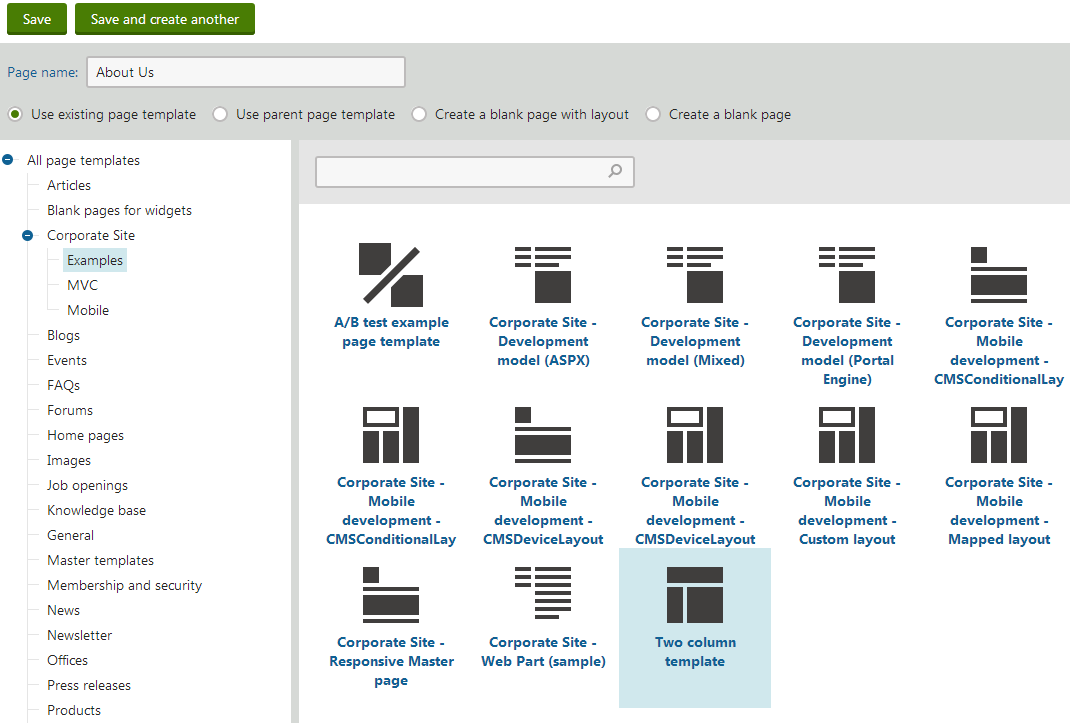
- Click Save to create the new page.
On the Page tab, you can see the page and its editable regions.
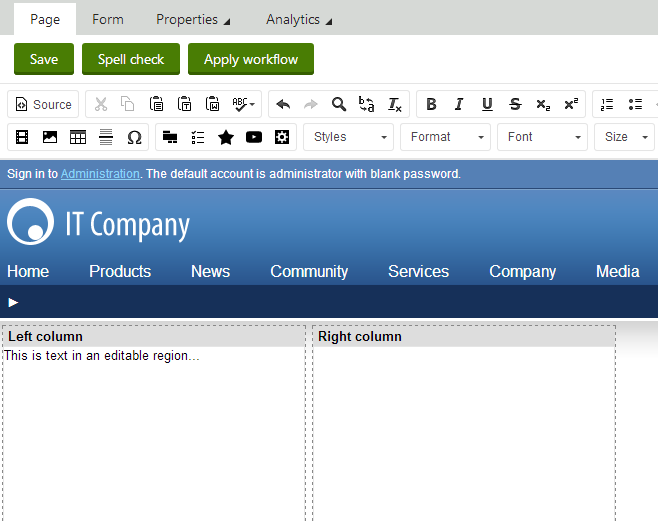
You can now type in text into the regions and click Save to store the content of the page.