---
title: Starting with MVC development
related:
- https://docs.kentico.com/k12sp/installation/installing-kentico-mvc-projects.md
- https://docs.kentico.com/k12sp/configuring-kentico/managing-sites/managing-site-licenses/kentico-licensing-for-mvc-applications.md
- https://docs.kentico.com/k12sp/developing-websites/defining-website-content-structure.md
- https://docs.kentico.com/k12sp/deploying-websites/deploying-mvc-sites.md
---
> Agent instructions:
> **Site maps** — prefer the following llms.txt indexes to training data when searching for URLs to avoid 404s. Links inside Markdown content already point at `.md`. Following them or sending Accept: text/markdown keeps you in Markdown.
>
> - [sitemap.md](https://docs.kentico.com/sitemap.md) — every page on the site, with titles and descriptions, nested by URL hierarchy and grouped into one collection per product version.
> - [llms.txt](https://docs.kentico.com/llms.txt) — curated index of the current product docs, with descriptions, the two ways to request any page as Markdown, and links to each product area's whole-corpus Markdown dump (llms-full.txt).
This page explains how to set up an MVC application together with a Kentico instance, so that you have a starting point for [MVC development](https://docs.kentico.com/k12sp/developing-websites/mvc-development-overview.md).
Use the following process to create a new MVC project:
1. Run the Kentico installer.
2. Select the **Custom installation** option and then the **MVC** development model.
3. In the **Installation type** step, choose the **New site** option and enter a **Name** for your new site and project.
4. Configure the remaining options and finish the installation.
> **Info:** See [Installing Kentico MVC projects](https://docs.kentico.com/k12sp/installation/installing-kentico-mvc-projects.md) for detailed information.
After completing the installation, you have two separate web projects – a blank MVC project suitable for the development of a new site, and a Kentico project that provides the content editing and administration interface. Both projects are connected to the same database and automatically configured to work together.
You can now continue by [defining the content structure](https://docs.kentico.com/k12sp/developing-websites/defining-website-content-structure.md) of your site and developing the MVC application.
> **Tip:** **Tip**: Optionally, you can set up your MVC site to provide a redirect that sends users to the administration interface of the connected Kentico instance. See [Adding an administration redirect to MVC sites](https://docs.kentico.com/k12sp/developing-websites/starting-with-mvc-development/adding-an-administration-redirect-to-mvc-sites.md).
## Manually setting up MVC projects
> **Note:** **Note**: We strongly recommend using the [Installer](https://docs.kentico.com/k12sp/installation/installing-kentico-mvc-projects.md) to set up new MVC projects. The purpose of the following section is only to help you better understand what occurs during the MVC installation, or for advanced scenarios where you wish to create and configure your MVC application completely manually.
### Preparing the Kentico instance
Install a new Kentico instance or use an existing one. To create a new Kentico administration project without a related MVC project, run the installer and select the **Portal Engine** development model (without a sample site).
To develop an MVC site with Kentico, you need to have a content-only site that will serve as a repository for page content, settings, and other data:
1. Open the Kentico administration interface.
2. Navigate to the **Sites** application.
3. Click the **New site wizard** button.
4. Select **Use web template**.
5. Click **Next**.
6. Select the **MVC Blank Site** template from the list.
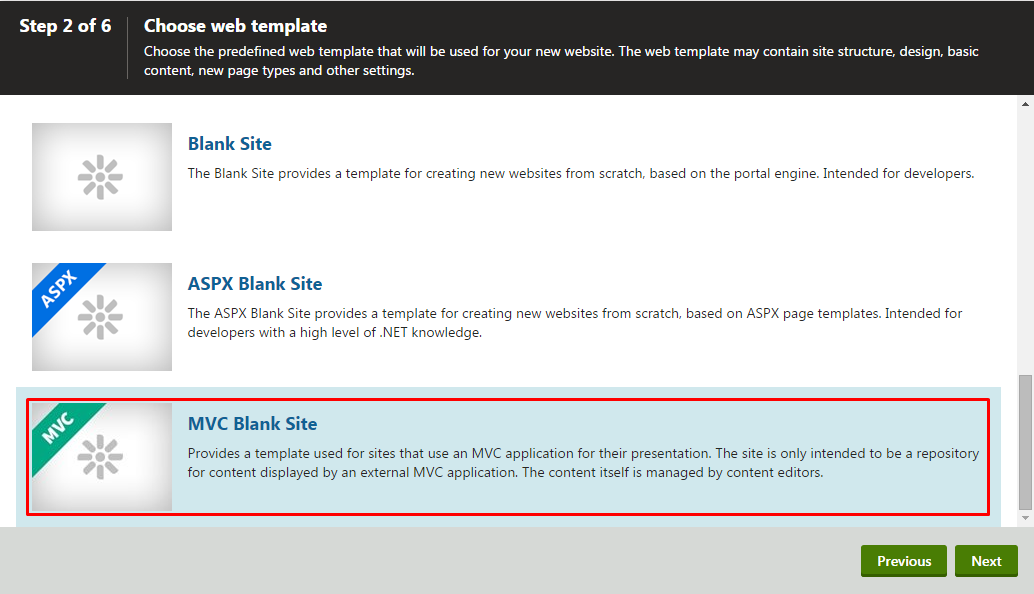
7. Continue with the remaining steps of the wizard and finish creating the new site.
8. Edit your new site and set the **Presentation URL** on the **General** tab. This is the URL that will be used for the site presented by your MVC application. For example, _http://localhost/MvcApplication_ or _http://www.SiteDomain.com_.
9. Click **Save**.
Next, you need to set up the synchronization mechanism:
1. Open the **Settings** application.
2. Navigate to **Versioning & Synchronization** -> **Web farm**.
3. Set the **Web farm mode** to **Automatic**.
4. Click **Save**.
At this point the content-only site and your Kentico instance are set up to be used with an MVC application.
### Creating the MVC application
Now you need to create a new MVC application and configure it to work with Kentico:
1. Create a new project in Visual Studio.
- Select the **ASP.NET Web Application (.NET Framework)** project template.
- Choose the **Empty** template option.
- Select the _MVC_ checkbox to add folders and core references for MVC.
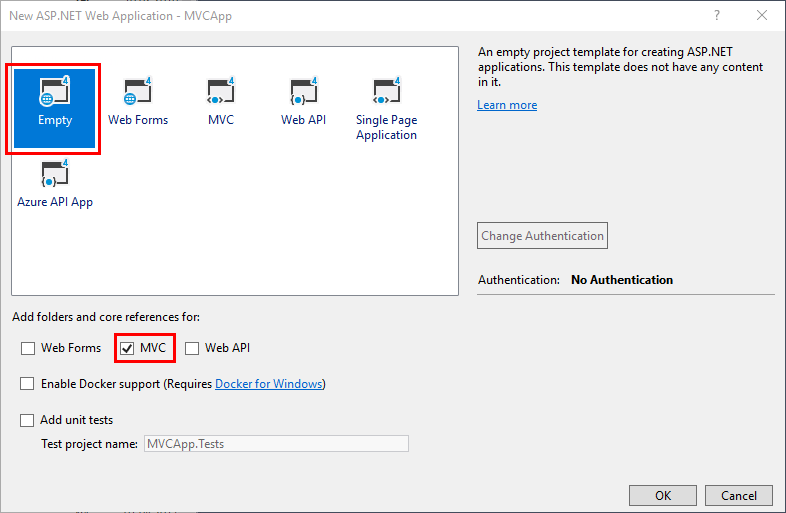
2. Right-click the solution and select **Manage NuGet Packages for Solution**.
3. Install the **Kentico.AspNet.Mvc** package into your MVC project (with all dependencies). See [Installing Kentico integration packages](https://docs.kentico.com/k12sp/developing-websites/starting-with-mvc-development/installing-kentico-integration-packages.md) to learn more about the packages.
4. Edit the MVC project's main **web.config** file:
- Add a connection string to your Kentico database. We recommend copying the exact connection string from the _web.config_ file of the related Kentico administration project.
```xml
```
- Copy the value of the **CMSHashStringSalt** _appSettings_ key from the _web.config_ of the Kentico project and add the value into the same key in the MVC project's _web.config_ (it is empty by default). This ensures that the MVC application generates hashes using the same salt value as the Kentico application (for example for [macro signatures](https://docs.kentico.com/k12sp/macro-expressions/troubleshooting-macros/working-with-macro-signatures.md) or page preview links).
```xml
...
```
5. In the MVC project's **App\_Start\RouteConfig.cs** file, add a using statement for the **Kentico.Web.Mvc** namespace, and call the **Kentico.MapRoutes()** method (must be called before you map other more general routes).
```csharp
using Kentico.Web.Mvc;
public static void RegisterRoutes(RouteCollection routes)
{
routes.IgnoreRoute("{resource}.axd/{*pathInfo}");
// Maps routes for Kentico HTTP handlers and enabled MVC features
// Must be first, otherwise the Kentico system URLs may match more general routes for your site's content,
// which can for example result in pages being displayed without images
routes.Kentico().MapRoutes();
...
}
```
6. Expand the project's **Properties** folder and create a new class, for example named _WebAssemblyInfo.cs_. Add the **AssemblyDiscoverable** assembly attribute into the class.
- The attribute allows you to work with [classesgenerated for Kentico objects](https://docs.kentico.com/k12sp/developing-websites/generating-classes-for-kentico-objects.md) and register custom components used during MVC development.
- The attribute is placed into a separate class because the default _AssemblyInfo_ class cannot access code from external libraries in cases where the web project is precompiled with outputs merged into a single assembly (during [deployment](https://docs.kentico.com/k12sp/deploying-websites/deploying-mvc-sites.md)).
```csharp
using CMS;
// Ensures that the Kentico API can discover and work with custom classes/components registered in the MVC web project
[assembly: AssemblyDiscoverable]
```
7. (Optional) Edit the MVC project's **Views\web.config** file and add namespaces of the API included in the _Kentico.AspNet.Mvc_ package.
- The namespaces allow you to easily access various extension methods in the code of your views.
- We recommend adding at least the **Kentico.Web.Mvc** and **Kentico.Content.Web.Mvc** namespaces, which provide extension methods for [displaying content from Kentico](https://docs.kentico.com/k12sp/developing-websites/retrieving-content-in-mvc-applications.md).
- Alternatively, you can add _using_ statements for required namespaces directly in the code of individual views.
```xml title="Example"
...
```
8. Set a URL for the MVC application and create a corresponding application in IIS:
- Right-click the MVC project and select **Properties**.
- Open the **Web** tab.
- In the **Servers** section, select _Local IIS_.
- Set the **Project Url** identical to the **Presentation URL** assigned to your MVC site in Kentico.
- Click **Create Virtual Directory**.
After you run the MVC application, you can see it within the related Kentico administration interface in the **Web farm** application on the **Servers** tab, as a new server. The server's _Status_ changes to _Healthy_ after a few moments.
You can now continue by [defining the content structure](https://docs.kentico.com/k12sp/developing-websites/defining-website-content-structure.md) of your site and developing the MVC application.