
Personalizing widgets in MVC
Kentico EMS required
Features described on this page require the Kentico EMS license.
Personalization is an on-line marketing technique that allows you to display different content on pages based on the situation in which they are viewed. This can help you provide more accurately targeted information to visitors and increase the effectiveness of your website. For example, you can show modified text or additional offers to visitors who belong to a specific contact group or persona.
You can personalize content that is displayed through page builder widgets. Individual widgets allow you to create multiple variants, which are then displayed to a different audience based on predefined conditions.
Prerequisite
Content personalization of widgets needs to be configured by your developers. For more information, see:
Creating personalization variants
To personalize widget content, you need to create one or more personalization variants, and set up a condition which decides whether the original or a personalized variant is displayed.
- In the Pages application, select a page that contains page builder widgets.
- On the Page tab, click on a widget you want to personalize.
- Click the Personalize () icon in the widget header.
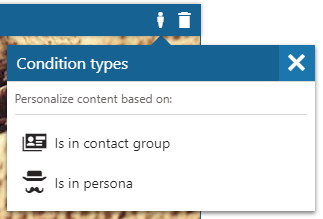
- Choose the condition type that you wish to use to personalize the widget.
- Fill in the configuration dialog and enter a name for the new variant.
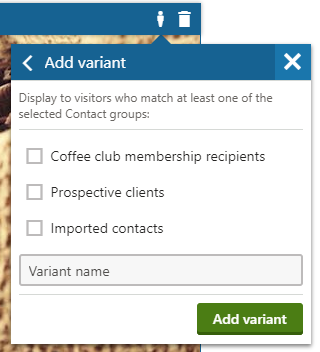
- Click Add variant within the dialog.
- Modify the properties or content of the new widget variant. Consider the target audience of the variant’s condition when preparing the modified content.
- Click Save at the top of the page.
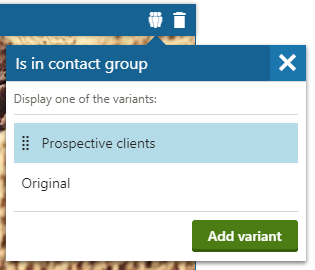
The new personalization variant of your widget is now created. In the Edit mode of the Pages application, you can switch between personalization variants of a widget by clicking the Personalize () icon and selecting the desired variant.
When a visitor views the page on the live site, the system evaluates the condition and displays the appropriate variant.
Configuring widget personalization variants
The available personalization condition types, their properties in the configuration dialog, and the properties of widgets all depend on the implementation of your website. For more information, visit your project’s documentation or contact your developer.
Creating additional variants
You can add variants to a personalized widget. All variants of a single widget use the same type of personalization condition, but you can configure different properties for the condition of each variant.
- Click the Personalize () icon of a widget to open the variant list.
- Click the Add variant button under the list.
- Fill in the configuration dialog and enter a name for the new variant.
- Click Add variant within the dialog.
- Modify the properties or content of your newly created widget variant.
- Click Save at the top of the page.
The newly created variant is created as a copy of the previously selected variant. The new variant is placed on top of the variant list while the original variant stays on the bottom of the list.
Priority of variants
The variants are evaluated from top to bottom according to their position in the variant list. The first variant for which the conditions are satisfied is displayed.
Recommended number of variants
There is no limitation on the number of variants you can create. However, for optimal displaying of the variant list, we do not recommend creating more than 10 variants for each widget.
Working with personalization variants
After you create personalization variants of a widget, you can edit, delete, or change the priority of the variants. To perform these actions, open the variant list by clicking the Personalize () icon in the given widget’s header.
Editing variants
You can edit the properties of your widget variants even after they are created. To edit a variant:
- Hover over the variant you want to edit in the variant list.
- Click the Edit variant () button. The pre-filled configuration dialog with the current variant properties is displayed.
- Edit the desired properties and click Apply within the dialog.
- Click Save at the top of the page.
Changing the priority of variants
You can reorder variants in order to change their priority of evaluation. Variants are evaluated from top to bottom, i.e. the first variant in the list for which the conditions are satisfied is displayed. To reorder variants:
- Hover over the variant you want to move in the variant list.
- Drag and drop the variant within the variant list.
- Click Save at the top of the page.
Deleting variants
To delete a variant from the variant list of a widget:
- Hover over the variant you want to delete from the variant list.
- Click the Delete variant () button.
- Click Save at the top of the page.