
Configuring shipping carriers
In Kentico, shipping options are provided by carriers and services of these carriers. Imagine a carrier as a package which carries some shipping functionality. For example, a typical carrier is a FedEx carrier. Such FedEx carrier returns shipping availability and prices from FedEx. However, FedEx offers more than one type of shipping. Carriers therefore provide services. In the example with the FedEx carrier, its services can be the International Priority service for a quick delivery and the International Economy service for a slower but cheaper delivery. If your on-line store has this carrier, then you are able to create shipping options in the Kentico administration interface that offer customers the FedEx International Priority shipping and the FedEx International Economy shipping.
By default, the Kentico E-commerce Solution offers the Default carrier. The Default carrier provides the Weight based shipping service, on which you can base shipping options with costs in levels according to weight of products in customers’ shopping carts. Developers can also implement custom carriers and add them to your Kentico. For example, you can add either carriers that provide services offering shipping based on the day of the week, based on customer’s address, etc., or more complex carriers, i.e., when you want to work with shipping providers (e.g., FedEx, USPS, Australia Post) and communicate with their systems to be able to calculate the actual shipping cost real-time.
After a developer implements and installs a custom carrier provider to your Kentico instance, create and configure a carrier in the Kentico administration interface.
Then you can create shipping options based on services of the carrier.
Creating a new shipping carrier
You can manage shipping carriers in the Store configuration application. To create a new shipping carrier:
Open the Store configuration application.
Navigate to the Shipping -> Carriers tab.
Click New carrier.
Specify properties of the carrier:
- Name – specifies the name of the carrier displayed in the administration interface.
- Code name – specifies the name of the carrier used by developers in the code.
- Carrier provider – specifies the assembly and its class that provides functionality of the carrier. The carrier provider can be set only when creating a carrier, it cannot be changed later.
Click Save.
If a new tab appeared, switch to the tab and specify the additional properties.
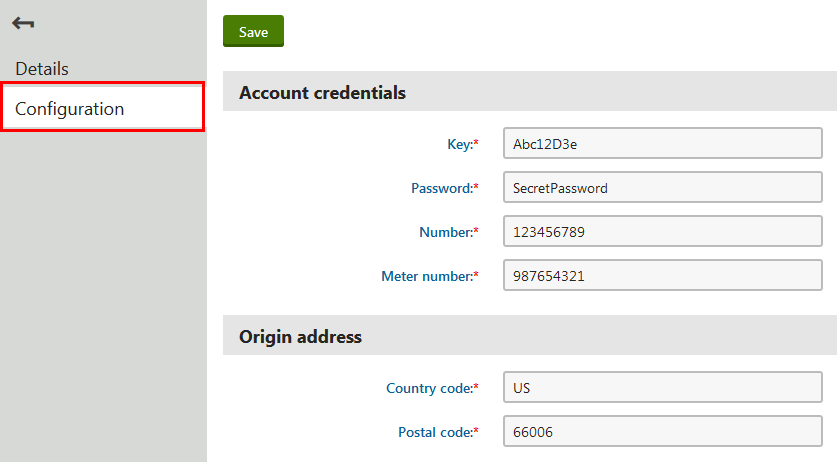
Always check if the carrier has a configuration tab and set all fields on the tab!
If you leave fields on the configuration tab empty or you enter incorrect values, the system will allow you to create shipping options based on the carrier anyway. However, if they are required for correct functionality of the carrier, the carrier may work incorrectly and possibly cause errors.
If you make any changes on the tab, click Save.
The system saves the carrier. From now on, you can create shipping options based on services of this carrier.