
Installing the database for Azure projects
After you have deployed your Azure project to the cloud, continue to installing the database. Kentico projects hosted in Azure can use any type of SQL database, hosted either on a standard SQL Server or in the cloud. This topic describes the installation on an SQL Azure server.
If you have already configured the connection string for your project, you can skip the Generating the connection string and Setting the connection strings sections.
Installing a database on an Azure SQL server
To install the database on an Azure SQL server, use the system to generate the connection string, paste the connection string as a value to your cloud service and let the system install the database.
Generating the connection string
Access the website of your deployed Azure project.
You can find the URL in Cloud services -> select your service -> Overviewunder Site URL.

Specify the target Azure SQL server (created when Preparing the cloud environment) and supply the credentials for the server:
SQL Server name or IP address – enter the SQL Azure server name, which you can find at SQL databases ->select your database-> Overview under Server name. The standard format is <servername>.database.windows.net.
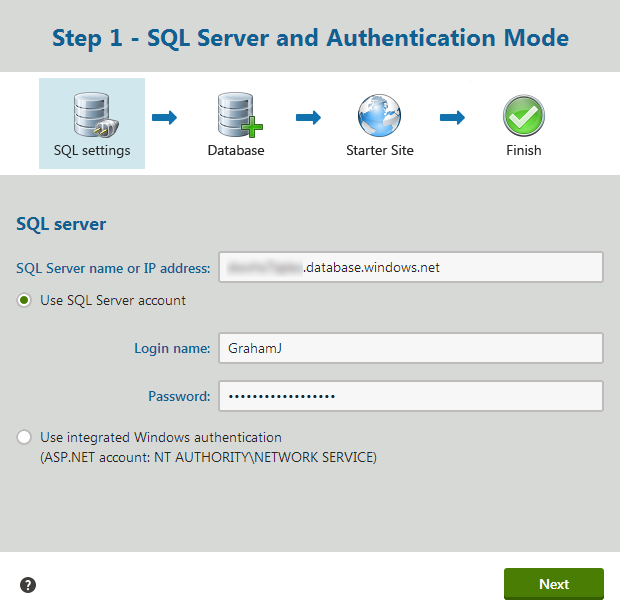
Click Next.
Enter the name of the SQL database (created when Preparing the cloud environment).
Choose whether you want to Create Kentico CMS database objects.
- Select this option if you are installing into an empty database.
- Clear this option if the existing database already contains Kentico objects (tables, stored procedures, views).
Click Next.
Copy the connection string value into the clipboard.
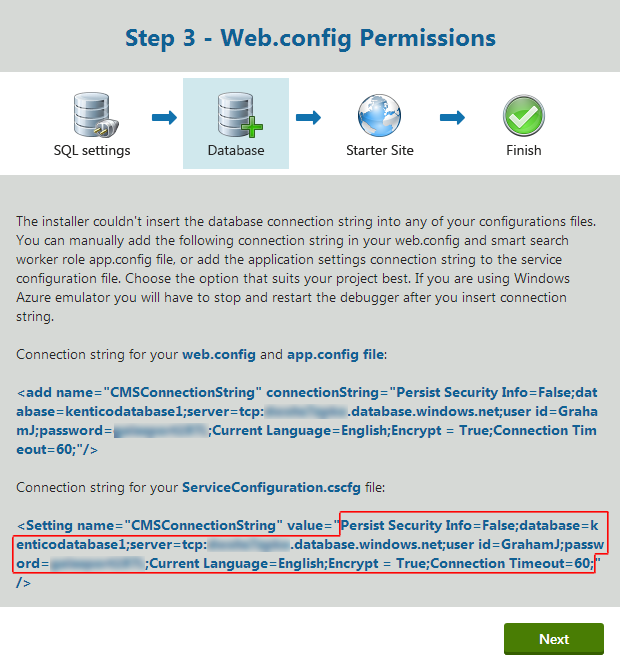
Setting the connection strings
Open the Azure Management Portal in another browser tab.
Navigate to Cloud services -> select your service -> Configuration.
Paste the copied connection string value into the fields of the CMSConnectionString setting for the CMSApp role and also the SmartSearchWorker role if you are using it.
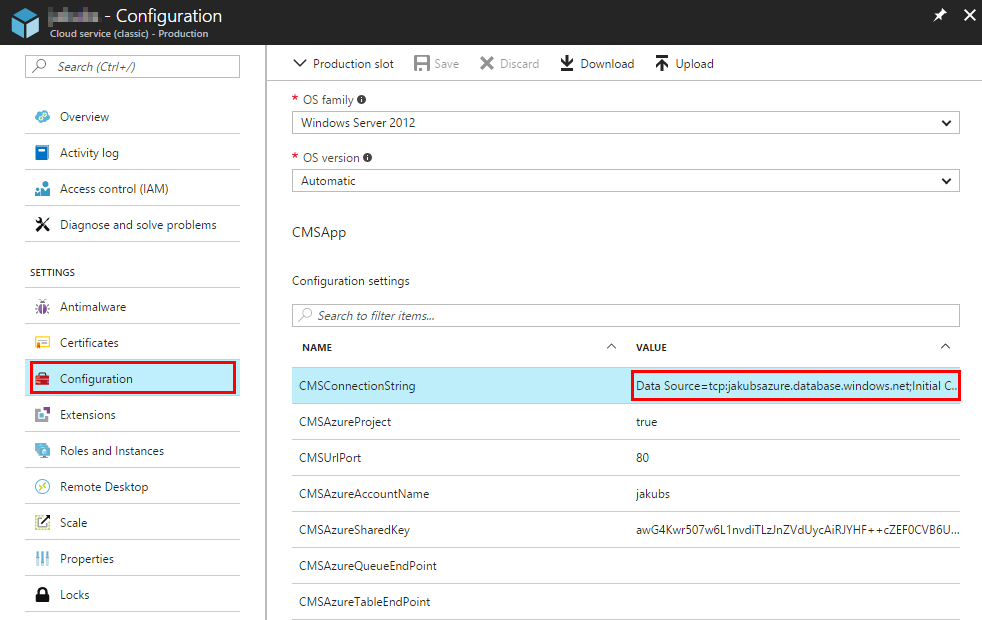
Click Save.
Close the original window with the database installation.
You have now connected your Cloud Service application to the created Azure SQL database.
We recommend that you configure the connection string in your local Azure project as well to ease future deployments:
- Open your Azure project in Visual Studio.
- Double-click the CMSApp role.
- Switch to the Settings tab and select Cloud as Service Configuration.
- Paste the connection string as a value for the CMSConnectionString key.
- Repeat for the SmartSearchWorker role if you are using it.
Now you will not have to set the connection string in your local project the next time you deploy your project to the cloud.
Finishing the database installation
Open your project’s website again (<your cloud service name>.cloudapp.net).
- The database installation automatically resumes.
Confirm the target database by clicking Next.
- The installer now installs the database for your project.
Enter a license key for the domain.
- Staging deployments are automatically covered by any other valid license, so you do not have to request a separate license for staging deployments. However, this applies only if you use the recommended configuration, which is to use separate databases for live and staging environment.
Click Next.
Choose an initial website to install:
- Choose a starter site – you can choose from the supplied sample sites to try out the functionalities of the system or use it as a base for custom development. We recommend the Corporate site or the E-commerce site.
- Continue to the New site wizard – choose this option if you want to to develop a new site from scratch. See Creating new sites using the New site wizard for more information.
- Import existing Kentico CMS website – choose this option if you have already created a website using Kentico and you want to import it to the new installation. See Importing a site or objects for more information.
Click Next.
The installer creates your chosen website and finishes the installation. See our Recommendations on using Azure SQL Database tiers and adjust the tier of your database to suit your project demands.
If you continue to your new website, you can log in to the administration interface.
To sign-in to our sample starter sites, use the following credentials:
User name: administrator
Password: (blank password)