
Importing contacts
You can import contacts into Kentico from Comma-separated values (CSV) files.Contact import comes in handy when you need to use contacts from 3rd party systems in Kentico. Typically, you will be able to export contacts to CSV files directly from your CRM. You can also export CSV files from Excel spreadsheets. After importing contacts and adding them to a contact group, you can send them an email, start a marketing automation process or use other On-line marketing functionality.
Limitations and requirements
Please take into account the following requirements and limitations of the import functionality:
- Only CSV files can be used for import.
- The input CSV file has to be encoded in UTF-8.
- The first row of the input file has to contain a header with the names of the columns.
- Only text contact fields are supported. Importing contact’s birthday, gender, country and other such fields is not supported.
- Contact import uses HTML 5 File API functionality, which is supported by the majority of modern browsers. However, it isn’t supported by Internet Explorer 9 and older.
To import contacts in Kentico
Note that the import process overwrites existing values.
Open the Contact management application.
Switch to the Contact import tab.
Click Select file.
Select the CSV from which you want to import contacts.
Segment the imported contacts
Kentico can add the contacts into a contact group during import. Choose from the following:
- Create a new contact group to import contacts into
- Import contacts into an existing contact group
- Do not segment imported contactsMap the columns from your file to Kentico contact fields
Specify which contact fields represent the specific values in the file:
Each value can be represented by one field.
You always need to map the email value. Kentico uses emails to identify unique contacts.
Contact mapping details
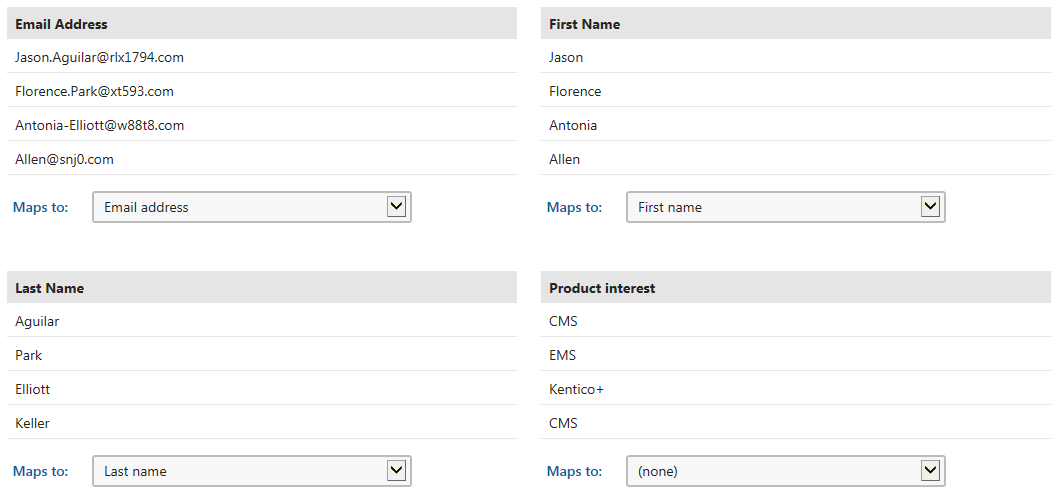
Labels in gray show names of the columns from the input CSV files (Email Address, First Name, Last Name, and Product interest). Values underneath column names show sample values in each column. The drop-down list under each column allows you to specify which of the contact’s fields will be filled with values from this column.
Click on Import contacts. The import process starts. Please don’t leave the page until the Import finished status is shown.
- Once the process is finished, you can see a confirmation screen showing the result of the import.
See how you can now work with the contacts you just imported further.
After the import, the system automatically:
- Recalculates all the affected Personas, Contact groups, and Scores to keep them up to date.
- Triggers Marketing automation processes that use the ‘Contact created’ and ‘Contact changed’ triggers for newly created and updated contacts.
Import finished screen description
Once the import finishes, a summary screen is displayed showing import results.

Each contact from the input file can end up in one of the following categories:
- Imported - the number of contacts successfully created in the system.
- Duplicates found and successfully updated - the number of contacts from the input file that already existed in the Kentico database and were successfully updated. Also contains entries that were in the CSV file more than once.
- Not imported contacts - the number of contacts that weren’t created or updated due to an error. You can download a .CSV file containing the contacts that haven’t been imported. The file contains an explanation of how you can remedy the situation next to each entry. Afterwards, you can import the file with the remaining contacts.