
Writing static campaign emails
After you create a static email campaign and acquire subscribers, you can send out individual emails. The following steps demonstrate how to create a sample email:
Open the Email marketing application.
Edit () an email campaign.
Click Create new email.
Fill in a Subject.
(Optional) Specify UTM parameters used in the campaign links.
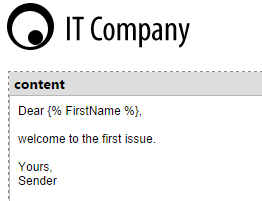
Fill in the email into content.
(Optional) Add a condition, such as the reader’s first name, using the Insert macro button in the editor toolbar.
An Insert Macro dialog opens.
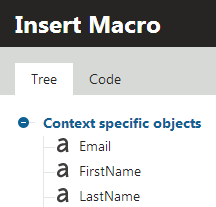
The system automatically replaces the {% FirstName %} macro expression with the email recipient’s first name.
Email templates
The overall structure of this email is defined by the default Email template, which you can find in the Template management tab of the Email marketing application. See Preparing email campaign templates for more information.
Email campaigns can have multiple templates assigned. In this case, expand Show advanced options next to the ****Subject** field, where you can choose a template for the new email. You can also change the template by clicking Show advanced properties** next to the Subject field and selecting a different option through the Template selector.
(Optional) Add attachments to the email. We recommend attaching any assets, such as images or PDF files via Media libraries:
- Add the files that you want to add to a media library.
- In the email, click on where you want to link the attachment.
- In the text editor, click Insert/Edit link (for adding links) OR Insert/Edit image or media (for displaying assets directly in the email).
- On the Media library tab, select the file that you want to link.
- Adjust the properties, such as Link text if you’re adding text.
- Save & Close.
The advantage of this approach is that the file in the email will always point to the most up to date file stored in the media library. Also, this approach is better performance-wise as it doesn’t affect performance when sending the email the way attaching a file using the Attachment button does.
Click Save.
Once you save the email, you can manage it using the following actions:
- Send draft - allows you to send a test draft of the email to any email address. Draft emails do not correctly resolve email macros (such as unsubscription links), since the recipients are not linked to subscribers in the system.
- Preview - opens a dialog window where you can view how the email will appear to specific subscribers.
- Attachments - allows you to attach files to the email, such as images, an event agenda, white papers, etc. However, we recommend using the approach described in the above scenario to attach files to campaign emails.
- Create A/B test - may be used to prepare an A/B test for the email. This allows you to create several different versions of the email, evaluate them on a test group of subscribers and then send out the most successful one. Clicking this button adds the first testing variant of the email. See A/B testing email campaigns.
Previewing and sending campaign emails
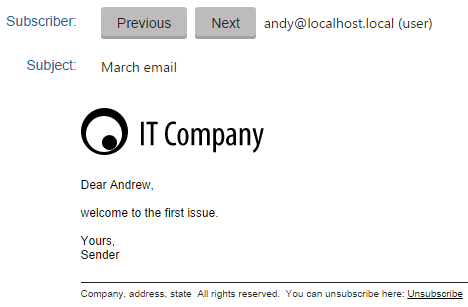
Click Preview.
- This opens a dialog where you can see how the content of the email will appear for each subscriber.
- This opens a dialog where you can see how the content of the email will appear for each subscriber.
Close the preview dialog.
Switch to the Send tab.
Choose when the system sends out the email:
- Send now to all subscribers - the email is sent out immediately to all subscribers.
- Schedule email campaign mail-out to all subscribers - the mail will be sent out on the specified date and time.
- Send draft email to specified email addresses - the email will not be sent for now and you can decide on the mail-out time later.
Click Finish.
On the Emails tab, you can review the statistics and details of the emails. You can modify emails that are scheduled to be sent out in the future by clicking Edit ().
If you experience problems with receiving emails, try following the instructions on the Troubleshooting email campaigns page.
Tagging email links with UTM parameters
To be able to better analyze your marketing campaigns, you can specify UTM parameters in campaign emails. The parameters are then added to all the links leading from the email to your site. This allows you to better track your marketing campaigns.
You can add the following parameters:
- UTM source (Campaign source) - identifies the source of the traffic. For example, a search engine, email campaign, referral site or other sources.
- Set to Email-campaign-name_campaign-email by default.
- UTM medium (Campaign medium) - identifies the medium the link was used in.
- Always set to ‘email’ in Kentico campaign emails.
- UTM campaign (Campaign name) - identifies a specific campaign or a promotion.
- You can select an existing Kentico campaign or use a custom campaign name, for example for campaigns specified outside of Kentico.
Adding UTM parameters to email links
- Open the Email marketing application.
- Edit the email campaign where you want to use UTM parameters.
- Next to Subject, click Show advanced options and UTM tracking settings.
- Enable Tag email links with UTM parameters.
- Specify the UTM parameters.
- Save.
All the email links leading back to your site will now be tagged by the specified UTM parameters.
Note: UTM parameters are shared across email campaign A/B test variants.