Creating dynamic newsletters
Dynamic newsletters allow you to send out any page from your website in the form of emails. You can create a new page specifically for the purposes of a dynamic newsletter. For example, to display new articles added to your website during the last month. Please note that some email clients may not be able to process and display pages exactly like a standard browser. Your developers may need to simplify the source page’s content or adjust its CSS stylesheet.
Dynamic newsletters are sent out automatically using the built-in scheduling system. When you schedule the mail-out of a dynamic newsletter, the system creates a new scheduled task named Send dynamic newsletter: <newsletter name> for the current site. The task reads the content of the newsletter’s source page and sends out the newsletters to the subscribers according to the set time interval.
To create a dynamic newsletter:
Open the Email marketing application and click New email campaign.
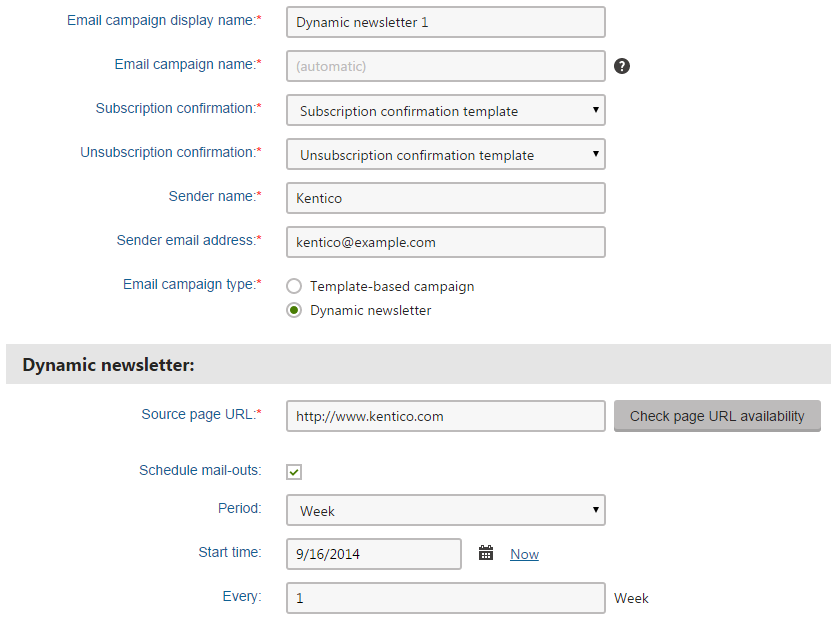
Fill in the basic properties of the campaign:
Campaign properties
Property
Description
Email campaign display name
Name of the campaign that is displayed in the administration interface.
Email campaign code name
Name of the campaign that is used as an identifier in web part properties, URLs and the API. You can leave the (automatic) option to have the system generate an appropriate code name from the display name.
Subscription confirmation
Select the template that the campaign uses for subscription confirmation emails.
Unsubscription confirmation
Select the template that the campaign uses for unsubscription confirmation emails.
Sender name
Name of the sender used in the campaign newsletters. Authors of individual newsletters can override the value and set a different sender name.
Sender email
The email address that the campaign uses as the sender in newsletters. Authors of individual emails can override the sender address.
Choose Dynamic newsletter and enter the following details:
Dynamic newsletter properties
Property
Description
Source page URL
The URL of the page from which the newsletter loads its content.
Clicking Check Page URL availability checks if the specified page is currently accessible.
For the purposes of this example, you can use: http://www.kentico.com
Schedule mail-outs
If enabled, the system automatically sends the newsletter according to the time interval settings below.
For testing purposes, use a short interval such as:
- **Period**: Minute- **Start time**: Click <i class="kx13-calendar" style="color: #000000"></i> and select the current date and time (click **Now**)- **Every**: 1 minute- **Between**: 00:00 and 23:59- **Days**: Check all days
Click Save. The system creates the campaign and opens its Configuration tab.
Configure the advanced settings of the campaign:
Advanced properties
Property / Section
Description
Base URL
Enter the base URL of your website (including the protocol, domain name and virtual directory). The campaign uses the base URL to convert relative links to absolute URLs inside emails (for unsubscription links, image paths, etc.).
Example: https://www.example.com
Unsubscription page URL
The URL of the page where users can unsubscribe from the email campaign. The page must contain the Unsubscription web part, which ensures the required functionality.
If you leave the property empty, the campaign uses the value of the Settings -> On-line marketing -> Email marketing-> Email campaign unsubscription page URL setting.
When testing on the sample Corporate site, you can enter ~/SpecialPages/Unsubscribe/Newsletter.aspx. This default page ensures the required functionality.
Send draft emails to
The addresses specified here are pre‑entered by default when sending draft emails for testing purposes. You can enter multiple addresses separated by semicolons.
Draft emails are not included in tracking statistics (email opening and link clicking).
Enable resending
If enabled, emails can be edited and manually sent again even after they have been mailed out to subscribers. Disable this property to ensure that subscribers do not accidentally receive the same content multiple times.
Subject
Sets the subject of the dynamic newsletter emails. You can either use the page title of the source page or enter a title manually by selecting Use the following subject.
On-line marketing
The properties in this section are related to tracking of the campaign’s emails and keeping marketing statistics.
Double opt-in
You can use the properties in this section to set up double opt-in subscription for the email campaign.
Click Save.
To see the functionality of the dynamic newsletter, you need to have at least one subscriber in the system.
(Optional) Creating newsletter subscribers
Back in the Email marketing application, click on Subscribers -> All subscribers in the left menu.
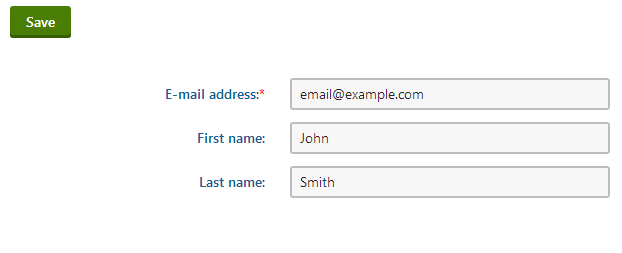
Click New subscriber and fill in information about the subscriber.

Click Save.
Adding subscribers to a dynamic newsletter
On the Email campaigns tab, edit () the campaign that you created previously.
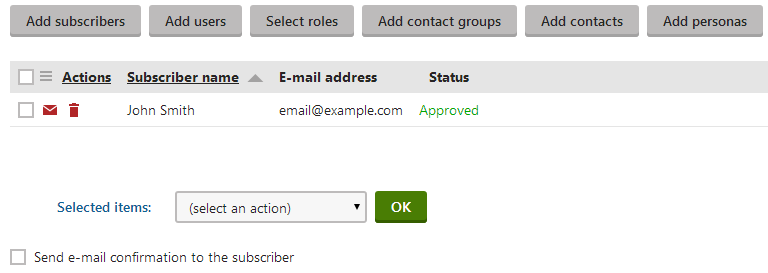
Switch to the Subscribers tab.
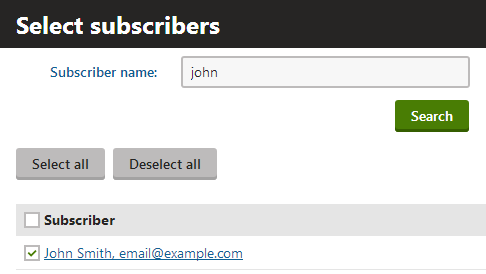
Click Add subscribers. A dialog appears. Select a subscriber

Choose a subscriber and click Select.
You can also use the Add users, Add roles, Add contact group, orAdd personas buttons to select from the users, roles, on‑line marketing contact groups, or personas defined for the current website.

Dynamic newsletter unsubscription
The content of a dynamic newsletter is loaded from a web page, and there are two ways to allow users to cancel their subscription:
You can add the Unsubscription request web part onto the source page. Subscribers will then be able to enter their address and receive a special email with an appropriate unsubscription link.
Another option is to place the UnsubscribeLink macro {%UnsubscribeLink|(resolver)subscriber%} on the source page, which creates a link that unsubscribes subscribers directly.
If you want to allow users to unsubscribe from all email campaigns at once, you will need to place the UnsubscribeFromAllCampaigns macro on the source page:
{%UnsubscribeFromAllCampaigns|(resolver)subscriber%}
Sending dynamic newsletters
The dynamic newsletter sends out emails automatically based on the configured mail-out interval. You can view a list of sent emails on the campaign’s Emails tab.
Sending dynamic newsletters manually
You can send out a dynamic newsletter at any time on the Send tab. The tab supports both regular newsletters for all subscribers and testing drafts sent to specific addresses.
Using the external scheduling service
To ensure reliable sending of dynamic newsletters even when your web application is inactive, you can use the external Windows scheduling service.
- Go to Settings > On-line marketing -> Email marketing.
- Enable the Use external service for dynamic newsletters setting for your website.
This does not change the settings of existing dynamic newsletter tasks. To configure existing dynamic newsletters to use the external scheduler:
- Open the Scheduled tasks application.
- Edit the corresponding Send dynamic newsletter tasks.
- Enable the Use external service property.
Blocking dynamic newsletter mail-out
If you want to block the mail-out of the dynamic newsletter page (for example if there is no new content on the source page), you can:
- Disable the Schedule mail-outs property of the dynamic newsletter on its Configuration tab.
- Set the title of the source page to ##DONOTSEND## (if the source page is managed in Kentico). You can change the page title by selecting the corresponding page from the content tree in the Pages application and editing the Page title field on the Properties -> Metadata tab.