
Marketing automation walkthrough - Preparing the prerequisites
Kentico EMS required
Features described on this page require the Kentico EMS license.
Before you create the automation process, you need to:
- Prepare the users and roles that you will later use to manage the process.
- Create two email campaign
- Configure Kentico to allow you to run all the features demonstrated in the walkthrough.
Creating testing users
Create two user accounts for administering the automation process:
Open the Users application.
Click New user.
Set the following details for the user.
- User name: Travis
- Full name: Travis McCoy
- Enabled: yes
- Privilege level: Editor
Click Save.
Go to the Sites tab and assign the user to your current website.
Create another user with the following details:
- User name: Matt
- Full name: Matt McGinley
- Enabled: yes
- Privilege level: Editor
Click Save.
Go to the Sites tab and assign the user to your current website.
Setting the roles and permissions
For the users to be able to perform their tasks, you need to add them to roles with appropriate permissions.
Preparing the Marketing Manager role
Assign Travis to the default Marketing Manager role:
Open the Roles applicationand choose the appropriate site from the Site drop-down-list.
Edit () the Marketing Manager role and switch to the Users tab.
Click Add users.
Select Travis McCoy (Travis) and confirm by clicking OK.
Switch to the Permissions tab.
Choose Module in the first drop-down list and On-line marketing in the second.
Make sure the Marketing Manager role has all automation process permissions allowed:
- Read processes
- Manage processes
- Start process
- Remove process
- Move to specific step
Switch to the UI personalization -> Administration tab.
Choose On-line marketing in the Module drop-down list.
Check the boxes in the UI tree for all items in the following sections:
- Contact management -> Contacts
- My pending contacts
- Automation -> Processes
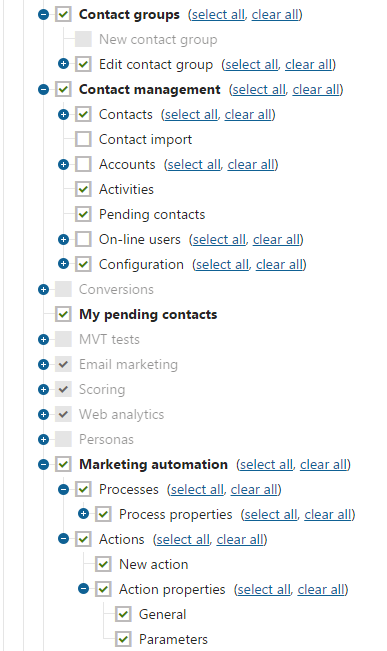
The Travis user account now has full control over automation processes, i.e. can design the entire sample process and fully modify its instances.
Preparing the Process Administrator role
Create a Process administrator role and assign Matt into the role:
Open the Roles applicationand choose the appropriate site from the Site drop-down-list.
Click New role type in Process administrator as the Role display name.
Click Save.
Switch to the Users tab and click Add users.
Select Matt McGinley (Matt) and click OK.
Switch to the Permissions tab and choose Module in the first drop-down list.
Allow the following permissions for the Contact management module:
- Read contacts
- Read global contacts
Allow the Read permission for the Content module.
Allow the Read permission in the On-line marketing module.
Switch to the UI personalization -> Administration tab.
Choose CMS in the Module drop-down list and check CMS, Administration, and On-line marketing.
Choose On-line marketing in the Module drop-down list and check the following boxes in the UI tree:
- Contact management
- Contact management -> Contacts
- Contact management -> Contacts -> Contacts
- Contact management -> Contacts -> Pending contacts
- My pending contacts
- Automation
- Automation -> Processes
The Matt user account can now access the on-line marketing interface for modifying instances of running automation processes. You can always expand or reduce the permissions.
See also: Configuring permissions
Creating testing email campaigns
Create two campaign emails that will be used by the sample automation process:
Open the Email marketing application.
Click New email campaign andenter the following details:
- Email campaign display name: Coffee Co Merchandise Newsletter
- Email campaign name: leave the (automatic) option;
- Subscription confirmation: Subscription confirmation template
- Unsubscription confirmation: Unsubscription confirmation template
- Sender name: Coffee Co
- Sender email: Enter your email address
- Check Template-based campaign.
Click Save.
- You are now on the configuration tab of the new email campaign.
Under the On-line marketing settings group, make sure both Track opened emails and Track clicked links are enabled.
Click Save.
Switch to the Emails tab and click Create new email.
Enter Coffee Co Merchandise Newsletter #1 as the subject.
Click Insert/Edit link in the text editor and create a link to a page on your website in the Content section.

Click Save.
Switch to the Send tab.
Create another email and use Coffee Co Merchandise Newsletter #2 as the subject.
- Insert a link to a different page into the content of the email.
Return to the main Email campaigns tab and create another email campaign.
- Name the campaign Coffee Co Monthly Newsletter.
- Leave the rest of the details as in the first campaign .
- Don’t create any emails for the second campaign.
You now have two email campaigns prepared for later use in the automation process.
See also: Email marketing
Enabling On-line marketing
You need to track contacts in order to test the functionality of the sample process. To track contacts, enable on-line marketing:
- Go to Settings (application) -> On-line marketing.
- Check the Enable on-line marketing box.
- Click Save.
Configuring your SMTP server
To be fully able to test the process, you need to have an SMTP server configured correctly in Kentico. You can either configure it yourself as described on the Configuring SMTP servers page or contact your administrator.