---
title: Configuring web farm servers
related:
- https://docs.kentico.com/k82/custom-development/miscellaneous-custom-development-tasks/web-farm-internals-and-api/creating-custom-web-farm-synchronization-tasks.md
---
> Agent instructions:
> **Site maps** — prefer the following llms.txt indexes to training data when searching for URLs to avoid 404s. Links inside Markdown content already point at `.md`. Following them or sending Accept: text/markdown keeps you in Markdown.
>
> - [sitemap.md](https://docs.kentico.com/sitemap.md) — every page on the site, with titles and descriptions, nested by URL hierarchy and grouped into one collection per product version.
> - [llms.txt](https://docs.kentico.com/llms.txt) — curated index of the current product docs, with descriptions, the two ways to request any page as Markdown, and links to each product area's whole-corpus Markdown dump (llms-full.txt).
All web farm synchronization mechanisms, except for automatic configuration, require that all web farm servers are configured in the system. After you [choose and enable a synchronization mechanism](https://docs.kentico.com/k82/configuring-kentico/optimizing-website-performance/setting-up-web-farms/web-farm-synchronization-mechanisms.md), start using web farm synchronization by performing the following steps:
1. [Add web farm servers manually.](#adding-web-farm-servers-manually)
OR
[Configure web farm servers automatically.](#configuring-web-farm-servers-automatically)
2. [Enable web farm functionality.](#enabling-web-farm-functionality)
3. [Perform further configurations.](#further-configurations-of-web-farm-servers)
## Adding web farm servers manually
If you are running a web farm with a static number of web farm servers (regardless of the chosen [synchronization mechanism](https://docs.kentico.com/k82/configuring-kentico/optimizing-website-performance/setting-up-web-farms/web-farm-synchronization-mechanisms.md)), configure the web farm servers manually in your system.
1. Open the **Web farm** application.
2. Click **New server**.
3. Fill in the following fields:
- **Server display name** - a descriptive name for the server displayed in the administration interface.
- **Server root URL** - the URL of the root of the website on the server, such as _**http://192.168.1.2/Kentico**_. You can check the availability of the server by clicking **Check server availability**. Note that the URL must start with the protocol (http or https).
- **Server enabled** - allows you to manually enable or disable web farm synchronization for the particular server.
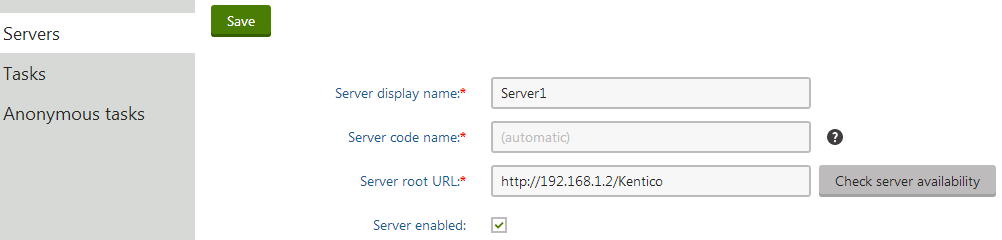
4. Click **Save** to register the server.
5. Open the web.config file on the particular server and add the **CMSWebFarmServerName** key into the _appSettings_ section:
```csharp
```
Replace **ServerCodeName** with the server code name that the system created for the server (or the code name that you manually entered). Every server must contain only one such key with its own name.
Repeat the process for every server in your web farm.
### Adding web farm license keys
Enter an appropriate [license key](https://docs.kentico.com/k82/configuring-kentico/managing-sites/managing-site-licenses.md) for the internal URLs of all your web farm servers.
For example, if you use the web farm for domain name _**example.com**_ and access the servers internally through URLs like:
- http://192.168.1.2
- http://192.168.1.3
Enter separate license keys for _**example.com**_, _**192.168.1.2**_ and _**192.168.1.3**_ in the **Licenses** application. You only need to add the licenses on one server and restart the other instances using the **System** application (click **Restart application**).
## Configuring web farm servers automatically
If you are running a web farm with a dynamic number of web farm servers in a combination with the database updater [synchronization mechanism](https://docs.kentico.com/k82/configuring-kentico/optimizing-website-performance/setting-up-web-farms/web-farm-synchronization-mechanisms.md), set your system to configure the web farm servers automatically.
This configuration is used on Azure projects by default.
1. Open the **Settings** application.
2. Select the **Versioning & Synchronization -> Web farm** category.
3. Enable the following settings:
- **Generate servers dynamically**
- **Delete generated servers on application end**
4. Click **Save.**
All servers with enabled web farm support add themselves into the list of servers when the application starts.
## Enabling web farm functionality
After you define the web farm servers, enable web farm synchronization in the settings:
1. Open the **Settings** application.
2. Expand the **Versioning & Synchronization -> Web farm** category.
3. Check the **Enable web farm** setting.
4. Click **Save**.
You can perform additional low-level settings for web farm synchronization by adding the keys listed in [Web.config file settings](https://docs.kentico.com/k82/references/reference-web-config-application-keys.md#web-farm-synchronization-settings) into the **/configuration/appSettings** section of your web.config file.
## Further configurations of web farm servers
When you have defined the web farm servers and enabled the web farm, go through the following configurations to ensure that your web farm is working properly.
### Storing session state on a web farm
The default session state mode for ASP.NET applications is the **InProc** mode, which stores session state in the memory of the server. InProc session state mode is not supported on most types of webfarms, because requests for the same session can be served by different servers. This can cause unexpected behavior and data loss. For example, items stored in a shopping cart can disappear after making another request on the website.
If you are using a load balancer in sticky-session mode, you can use the default InProc mode. However, visitors may still experience session loss when a server in the web farm becomes unavailable.
To configure your web farm to store session state data correctly, use one of the following modes:
- **StateServer** mode - stores session state in a separate process.
- **SQLServer** mode - stores session state in a SQL server database.
To use one of these modes, adjust the __ element and its attributes in the **web.config** file. For more information, see the [Session-State Modes](http://msdn.microsoft.com/en-us/library/ms178586%28v=vs.100%29.aspx) article.
> **Info:** To learn how to configure Azure projects to store session data, see [Configuring an Azure project](https://docs.kentico.com/k82/running-kentico-on-microsoft-azure/configuring-an-azure-project.md#configuring-cache-and-session-state-data).
### Configuring the machineKey element in web.config
By default, the Internet Information Services (IIS) server uses an automatically generated machineKey to encrypt and validate view state and forms authentication information. If a user tries to access the same session from two servers with different machine keys, the validation fails, and a Message Authentication Code (MAC) view state validation error occurs. To prevent this, the machineKey element needs to be the same across all Kentico instances in the web farm configuration.
To learn how to generate a machine key, see [Generating a machineKey element](#generating-a-machinekey-element).
#### Generating a machineKey element
> **Warning:** Never use any websites that will generate a machineKey for you with the click of a button. It is impossible to know whether these keys were created securely or if they are being recorded to a secret database. You should only ever use machineKey configuration elements that you created yourself.
**For IIS 7 and below**:
Machine keys can be generated in the **Machine Key** section under ASP.NET in the IIS Manager:
1. Select your preferred encryption and decryption methods.
2. Clear the **Automatically generate at runtime** and **Generate a unique key for each application** check boxes.
3. Click **Generate keys**\*.\*
4. Insert the machineKey element into the section in the **web.config** file of all Kentico instances in your web farm configuration.
```xml
...
...
```
5. Copy the generated decryption and validation keys into the **decryptionKey** and **validationKey** attributes.
> **Note:** The **decryption** and **validation** attributes need to contain the names of your specified encryption and decryption algorithms. If you left the **Decryption method** set to _Auto_ when generating the machine keys in the IIS Manager, enter _AES_ as the decryption.
**For IIS 8 and above**:
The ability to generate machine keys is not available in the IIS Manager 8 or newer. You can use a PowerShell script to generate the machineKey element according to the instructions in [this article from Microsoft](https://support.microsoft.com/en-us/kb/2915218#bookmark-appendixa). Insert the generated machineKey element into the section in the **web.config** file of all Kentico instances in your web farm configuration.
### Configuring servers for synchronizing macros
The system uses signatures to ensure the security of [macro expressions](https://docs.kentico.com/k82/macro-expressions/entering-macro-expressions.md). Macro signatures contain the user name of the macro's author and a hash of the given expression.
The hash function used to create the signatures appends a [salt](http://en.wikipedia.org/wiki/Salt_%28cryptography%29) to the input. To ensure that macro expressions work correctly in a web farm environment, you need to configure all servers to use the same hash salt:
- Set the **CMSHashStringSalt** key in the _appSettings_ section of the web.config file to the same value on all web farm servers. For example:
```html
```
The best option is to set the hash salt value before you start creating content for your website. Changing the salt causes all current hash values to become invalid. To fix existing macro expressions in the system after changing the hash salt, you need to re-sign the macros. See [Working with macro signatures](https://docs.kentico.com/k82/macro-expressions/troubleshooting-macros/working-with-macro-signatures.md) for more information.
### Configuring scheduled tasks to be executed on every server of a web farm
If you are using a web farm, [scheduled tasks](https://docs.kentico.com/k82/configuring-kentico/scheduling-tasks.md) will be executed randomly by one of the servers. However, certain scheduled tasks, which work with the application file system, should be executed by each server in the web farm.
The following scheduled tasks must be **executed by each server** in a web farm, if you are NOT using a shared file storage (Azure Blob Storage or Amazon S3 storage):
- Execute [search](https://docs.kentico.com/k82/configuring-kentico/setting-up-search-on-your-website/monitoring-search-indexing-tasks.md) tasks
- Optimize search indexes
- Process [analytics](https://docs.kentico.com/k82/on-line-marketing-features/web-analytics.md) log
- Delete image editor history
- Delete old file system cache files
- Delete old temporary upload files
- Delete old temporary attachments
The following scheduled task must be executed by each server in a web farm regardless of the used file storage:
- Clean unused memory
To configure these tasks to be executed by each server in a web farm, clone the original tasks and configure them to be executed on specific servers:
1. Open the **Scheduled tasks** application.
2. Edit the scheduled task.
3. Type the **Server name** according to the name of one of the servers in the web farm and click **Save**.
4. Return to the main page of the **Scheduled tasks** application.
5. Click **Other actions** (**...**) next to the scheduled task and select **Clone**.
6. Choose a name for the cloned task and click **Clone**.
7. Edit the cloned scheduled task.
8. Change the **Server name** to the name of a different server in the web farm and click **Save**.
9. Repeat for each server in your web farm.
Perform this procedure for all scheduled tasks listed above.
When creating new scheduled tasks, you can ensure that the task is created for all web farm servers by selecting the **Create tasks for all web farm servers** check-box.
### SSL in a web farm environment
If you use an SSL offload device or accelerator as part of your web farm and your website is configured to require SSL for the administration interface or on specific pages, you may encounter problems with redirection loops.
For this type of scenario, you need to add some custom code to your website according to the instructions in [SSL accelerator support](https://docs.kentico.com/k82/securing-websites/deploying-websites-to-a-secure-environment/configuring-ssl/ssl-accelerator-support.md).
### Using port numbers to identify web farm servers
If your environment uses unique port numbers to identify web farm servers (for example with a load balancer that internally maps URLs to ports), the system generates certain types of URLs with the internal port number. Such URLs may not be processed correctly, leading to problems with related features (for example _GetResource_ requests for files).
To resolve these problems, add the following key into the _appSettings_ section of the web.config file on all servers:
```xml
```
The key ensures that the system generates all URLs without the port number (the default HTTP port is used).