
Checkout process
Checkout process in the Kentico E-commerce Solution represents a fully customizable mechanism that the customers have to go through to purchase products offered in your on-line store. Although the checkout process is automatic and no direct involvement by your staff is needed, you have full control over the process.
By default, the checkout process includes a number of steps. The checkout process steps are implemented as a sequence of pages that the customers step through. The content of the step pages is facilitated by a set of dedicated web parts, and includes:
- inserting product items to the shopping cart,
- entering the billing address,
- entering the shipping address,
- specifying the shipping option,
- selecting the payment method,
- reviewing the order, etc.
If the multiple-step checkout process does not correspond to your business objectives, the system allows you to configure a one-step checkout process. This approach allows you to provide your customers with the checkout functionality on a single page.
You can also build a checkout process for mobile devices.
Among other features, the Kentico E-commerce Solution offers:
- a sample multiple-step checkout process,
- a sample one-step checkout process,
- a sample checkout process for mobile devices,
- the option to checkout as an anonymous customer, and as a registered customer,
- a clear indication of the steps/progress throughout the entire checkout process,
- retention of information that the customer entered in the previous steps.
You cannot use ASPX templates for the checkout process (or when creating any other wizard) or Portal engine sections of ASPX templates, use only the Portal engine.
Configuring a multiple-step checkout process
You can configure a multiple-step checkout process from scratch by:
- Designing (manually) the content of all checkout process pages.
- Using a set of preconfigured features.
Both approaches allow you to achieve the same results, and offer your customers a fully customized checkout process.
To configure your custom checkout process with least effort, we recommend that you use the Checkout wizard and Checkout step page types.
These page types are available on the sample E-commerce Site only. If you want to use them on other websites:
- Import the sample E-commerce Site.
- Edit the page types in the Page types application on the Sites tab.
- Add selected websites.
Configuring a multiple-step checkout process includes the following stages:
- Setting up the checkout wizard
- Adding checkout steps
- Changing the order of wizard steps
- Removing wizard steps
Setting up the checkout wizard
To set up a checkout process wizard on your website:
Open the Pages application.
Select in the content tree a node under which you want to place the wizard page.
Add a new page based on the Checkout wizard page type.
- If you don’t want to add the Checkout wizard page to the root of the website, make sure None is selected in Template -> Page nesting for the wizard page.
- If the Checkout wizard page type is not available, see Creating wizards on websites.
Enter the wizard name.
Click Save.
The system adds the checkout wizard page containing a basic set of the required functional components; for example the Page wizard manager web part, the Page place holder web part, and the Page wizard navigation web part. The wizard page serves as the “parent” of the checkout wizard and provides a master page for the content of the checkout process steps.
Notes
If the wizard page inherits its settings from the master page (default configuration) or from some other ancestor page that doesn’t contain the Page placeholder web part (default configuration), the system displays empty checkout step pages under the wizard page.
Page wizard manager web part
Make sure the Restrict step order property of the Page wizard manager web part is enabled, forcing the customers to progress through the checkout steps in the defined order. For example, you want to prevent the customers from visiting the Shipping page prior to specifying the shipping address.
You can specify the Final step URL property of the Page wizard manager web part to redirect the customers to a selected URL, for example to the payment gateway page. The system redirects the customers if they click the final next button, labelled e.g. Place order.
If you want to set up your checkout wizard manually, see Defining page wizards.
Adding checkout steps
To add the checkout wizard steps, add child pages under the checkout wizard page. Build the content of the steps just like any other portal engine pages.
If you set up your checkout wizard manually, see Adding steps.
Select the checkout wizard page in the content tree.
Click New ().
- You have used the Checkout wizard page type to create the checkout wizard page. That’s why the system now offers for the checkout steps the dedicated Checkout step page type.
Select the Checkout step page type.
Enter the name of the checkout step.
Click Save or click Save and create another to add more checkout steps.
- To prevent from interfering with the display and behavior of the current page, enable the AJAX -> Use update panel property for selected web parts.
For example, the Shopping Cart Content web part in the Shopping cart step of the sample multiple-step checkout process has this property enabled. - To prevent the customers from updating previously entered data, enable the Read only mode property for selected web parts (if available).
For example, the Shopping Cart Content Summary web part in the Order summary step of the sample multiple-step checkout process has this property enabled.
- To prevent from interfering with the display and behavior of the current page, enable the AJAX -> Use update panel property for selected web parts.
(Optional) Style the step(s) and build further step content just like for any other portal engine pages.
The system adds the checkout step(s) in basic configuration.
If you styled the step(s) and built further step content (Step 6.), the steps contain also their functional components.
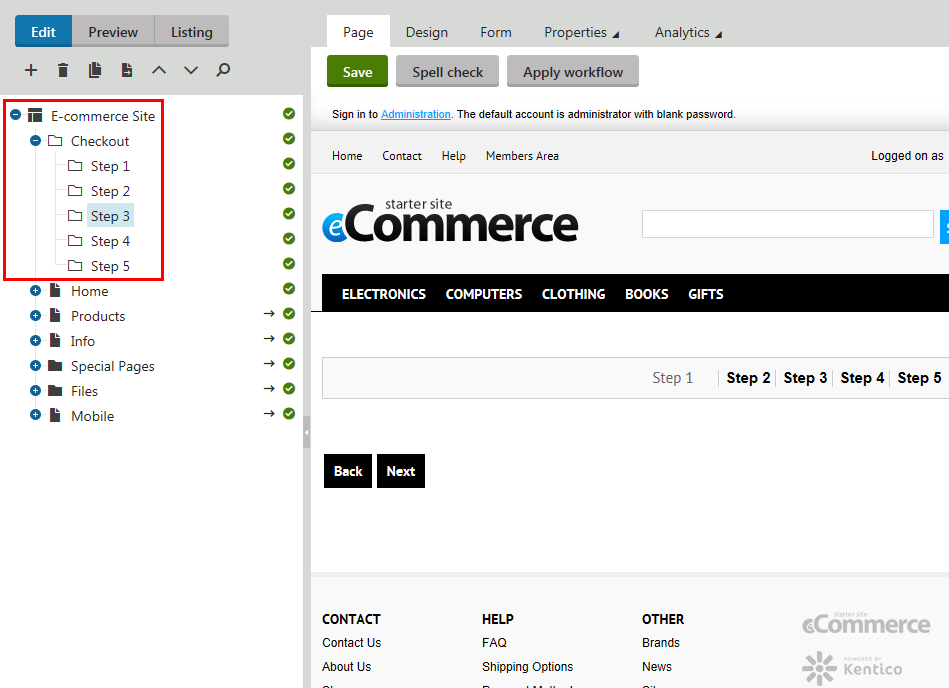
See the sample multiple-step checkout process available at E-commerce Site content tree -> Special Pages -> Checkout for reference and inspiration.
Changing the order of wizard steps
By default, the step order matches the order of the step pages in the content tree. You can use the OrderBy property of the Page wizard manager web part (available in the checkout wizard page) to load the steps in a different order determined by an SQL clause.
To change the order of checkout steps in the content tree:
Select the checkout step in the content tree.
Use the Move up () / Move down () actions to change the position of the step.
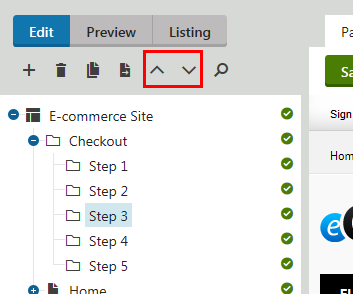
(Optional) Use the Drag and drop functionality to change the position of the step.
Removing wizard steps
To remove a step from the checkout process:
- Select the checkout step in the content tree.
- Click Delete ().
- The system opens the delete page dialog.
- Specify the deletion options.
- See Deleting pages for more details.
- Confirm the deletion of the step by clicking Yes.
The system removes the step from the checkout process. If you specified that you don’t want the system to destroy page and its history, you can restore the step at any time.
Configuring a one-step checkout process
To configure a one-step checkout process, you need to go through the same steps as when configuring a multiple-step checkout process.
Notes
- Because the customers enter checkout data on a single page, it is essential for the system to process the data immediately after its input. You can ensure this behavior by enabling the Propagate changes on postback property for selected web parts (if available).
For example, the Customer Detail web part in the Order Summary step of the sample one-step checkout process has this property enabled. - Enable the AJAX -> Use update panel property for the web part zone wrapping up the content of the one-step checkout page. Make sure this property is disabled for all contained web parts, same as for all nested web part zones. Failing that, you may experience interference with the display and behavior of the page.
For example, the Content Zone web part zone in the Order Summary step of the sample one-step checkout process has this property enabled.
- Set up the checkout wizard.
- Add the checkout step(s).
- (Optional) Style the step(s) and build further step content just like for any other portal engine pages.
See the sample one-step checkout process available at E-commerce Site content tree -> Special Pages -> 1-Step Checkout for reference and inspiration.
Configuring a checkout process for mobile devices
To configure a checkout process for mobile devices, you need to go through the same steps as when configuring a multiple-step checkout process.
- Set up the checkout wizard.
- Add the checkout step(s).
- Style the step(s) as required.
- (Optional) Build further step content just like for any other portal engine pages.
See the sample checkout process for mobile devices available at E-commerce Site content tree -> Mobile -> Special Pages -> Checkout for reference and inspiration.
Configuring a checkout process for anonymous customers
All your customers, both anonymous and registered, can checkout by default.
However, you can configure the system to allow checkout only for registered customers.
To configure a checkout process available to anonymous customers, you need to configure a checkout process allowing the customers to finish the process without authentication into the system.
Set up the checkout wizard.
Add the checkout step(s).
- You can add the Register after checkout web part to an appropriate step (usually the final step). This gives your anonymous customers the option to register themselves after their first checkout.
(Optional) Style the step(s) and build further step content just like for any other portal engine pages.
See the Login step in the sample multiple-step checkout process in E-commerce Site content tree -> Special Pages -> Checkout for reference and inspiration.
Configuring a checkout process for registered customers
By default, all your customers, both anonymous and registered, can checkout in your on-line store.
To configure a checkout process available only to registered customers, you need to configure a checkout process allowing the customers to place orders only if authenticated in the system.
Set up the checkout wizard.
Add the checkout step(s).
Configuring the Login step
Add the Logon form web part to the step.
- Allows registered customers to sign into the system.
- You can configure the web part to automatically redirect the customers to the next step after a successful authentication.
- Default target URL: {% CurrentDocument.RelativeURL #%}
Add the Custom registration form web part to the step.
- Allows customers visiting your on-line store for the first time to register.
- You can configure the web part to automatically redirect the customers to the next step after a successful registration.
- Redirect to URL: {% CurrentDocument.RelativeURL #%}
(Optional) Add the Page wizard step action web part to the step.
- The system skips the step if the customer is already signed in (authenticated) while going through the checkout process.
- Action type: Skip
- Action condition: MembershipContext.AuthenticatedUser.IsAuthenticated#
(Optional) Style the step(s) and build further step content just like for any other portal engine pages.
See the Login step in the sample multiple-step checkout process in E-commerce Site content tree -> Special Pages -> Checkout for reference and inspiration.
You need to remove the Continue as guest (Next Button) button from the step to allow checkout only for registered customers.
Configuring settings related to the checkout process
You can give your anonymous customers the option to register themselves after their first checkout (see Configuring a checkout process for anonymous customers). Besides, you can configure the system to register anonymous customers automatically after placing their first orders.
- Open the Settings application.
- Select the E-commerce category.
- Select the website where you want the system to automatically register anonymous customers after their first checkout.
- If you select global, you can use automatic customer registration on all your sites.
- Enable the Register customer after first checkout property.
- The system automatically registers anonymous customers after their first checkout.
- (Optional) Enable the Registration after checkout e-mail template property.
- The system uses this template to notify the customers about automatic registration after their first checkout.
- Click Save.
If an anonymous customer places their first order in your on-line store, the system registers them automatically.
Reference
Sample checkout process
A sample multiple-step checkout process is available at E-commerce Site content tree -> Special Pages -> Checkout.
The process is customizable and fully functional. This means you can modify it to best suit your needs, and use it in your everyday business. You can also use the sample checkout process only as inspiration if you prefer to build your custom checkout process.
During the sample checkout, the system displays for each step page its display name, indicating the current stage of the process.
The customer can return to an earlier stage by clicking Back, and navigate forward by clicking Next (or similar, based on the context). For example, clicking Back on the Shipping and payment page returns the customer to the previous step where they can review the specified address.
The exact set of pages the customer steps through can vary depending on context. For example, if the customer is not authenticated (signed in) when they click Checkout on the Shopping Cart page, the system displays the Login page. Here the customer has the option of signing in to an existing account, creating a new account, or checking out as a guest. The system skips the Login page for authenticated customers because the page contains the Wizard Step Action - Skip (Page wizard step action) web part.
A sample one-step checkout process is available in E-commerce Site content tree -> Special Pages -> 1-Step Checkout.
A sample checkout process for mobile devices is available in E-commerce Site content tree -> Mobile -> Special Pages -> Checkout.
Below follows a description of web parts that you can use while configuring your custom checkout process. The web parts are presented against background of the sample multiple-step checkout process.
Available web parts
You can find dedicated checkout web parts in the E-commerce -> Checkout process category (in the Select web part dialog while configuring a selected web part zone).
You may need to use also web parts from other categories to configure your custom checkout process, for example the Logon form web part, the Page wizard step action web part, etc.
Currency selection
Allows the customers to select a currency for the price of product items displayed in the shopping cart during checkout, and for the price of products displayed in the product listing pages and product details pages. You can configure the web part to display for the selected currency either its name or code.
Customer address
Displays a form allowing the customers to enter details of their billing and shipping address (if the shipping address is different from the billing address).
Customer detail
Displays a form allowing the customers to enter their personal and business details. For example, the customers enter their name and e-mail address (personal account type), and their company’s organization ID and tax registration ID (business account type).
Discount coupon
Allows the customers to enter discount coupon codes to receive discounts and free shipping.
Message panel
Allows you to inform the customers about events that occur during the checkout process. For example, you want to promptly inform the customers about additional checkout configuration, errors, etc. If the wizard page doesn’t contain the Message panel web part, the system displays standard javascript pop-up messages during the checkout process.
Order note
Allows the customers to add comments on the placed orders. For example, the customers can notify your on-line store administrators about special circumstances of order delivery.
Payment form
Displays payment information such as the order identification number, selected payment method and order total price. Allows you to specify a URL where the customers are redirected after the purchase.
Payment method selection
Allows the customers to select a payment method for the current order.
Register after checkout
Allows you to give your anonymous customers the option of getting automatically registered after checkout. If an anonymous customer turns the check box on, the system registers them after finishing the checkout process. The system creates a new account for the customer, using information that they entered during checkout; this means that no additional data input by the customer is needed. The customer receives a notification e-mail informing them about their authentication details (if a notification e-mail template is specified). Please note that you can configure the system to automatically register all anonymous customers after checkout.
Remaining amount for free shipping
Allows you to inform the customers how much the customer should spend to receive free shipping.
Shipping option selection
Allows the customers to select a shipping option for the current order.
Shopping cart content
Displays the content of the shopping cart. Allows the customers to modify the number of inserted product items, view price details of the inserted products, and remove product items from the shopping cart. Uses a transformation to display the product items in a table or div format.
Displays total values of the shopping cart content in a currency specified with the Currency selection web part (if available). For example, can display the total price of order without tax, total price of order including tax, total order tax, etc.