
Managing projects and tasks
There are several ways how projects and their tasks can be used and managed:
- Using the main project management interface
- All projects that do not belong to a community group can be managed by users with sufficient permissions in the Projects application.
- Using the Group management interface
- Group projects can be administered by users, who have permissions to manage a given group, by editing the group on its Projects tab either in the Groups application or on‑site using the Group profile web part.
- Exactly the same options are available as when using the Projects tab of the main project management interface, except that the context of the current group is used (for example for selecting users to whom a task should be assigned).
- Using the My projects application
- Users with access to Administration can use My projects interface to manage projects and tasks that they are involved in.
- The users can see a list of all tasks assigned to them on the My tasks tab, all the projects that they have permissions to access on the My projects tab and all tasks that they own on the Tasks owned by me tab.
Creating new projects with tasks
You can create new projects in the Projects application:
Click New project and fill in at least the following property:
- Display name - name of the project that is displayed on the live site and in the user interface.
Click Save.
- This will open the editing interface of the new project, where three tabs are available. The General tab allows the properties that were set when the project was created to be modified and the Security tab is where permissions for the project can be configured.
Click New task and fill in at least the following property:
- Title - name of the task that is displayed on the live site and in the user interface.
Click Save.
You have just created a new project with one task.
Configuring project and task statuses
You can define statuses and priorities for projects and tasks in Projects -> Configuration. The tab can only be accessed by users belonging to roles with the Manage configuration permission for the Project management module.
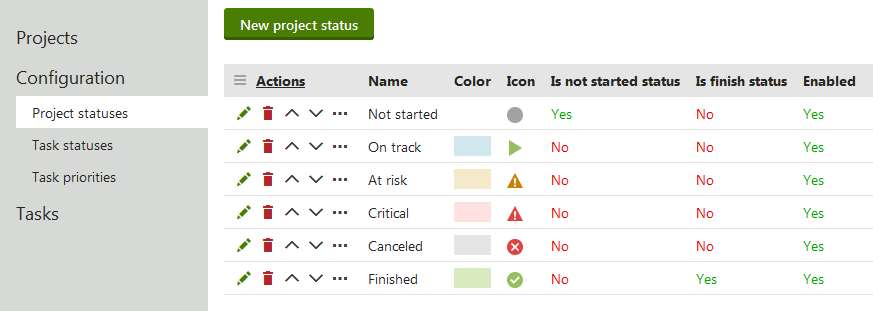
When creating or editing a status, the following properties can be set:
- Display name - name of the status that is used in the status selection list.
- Code name - code name of the status.
- Status color - determines the color of projects/tasks that have this status selected. The color selector can be used here.
- Status icon - contains the path to an image used as the icon of the status.
- Is not started status - if enabled, projects/tasks with this status are marked as not yet started.
- Is finish status - if enabled, projects/tasks with this status are marked as finished. A status cannot be both not started and finished.
- Enabled - if enabled, the status can be selected for projects.
The not started or finished flag given to a project or task by its status can have an effect on whether it is displayed by certain project management web parts or widgets, depending on their configuration.
The Task priorities tab is where you can manage priorities, which can be selected to determine how urgent a task is.
The following properties are available for task priorities:
- Display name - name of the priority that is used in the task priority selection list.
- Code name - code name of the task priority.
- Default - if enabled, the priority is selected by default when a new task is created. Only one priority can be set as default.
- Enabled - if enabled, the priority can be selected for tasks.
E‑mail notifications
There are several types of notification e‑mails that are sent to users informing them about events related to tasks that they are involved in. These e‑mails are sent from the address specified in the value of the Settings -> Intranet & Collaboration -> Projects -> Send project management e‑mails from setting.
The format of the e-mails can be customized in the E‑mail templates application. These e‑mail templates are available:
- Project Management - New task - sent when a new task is assigned to the user.
- Project Management - Changed task - sent when an assigned or owned task is in some way modified.
- Project Management - Overdue task - sent when an assigned task reaches its deadline before it is finished.
- Project Management - Task reminder - sent when the Send reminder button is used for an assigned task.
You can use the following specific context macros in project management notification templates:
- {% TaskURL %} - URL of the page where the given task can be edited.
- {% ProjectTaskDescriptionPlain %} - resolves into a plain text version of the task’s description (all HTML tags are removed or converted to text equivalents).
- {% ReminderMessage %} - text of the message entered by the user who sent the reminder.
- {% ReminderMessagePlain %} - plain text version of the reminder message.
You can also access the following related objects and their properties (e.g. {% Project.ProjectDeadline %}, {% Owner.FullName %} etc.):
- {% Project %} - ProjectInfo object of the project under which the given task belongs.
- {% ProjectTask %} - ProjectTaskInfo object representing the task to which the notification is related.
- {% ProjectTaskStatus %} - ProjectTaskStatusInfo object of the task’s current status.
- {% Owner %} - UserInfo object representing the task’s owner.
- {% Assignee %} - UserInfo object of the user to whom the task is assigned.
Besides these special ones, you can also use all other standard macro expressions in the templates. See the Macro expressions chapter for more information about macro expressions in Kentico.