
Creating static campaign emails
Before you start writing static emails, you need to create a static (template-based) campaign and assign subscribers to it.
The following steps demonstrate how to create a static email campaign:
Open the Email marketing application and click New email campaign.
Fill in the basic properties of the campaign:
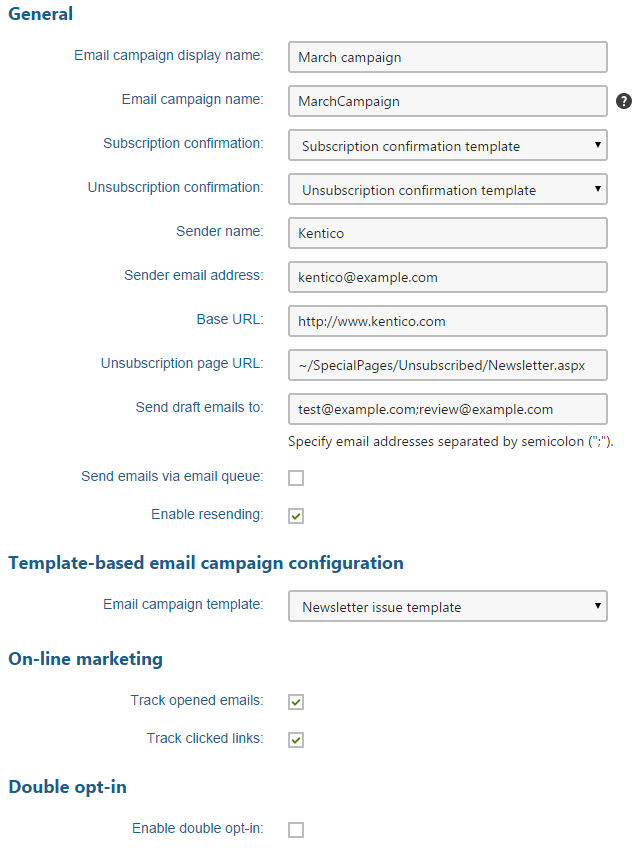
Email campaign properties
Property
Description
Email campaign display name
Name of the campaign that is displayed in the administration interface.
Email campaign code name
Name of the campaign that is used as an identifier in web part properties, URLs and the API. You can leave the (automatic) option to have the system generate an appropriate code name from the display name.
Subscription confirmation
Select the template that the campaign uses for subscription confirmation e-mails.
Unsubscription confirmation
Select the template that the campaign uses for unsubscription confirmation e-mails.
Sender name
Name of the sender used in campaign emails. Authors of individual emails can override the value and set a different sender name.
Sender email
The email address that the campaign uses as the sender in emails. Authors of individual emails can override the sender address.
Select Template-based campaign option and select the primary template for the emails.
Click Save.
- The system creates the campaign and opens its Configuration tab.
Configure the advanced properties of the campaign:
Static email campaign properties
Property / Section
Description
Base URL
Enter the base URL of your website (including the protocol, domain name and virtual directory). The campaign uses the base URL to convert relative links to absolute URLs inside emails (for unsubscription links, image paths, etc.).
Example: https://www.example.com
Unsubscription page URL
The URL of the page where users can unsubscribe from the email campaign. The page must contain the Unsubscription web part, which ensures the required functionality.
If you leave the property empty, the campaign uses the value of the Settings -> On-line marketing -> Email marketing-> Email campaign unsubscription page URL setting.
Send draft emails to
The addresses specified here are pre‑entered by default when sending draft emails for testing purposes. You can enter multiple addresses separated by semicolons.
Draft e-mails are not included in tracking statistics (e-mail opening and link clicking).
Send emails via email queue
If enabled, the emails are sent queued to be sent via the Send queued emails scheduled task. Recommended for large amounts of subscribers or when using role or contact group subscribers.
After applying hotfix 8.2.12 or newer, the property is always enabled and the field is not available anymore.
Enable resending
If enabled, emails can be edited and manually sent again even after they have been mailed out to subscribers. Disable this property to ensure that subscribers do not accidentally receive the same content multiple times.
Emails that utilize A/B testing are an exception and can never be re-sent.
On-line marketing
The properties in this section are related to tracking of the campaign’s emails and keeping marketing statistics.
Double opt-in
You can use the properties in this section to set up double opt-in subscription for the email campaign.
Click Save.
Open the Subscribers tab and assign subscribers to the campaign.
- See Managing email marketing subscribers for details.
- To allow visitors to subscribe to the campaign, developers need to place web parts to your website.
Your email campaign is ready. You can now write and send out new emails.