Creating extenders for module interface pages
When building the user interface of a custom module, the portal engine development approach allows you to quickly create pages based on common patterns directly in your browser (see the example in Creating custom modules for more information). However, if you need custom functionality or content adjustments that you cannot configure through the properties of the available UI page templates, you need to develop an extender and assign it to the corresponding UI element.
Extenders allow you to prepare custom code that the system executes when initializing the controls used on a page or the page itself. For example, you can use extenders to dynamically modify control properties or assign handler methods to events that occur during the page or control life cycle.
Development approaches for custom user interface pages
Before you start developing a user interface page that requires customization, carefully consider which of the following approaches best fits your needs:
- Pages with portal engine templates and extenders - allows you to leverage the templates and automatic features of the portal engine and add custom code-behind logic using extenders. Suitable for pages that share a common pattern with other pages (for example object listing pages), but require one or more custom adjustments.
- Manual user interface pages - for pages that require heavy customization, it may be easier to implement the entire page as a separate web form. Gives you full control over the content and logic of the page, but you need to develop the whole page manually. See Manually creating the interface for custom modules for more information about this approach.
Implementing extenders
To develop a new extender, you need to create a class in the web project and write the required code:
Open your project in Visual Studio (using the WebSite.sln or WebApp.sln file).
Add a new class in your module’s code folder:
- For modules that do not have their own project, use the CMSModules/<module code name> folder in the App_Code directory (or Old_App_Code directory under the CMSApp_AppCode project for web application installations).
- If your module uses a separate assembly, add the extender class into the corresponding project.
Extender naming convention: We recommend using the Extender suffix in the name of the class and the corresponding file.
Make the class inherit from an appropriate base class:
ControlExtender<TControl> - for extenders that target a control. Set the generic parameter to the type of the control that you are extending (see Extender types).
PageExtender<CMSPage> - for extenders that apply to pages. Use CMSPage as the type in the generic parameter.
The extender base classes are located under the CMS.ExtendedControls namespace
Override the OnInit() method in the extender class.
- You can add any custom initialization code for the page or control, for example assign handler methods to events.
- When extending a control, you can access a strongly typed instance of the given control through the Control property of the extender class.
Add any other code required to implement your custom functionality (such as the handler methods assigned to events in the OnInit method).
If you created the extender in App_Code, you need to add the RegisterCustomClass assembly attribute above the class declaration (and any namespace declarations). The attribute registers the class under a specific name.
Save the file (build the solution if your project is a web application or if you use a separate project for the module code).
using CMS;
using CMS.ExtendedControls;
using CMS.UIControls;

[assembly: RegisterCustomClass("CustomExtender", typeof(CustomExtender))]

public class CustomExtender : ControlExtender<UniGrid>
{
    public override void OnInit()
    {
        // Sets a property of the extended page's UniGrid control
        Control.ShowObjectMenu = false;
    }
}
Tip: The web project contains examples of extenders used by the default Kentico administration interface. You can view the code and use it as a reference when creating your own extenders. Search for files with the Extender.cs suffix in Visual Studio or browse the content of individual module folders in the App_Code/CMSModules directory.
Assigning extenders to module pages
After you implement the extender class, you need to assign it to the UI element representing the related page in the module’s interface:
Open the Modules application and edit the related module.
Select the User interface tab.
Use the tree to select the UI element representing the page that you wish to extend:
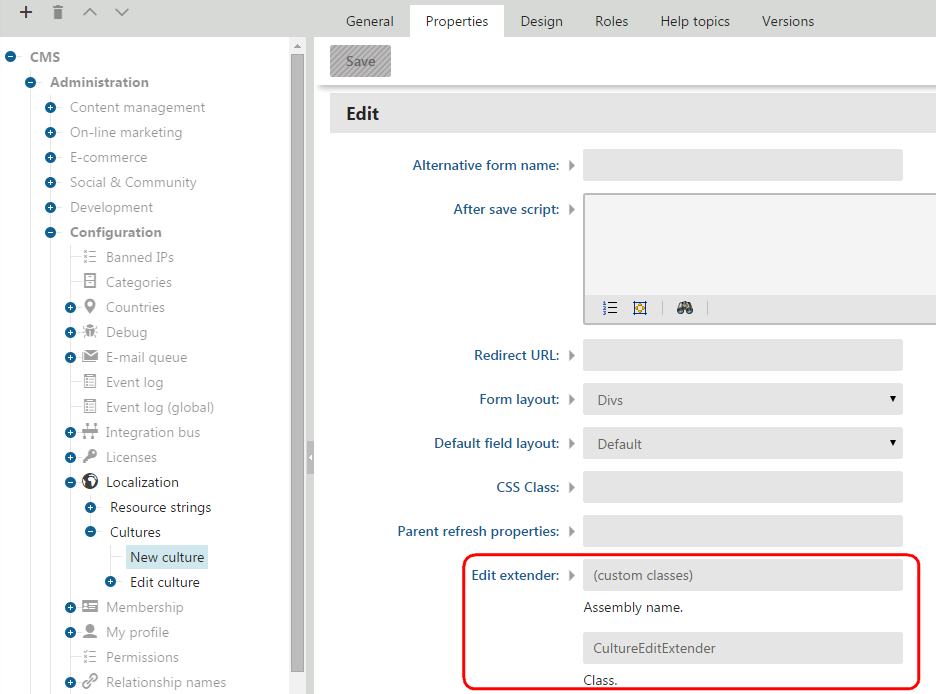
Open the element’s Properties tab:
Find the appropriate Extender property (see Extender types).
Select your extender class using the property:
Assembly name
- Choose (custom classes) for extender classes created and registered in App_Code.
- If you added the extender to a separate module project, choose the matching assembly.
Class - select the specific extender class (the value includes the class’s namespace).
Click Save.
The extender is now applied to the given user interface page and the system runs the extender’s initialization code when the page is loaded.
Extender types
The following table lists the default UI page templates that you can customize using extenders:
|
UI page template |
Primary control |
Extender property (Properties tab of UI elements) |
|
Object listing |
UniGrid |
Listing -> Grid extender |
|
Listing with general selector |
UniGrid |
Listing -> Grid extender |
|
New / Edit object |
UIForm |
Edit -> Edit extender |
|
Edit bindings |
UniSelector |
Binding -> Edit extender |
|
Vertical tabs |
UITabs |
Tabs -> Tab extender |
|
Custom control |
Any base class of the selected user control |
Control settings -> Control extender |
Control extenders must inherit from the ControlExtender<TControl> class, where TControl is a control used on the given UI template. To assign a control extender, edit the module on the User interface tab, select the given UI element and use the appropriate extender property on the Properties tab.
Note: The extender control type does not necessarily need to match the primary control related to the property through which the extender is assigned. If the type does not match, the extender automatically searches the underlying control hierarchy for the first control of the matching type. For example, you can create a UIForm extender for a different type of control without knowing how deep in the control hierarchy the form is located.
If you are developing an extender for the page itself (not a specific control), the extender must inherit from PageExtender<CMSPage>. To assign a page extender, edit the module on the User interface tab, select a UI element and use the Code behind -> Extender property on the Properties tab. You can assign page extenders to UI elements with any type of page template.
Example - Extending a module’s listing page
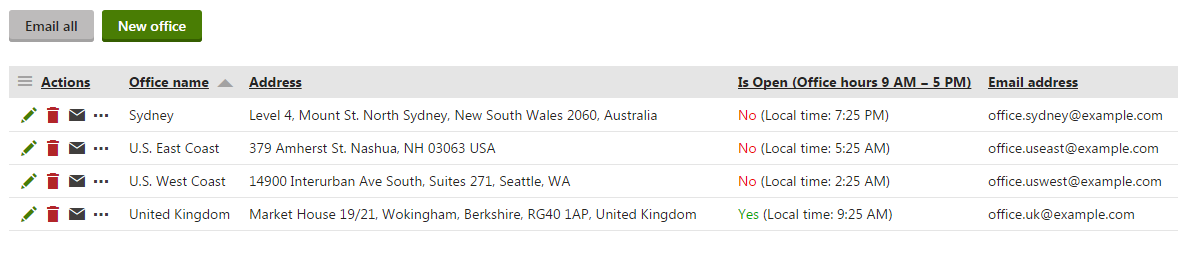
The following example demonstrates how to create an extender that adds the following features to the listing page of the sample Company overview module:
- A header action button that allows users to send email to all listed offices
- List actions for sending email to specific offices
- An indicator that shows which offices are currently open, based on the time zone of each office’s location
To follow the example, you first need to create the Company overview custom module according to the instructions in Creating custom modules.
Adding class fields
Before you can create the extender, you need to expand the Office class used within the Company overview module to include fields for storing an email address and a reference to a time zone.
Open the Modules application and edit the Company overview module.
Select the Classes tab and edit the Office class.
Open the Fields tab and create a New field:
- Field type: Standard field
- Field name: OfficeEmail
- Data type: Text
- Field caption: Office email address
- Form control: Email
Click Save.
Create another New field:
- Field type: Standard field
- Field name: OfficeTimeZoneID
- Data type: Integer number
- Reference to: Time zone
- Reference type: Not required
- Field caption: Office time zone
- Form control: Time zone selector (select via the (more items…) option)
Click Save.
Switch to the Code tab of the class editing interface.
Click Save code.
The Office class now contains the OfficeEmail and OfficeTimeZoneID fields, which allow users to set an email address and select a time zone when editing offices. By saving the new code of the class, you also updated the OfficeInfo API class in the web project (allows the system to handle the new fields).
Note: On web application installations, you need to manually build the CMSApp_AppCode project in Visual Studio to process the changes in the code.
Updating the listing grid definition
Because the example extends the listing page of the Company overview module, you need to update the grid definition that specifies the page’s content.
By default, the grid definition used by the listing page of the Company overview module is stored in the ~/App_Data/CMSModules/CompanyOverview/UI/Grids/CompanyOverview_Office/default.xml file. Edit the grid definition and change it to the following XML code:
<?xml version="1.0" encoding="utf-8" ?>
<grid>
    <actions>
        <action name="edit" caption="$General.Edit$" fonticonclass="icon-edit" fonticonstyle="allow" />
        <action name="#delete" caption="$General.Delete$" fonticonclass="icon-bin" fonticonstyle="critical" confirmation="$General.ConfirmDelete$" />
        <action name="email" commandargument="OfficeEmail" caption="Send email" fonticonclass="icon-message" />
    </actions>
    <columns>
        <column source="OfficeDisplayName" caption="Office name" wrap="false" localize="true">
            <filter type="text" size="200" />
        </column>
        <column source="OfficeAddress" caption="Address" width="35%" />
        <column source="OfficeTimeZoneID" caption="Is Open (Office hours 9 AM - 5 PM)" externalsourcename="officehours" />
        <column source="OfficeEmail" caption="Email address" width="100%" />
    </columns>
    <options>
        <key name="DisplayFilter" value="true" />
    </options>
</grid>
The updated grid definition contains:
- A new email action, which will be handled by the extender.
- A column with the OfficeTimeZoneID field as its source. The extender will handle the officehours source name and provide the output of the column.
- A column displaying the OfficeEmail value.
See also: Reference - UniGrid definition
Creating the extender class
Open your project in Visual Studio.
Create a new class named OfficeListExtender.cs in the module’s code folder (by default ~/App_Code/CMSModules/CompanyOverview).
Add the following using statements to the start of the code:
 using System;
 using System.Linq;
 using System.Web.UI.WebControls;

 using CMS;
 using CMS.Base;
 using CMS.ExtendedControls;
 using CMS.ExtendedControls.ActionsConfig;
 using CMS.Globalization;
 using CMS.Helpers;
 using CMS.UIControls;
Use the following code for the class:
 [assembly: RegisterCustomClass("OfficeListExtender", typeof(OfficeListExtender))]

 public class OfficeListExtender : ControlExtender<UniGrid>
 {
     /// <summary>
     /// Adds custom code that occurs during the initialization of the extended control.
     /// </summary>
     public override void OnInit()
     {
         // Calls a method that adds a custom header action button
         InitHeaderActions();

         // Registers a method that handles the functionality of header actions
         Control.HeaderActions.ActionPerformed += HeaderActions_ActionPerformed;

         // Assigns handlers to the UniGrid control's OnAction and OnExternalDatabound events
         Control.OnAction += Control_OnAction;
         Control.OnExternalDataBound += Control_OnExternalDatabound;
     }

     /// <summary>
     /// Initializes header actions.
     /// </summary>
     private void InitHeaderActions()
     {
         // Prepares the "Email all" header action
         HeaderAction mailAllButton = new HeaderAction
         {
             ButtonStyle = ButtonStyle.Default,
             Text = ResHelper.GetString("Email all"),

             // Sets a name that identifies the action when handling the 'ActionPerformed' event
             CommandName = "emailall",
         };
         Control.HeaderActions.AddAction(mailAllButton);
     }

     /// <summary>
     /// Performs header actions.
     /// </summary>
     private void HeaderActions_ActionPerformed(object sender, CommandEventArgs args)
     {
         switch (args.CommandName.ToLowerCSafe())
         {
             // Runs when a user clicks the "Email all" header action button
             case "emailall":
                 // Gets a string containing all office emails separated by commas
                 string officeEmails = String.Join(",", CompanyOverview.OfficeInfoProvider.GetOffices().Select(o => o.OfficeEmail));

                 // Prepares a mailto link for all office emails
                 string officesMailtoLink = HTMLHelper.HTMLEncode(String.Format("mailto:" + officeEmails));

                 // Opens the mailto link when the header action button is clicked
                 string scriptText = "win = window.open('" + officesMailtoLink + "', 'emailWindow');" +
                                     "if (win && win.open && !win.closed) win.close();";
                 ScriptHelper.RegisterStartupScript(Control.Page, typeof(string), "OpenAllMailToLink", ScriptHelper.GetScript(scriptText));
                 break;
         }
     }

     /// <summary>
     /// Handles the UniGrid control's OnAction event.
     /// </summary>
     /// <param name="actionName">The name of the UniGrid action that was used.</param>
     /// <param name="actionArgument">The value of the data source column in the UniGrid row for which the action was used.</param>
     private void Control_OnAction(string actionName, object actionArgument)
     {
         if (actionName == "email")
         {
             // Gets the email of the office for which the "Send email" action was used
             string officeEmail = HTMLHelper.HTMLEncode(ValidationHelper.GetString(actionArgument, ""));

             // Opens a mailto link
             string scriptText = "win = window.open('mailto:" + officeEmail + "', 'emailWindow');" +
                                 "if (win && win.open && !win.closed) win.close();";
             ScriptHelper.RegisterStartupScript(Control.Page, typeof(string), "OpenMailToLink", ScriptHelper.GetScript(scriptText));
         }
     }

     /// <summary>
     /// Handles the Unigrid control's OnExternalDataBound event.
     /// </summary>
     private object Control_OnExternalDatabound(object sender, string sourceName, object parameter)
     {
         if (sourceName == "officehours")
         {
             // Gets the ID of the time zone assigned to the office
             int timeZoneId = ValidationHelper.GetInteger(parameter, 0);

             // Loads a TimeZoneInfo object representing the office's time zone
             CMS.Globalization.TimeZoneInfo timeZone = TimeZoneInfoProvider.GetTimeZoneInfo(timeZoneId);

             // Creates a temporary time zone representing Coordinated Universal Time (UTC)
             CMS.Globalization.TimeZoneInfo utcTimeZone = new CMS.Globalization.TimeZoneInfo();
             utcTimeZone.TimeZoneGMT = 0;

             // Gets the current time, converted to the office's time zone
             DateTime currentDateTime = TimeZoneHelper.ConvertTimeZoneDateTime(DateTime.UtcNow, utcTimeZone, timeZone, false);

             // Formats the office's local time into a string
             string officeLocalTime = "(Local time: " + currentDateTime.ToString("h:mm tt") + ")";

             // Checks whether the office's local time is within office hours and displays the result in the column
             if (currentDateTime.TimeOfDay < new TimeSpan(9, 0, 0) || currentDateTime.TimeOfDay > new TimeSpan(17, 0, 0))
             {
                 return "<span class=\"StatusDisabled\">" + ResHelper.GetString("general.no") + "</span> " + officeLocalTime;
             }
             else
             {
                 return "<span class=\"StatusEnabled\">" + ResHelper.GetString("general.yes") + "</span> " + officeLocalTime;
             }
         }

         return parameter;
     }
 }
Save the class (build the solution on web application installations).
The code provides the functionality of the listing page customizations and registers the extender under the name OfficeListExtender.
For more information about the UniGrid OnAction and OnExternalDatabout events, see: UniGrid
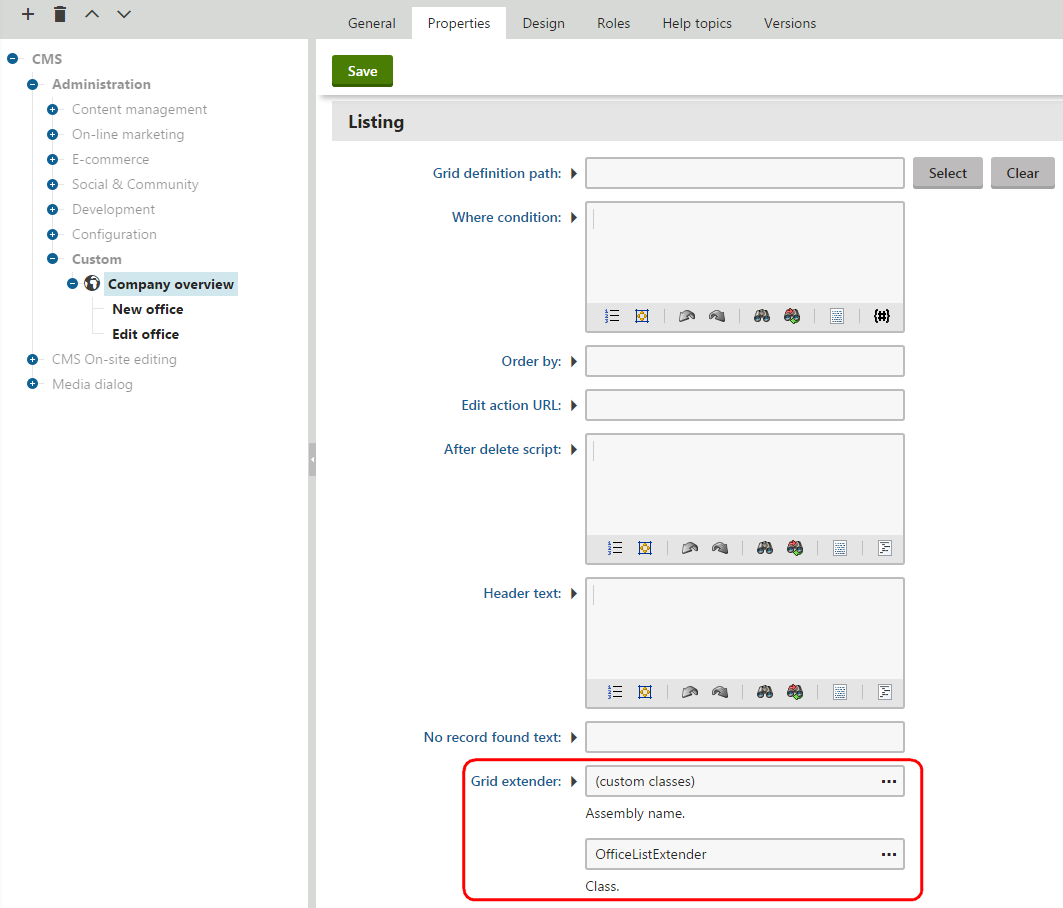
Assigning the extender to a UI element
To apply the extender to the listing page of the Company overview module:
- In the Modules application, edit the Company overview module.
- Select the User interface tab.
- Select the CMS -> Administration -> Custom -> Company overview element in the UI element tree.
- Open the Properties tab of the element.
- Scroll down to the Listing category and set the Grid extender property:
- Assembly name: (custom classes)
- Class: OfficeListExtender
- Click Save.
The extender is now applied to the listing page of the Company overview module. To view the results, open the Company overview application (under the Custom category). The Email all header action button and the Send email actions of individual offices open mailto links, and the Is Open column shows which offices currently have office hours. You need to create offices with email address values and an assigned time zone to fully try out the customizations.