
Orders
In the Kentico E-commerce Solution, orders of products that you offer in your on-line store can place both your registered and anonymous customers. Various types of discount such as product coupons, catalog discounts, order discounts, volume discounts, and free shipping offers can be applied (to whole orders or selected order items) to further motivate the purchasers and therefore boost your sales.
The system allows you to define multiple shipping options and payment methods. The checkout process in Kentico is also fully customizable, making your customers’ shopping smooth and effective.
Besides, you can track the life cycle of your customers’ orders through customizable order statuses.
Managing orders
The usual scenario is that your customers, both registered and anonymous, place their orders on the live site while going through the checkout process. The registered customers can also view their orders on the live site.
Moreover, the system allows your on-line store administrators to create orders for the customers directly in a dedicated part of the administration interface. Here the administrators can also modify the properties of, and remove any selected order.
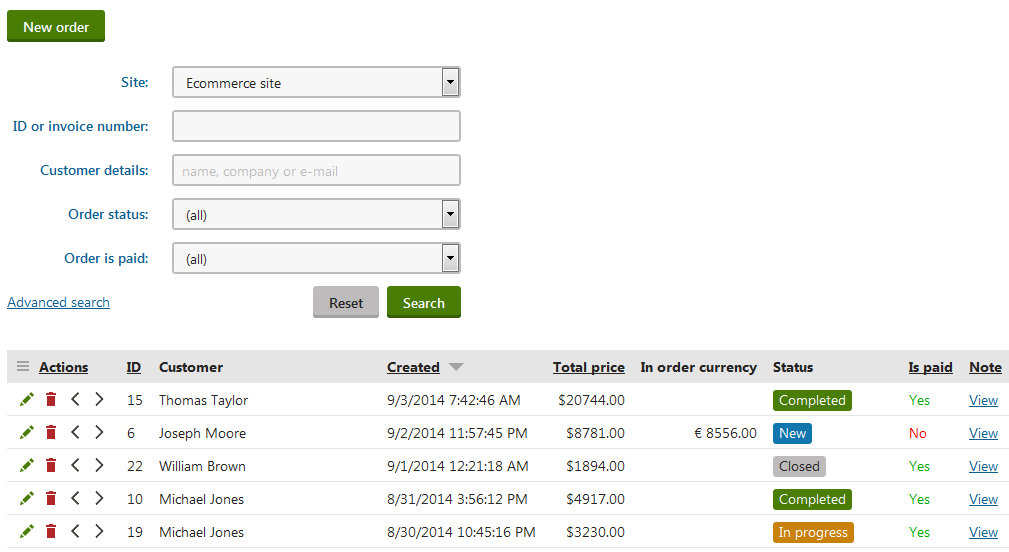
To manage orders in the administration interface:
- Open the Orders application.
- Perform the required action.
- You can add new orders, and modify or remove the existing ones.
- Save your work.
You can perform the Move to the previous status () and Move to the next status () actions to manually change the status of a selected order as required, for example Payment received, Completed, etc.
Recalculating orders
The system allows your on-line store administrators to modify orders placed by your customers. After changing values of selected order properties (while editing a selected order), the order is recalculated.
The system recalculates orders after:
- changing order currency (Billing tab, Items tab)
- changing the shipping option (Shipping tab)
- adding product items (Items tab)
- changing the number of ordered product items (Items tab)
- removing product items (Items tab)
- entering a discount coupon code (Items tab)
The system doesn’t recalculate orders after modifying the billing address or shipping address, changing order status, changing the payment method, etc.
To get the system to recalculate your customers’ orders:
- Open the Orders application.
- Edit () a selected order on the respective tab.
- Modify order properties as required.
- Click Save (OK on the Items tab).
The system saves the order with recalculated values.
Marking orders as paid
The system can automatically mark your customers’ orders as paid after the orders are moved to a selected order status. For example, to the Payment received order status when the customers make their payments through a payment gateway (automatic order status change), or when your on-line store administrators change the status of existing orders in the administration interface (manual order status change).
Besides, you can mark orders as paid directly in the administration interface while editing the orders on the Billing tab:
- Open the Orders application.
- Edit () a selected order.
- Switch to the Billing tab.
- Enable the Order is paid property.
- Click Save.
If an order is marked as paid (both automatically by the system and manually by a store administrator):
- the system sends to specified e-mail addresses notification e-mails informing about receiving payment
- purchased memberships become activated
- expiration of purchased e-products starts
- store administrators cannot add product items (Items tab)
- store administrators cannot perform the Update action (Items tab)
- store administrators cannot change order currency (Billing tab, Items tab)
- store administrators cannot change the shipping option (Shipping tab)
- store administrators cannot change the payment method (Billing tab)
To be able to modify the disabled order properties, you need to disable the Order is paid property for the order.
If orders are marked as paid immediately after making them, check whether the first order status (the top status in the Store configuration -> Order status) marks the order as paid.
If it is the case, clear the Mark order as paid field while editing the first order status, or create a new order status that does not mark the order as paid and move it to the top of the order statuses list.
Changing order statuses
You can configure the system to change the status of your customers’ orders automatically. For example, the system sets up a selected order status on placing new orders, after making payments through payment gateways, etc.
Your on-line store administrators can also change the status of existing orders directly in the administration interface:
- Open the Orders application.
- Edit () a selected order.
- The system opens the order on the General tab.
- Select an order status as required.
- Click Save.
The system saves the order with the selected status.
If you switch to the History tab, you can view the order’s all order status changes.
Modifying order items
In the Orders application, you can edit order item properties if the current order is not marked as paid. Regardless of this setting, you can edit also product (SKU) properties here.
Note that the system allows you to modify order item and product properties in the Orders application only if the web.config file contained in your web project folder is properly configured. See E-commerce web.config settings for further details.
To modify items in an existing order:
- Open the Orders application.
- Edit () a selected order.
- Switch to the Items tab.
- Here you can add new product items, change the number of ordered product items, and remove product items.
- Optionally, you can modify also product (SKU) properties.
If you check Send order changes by e-mail, the system sends to specified e-mail addresses (typically to the customer and to the merchant) a notification e-mail informing about the changes made in the order.
- Click OK.
If you now generate an invoice for the order (Invoice tab), it contains the updated set of items.
Returning product items to the inventory
If you configured the system to track inventory for the products (i.e. the products have the Track inventory property enabled), product items are returned to the inventory:
if the Order is paid property is disabled for the order (Billing tab)
-AND-you remove product items from the order (Items tab)
If you click Empty, the listed product items are removed from the order all at once. You can also remove only selected product items from the order. To do so, select product items and click Update.
If you remove a whole order, no product items contained in the order are returned to the inventory.
Modifying order addresses
The system allows your customers to specify a different address for billing and for shipping (if the shipping address is different from the billing address). Otherwise, the billing address is used as the shipping address.
To modify order addresses:
- Open the Orders application.
- Edit () a selected order.
- Switch to the Billing tab.
- Click Edit.
- This opens the Edit address properties dialog.
- Change address details as required.
- Click Save.
- The system saves the updated address and closes the dialog.
- (Optional) Switch to the Shipping tab and repeat steps 3. through 5. to edit the shipping address.
If you now generate an invoice for the order (Invoice tab), it contains the updated address.
Changing order currency
The system allows your customers to place orders in multiple currencies (if defined).
To change the currency for a selected order:
Open the Orders application.
Edit () a selected order.
Switch to the Billing tab.
Alternatively, you can change order currency while editing the order on the Items tab.
Change the currency as required.
Click Save.
If you now generate an invoice for the order (Invoice tab), you can see that the prices are in the selected currency.