
Deploying an Azure project
To deploy a Microsoft Azure project to the cloud, publish the project directly from Visual Studio to Microsoft Azure.
Deploying the Azure project from Visual Studio to Microsoft Azure
Deploying an Azure project from Visual Studio is a recommended practice. This procedure consists of two parts.
Importing a credentials file
- Open your Azure project in Visual Studio.
- Right-click the CMSAzure project in the Solution Explorer and select Publish.
- Click the Sign in button.
- Sign in to the Azure Management Portal and download the credentials file (the download should start automatically).
- Click Import… and select the downloaded file.
- Click Next.
Configuring the deployment
- Select the cloud service you have created (according to the instructions in Preparing the cloud environment).
- Choose the Environment:
- Production - live environment.
- Staging - environment designed for testing the deployed project before promoting it to the production environment. You can swap the production and staging environments easily.
- Select the Build configuration:
- Debug - includes debugging information.
- Release - includes code optimizations and is better suited for live environment.
- Select Cloud in the Service configuration drop-down list.
- Check Enable Remote Desktop for all roles.
- Specify the credentials for connecting to the remote desktop.
- [optional] Check Enable Web Deploy for all web roles (requires Remote Desktop).
After you publish your project, this option will allow you to publish changes for the web role directly without having to package or publish the whole project again. See Web Deploy for instructions.
You can find detailed information in the Update a Web Role MSDN article.
Use Web Deploy only for development and testing purposes and only if you use one web role.
.
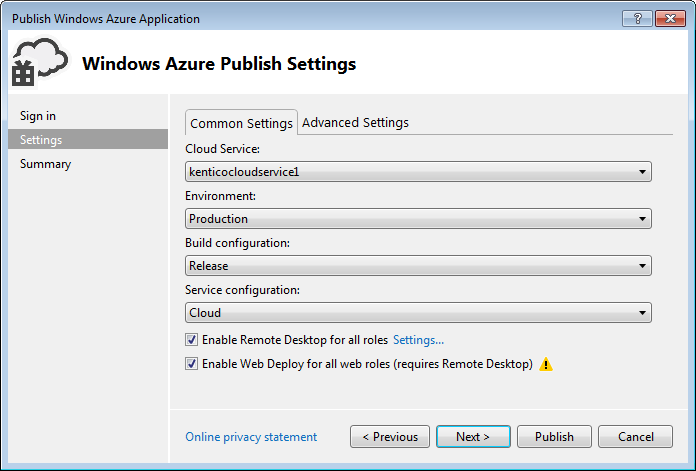
- Click Next and check the summary.
- Click Publish.
Visual Studio packages your project and uploads the package to the cloud. This may take some time (about half an hour).
Continue to Installing the database for an Azure project.